background image

162

Specifications - High Speed Compact Disc

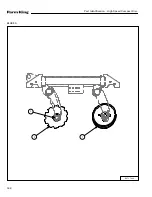
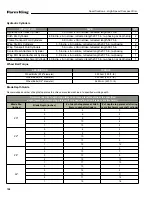
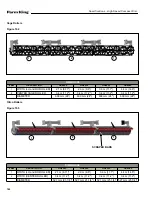
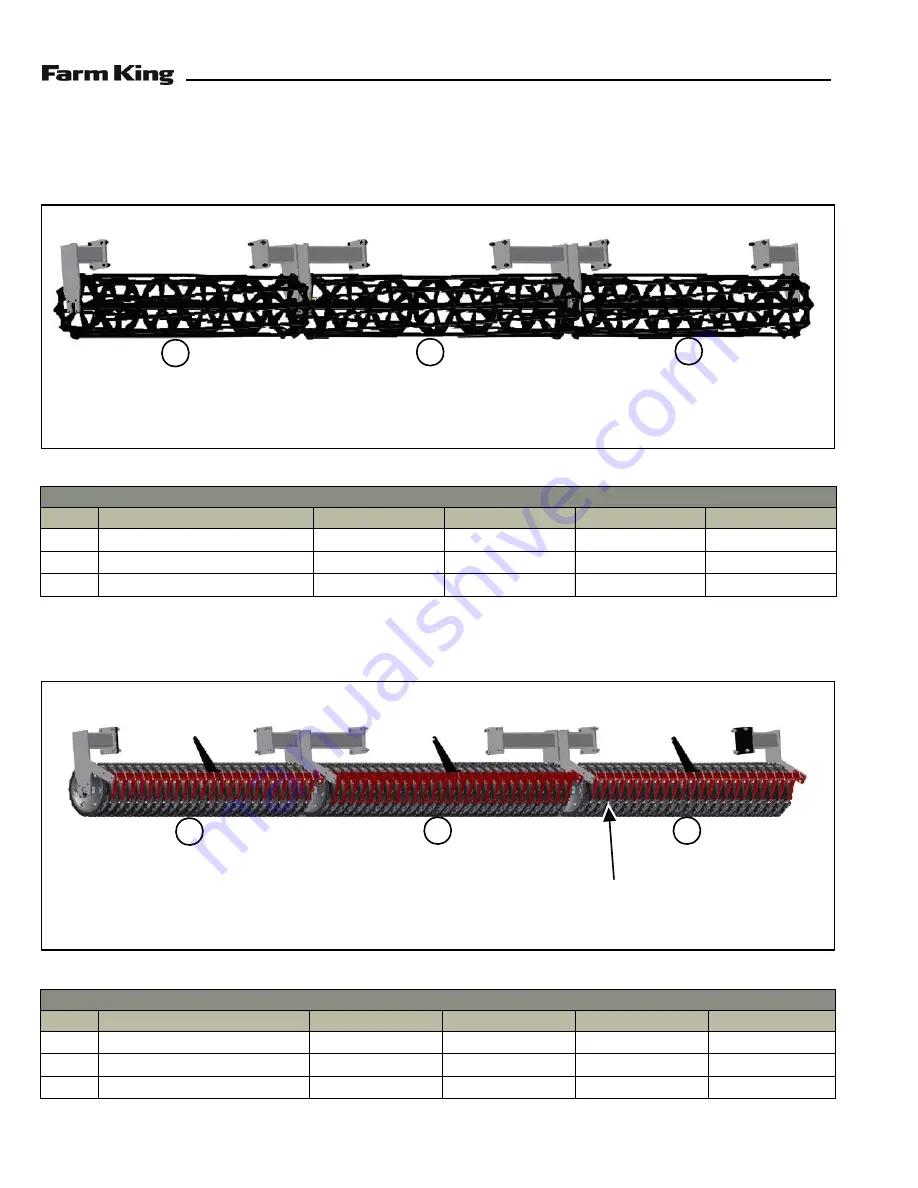
Cage Rollers

Figure 162

Otico Rollers

Figure 163

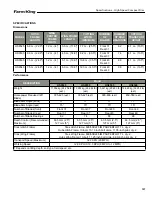
DIMENSIONS

ITEM

DESCRIPTION

HS8525

HS8530

HS8535

HS8540

1

WIDTH (LH and RH ROLLER)

2.1 m (6.11")

2.9 m (9.6") 

3.6 m (11.1") 

 4.4 m (14.6")

2

CENTER CAGE ROLLER

3.4 m (11.2")

3.4 m (11.2")

3.4 m (11.2")

3.4 m (11.2")

DIAMETER

609 mm (24")

609 mm (24")

609 mm (24")

609 mm (24")

1

2

1

DIMENSIONS

ITEM

DESCRIPTION

HS8525

HS8530

HS8535

HS8540

1

WIDTH (LH and RH ROLLER)

2.1 m (6.11")

2.9 m (9.6")

 3.6 m (11.1")

4.4 m (14.6")

2

WIDTH (CENTER ROLLER)

3.4 m (11.2")

3.4 m (11.2")

3.4 m (11.2")

3.4 m (11.2")

DIAMETER

 527 mm (21-1/4")

527 mm 21-1/4")

 527 mm (21-1/4”) 527 mm (21-1/4") 

1

2

1

SCRAPER BARS

Summary of Contents for HS8525

Page 1: ...6990633 1 13 Printed in U S A Bobcat Company 2013 OPERATOR AND PARTS MANUAL High Speed Compact Disc Model HS8525 HS8530 HS8535 HS8540 062013 Rev 1 88664296 012018 88720349 ...

Page 2: ......

Page 3: ...SPECIFICATIONS 155 WARRANTY 167 Manufacturer s Statement For technical reasons Buhler Industries Inc reserves the right to modify machinery design and specifications provided herein without any preliminary notice Information provided herein is of descriptive nature Performance quality may depend on ground type applied techniques weather conditions and ...

Page 4: ...4 Table of Contents High Speed Compact Disc ...

Page 5: ...ial Number Delivery Date Dealer Inspection Report Safety Lubricate Machine All Lights And Reflectors Installed Level Machine All Lights And Reflectors Cleaned And Working Hydraulic Lock Up Valves Function Properly Safety Chain On Hitch Correct Of Depth Stops All Decals Installed Wheel Bolt Lug Nut Torque Guards And Shields Installed And Secure Fasteners Tight Review Operating And Safety Instructio...

Page 6: ...Warranty Registration High Speed Compact Disc 6 ...

Page 7: ...ic shut off valves 16 Main pivot pins 17 Hydraulic hoses color coding to tractor 18 Hitch depth stops transport stops 19 Hydraulic cylinder mounting hardware 20 Main lift cylinders float in field operation 21 Hitch rockshaft mounting bearings hardware Center frame and wings 22 Rear blade setting offset from front blades 23 Blade and bearing hardware 24 Blade arm mounting rubber inserts 25 End shield...

Page 8: ... 12 High torque 13 Low torque 14 Other PDI certified complete and correct Date Description Def Rep OK Problem Corrective Action Other Complete the Delivery Report Dealership Sales to Complete with Customer Complete warranty form with customer Review First 400 Acres checklist with customer Review wing lock with customer NOTE Def Defective Rep Repair or Replace Adj Adjustment ...

Page 9: ...cation of the Farm King equipment READ AND UNDERSTAND THIS OPERATOR AND PARTS MANUAL BEFORE OPERATING YOUR FARM KING EQUIPMENT If you have any questions see your Farm King dealer This manual may illustrate options and accessories not installed on your Farm King equipment OWNER S INFORMATION 11 Serial Number Location 11 Manual Storage 11 EQUIPMENT IDENTIFICATION 12 Component Location 12 ...

Page 10: ...10 Introduction High Speed Compact Disc ...

Page 11: ...y or guarantee of any kind written or expressed implied or otherwise with regard to the information contained within this manual Farm King assumes no responsibility for any errors that may appear in this manual and shall not be liable under any circumstances for incidental consequential or punitive damages in connection with or arising from the use of this manual Keep this manual available for fre...

Page 12: ...TION Component Location Figure 3 HITCH WING TIRE LIFT CYLINDER LH WING FRAME HITCH FRAME WHEEL WING WHEEL HITCH FRAME LIFT CYLINDER RH WING FRAME WING FOLD CYLINDER WING CRADLE CENTER FRAME FOLD CYLINDER REAR ATTACHMENT LIFT CYLINDER CENTER FRAME HYDRAULIC JACK ...

Page 13: ... 15 Safe Operation Needs A Qualified Operator 15 Use Safety Rules 16 Transport Safety 16 Tractor Requirements And Capabilities 17 FIRE PREVENTION 18 Maintenance 18 Operation 18 Starting 18 Electrical 18 Hydraulic System 18 Fueling 18 Welding And Grinding 19 Fire Extinguishers 19 DECALS 20 SAFETY SIGN OFF FORM 27 ...

Page 14: ...14 Safety High Speed Compact Disc ...

Page 15: ...or she can operate the tractor and equipment safely under all conditions of the work area Always fasten seat belt before operating Know the Work Conditions Clear working area of all bystanders especially small children and all obstacles that might be hooked or snagged causing injury or damage Know the location of any overhead or underground power lines Call local utilities and have all underground...

Page 16: ...epairs on the equipment while the tractor is running Keep shields and guards in place Replace if damaged Always relieve the pressure in hydraulic system and close the four hydraulic lock up valves when the equipment is not being operated Always stay clear of the folding wings when they are being raised lowered or placed in or out of the folded position When operating on hillsides use extreme care ...

Page 17: ...When transporting the equipment use the flashing warning lights and follow all local regulations The tractor must be equipped with an approved Roll Over Protective Structure ROPS cab and a category 4 or 5 drawbar Serious injury or death could result from falling out of the tractor cab Before leaving the operator s position 1 Always park on a flat level surface 2 Place all controls in neutral 3 Eng...

Page 18: ...page 95 Do not use the tractor where exhaust arcs sparks or hot components can contact flammable material explosive dust or gases Starting Do not use ether or starting fluids on any engine that has glow plugs These starting aids can cause explosion and injure you or bystanders Use the procedure in the tractor s operator s manual for connecting the battery and for jump starting Electrical Check all...

Page 19: ...ilation when grinding or welding painted parts Wear dust mask when grinding painted parts Toxic dust or gas can be produced Dust generated from repairing nonmetallic parts such as hoods fenders or covers can be flammable or explosive Repair such components in a well ventilated area away from open flames or sparks Fire Extinguishers Know where fire extinguishers and first aid kits are located and h...

Page 20: ...ons Decals are available from your Farm King dealer Decal Locations Top and Rear Views Figure 4 DECAL LOCATION PAGE A A 21 B 22 C C 23 D D 25 E E 25 F F 26 A A D D E E C C B F F LOCATIONS 88717464 XXXXXX CAUTION DURING FIELD OPERATIONS THE WING AND CENTER FRAME LIFT CYLINDERS MUST BE IN THE HYDRAULIC FLOAT POSITION AT ALL TIMES HYDRAULIC CONTROLS P N 88717464 1 1 1 1 1 1 1 1 1 ...

Page 21: ...21 Safety High Speed Compact Disc Location A A Hitch Both Sides Figure 5 88717373 A A 1 2 3 3 1 P N EZDF10061 Amber 2 P N 88719472 P N 88719469 P N 88719471 P N 88719470 P N 88719822 3 ...

Page 22: ...22 Safety High Speed Compact Disc Location B Hitch Top Figure 6 XXX 86054197 88717373 B B 1 2 3 4 2 P N 86054197 1 P N EZDF13001 P N 86054092 3 XXX 86054092 86058185 X X X P N 86058185 4 ...

Page 23: ...CAUSING BODILY INJURY IF HYDRAULIC SYSTEM FAILED OR IF HYDRAULIC LEVER IS ACCIDENTLY OPERATED ALWAYS INSTALL WING LOCK UP DEVICES IF PROVIDED WHEN WINGS ARE IN FOLDED UP POSITION ALWAYS CLOSE HYDRAULIC LOCK UP VALVES TO PREVENT ACCIDENTAL OPERATION OF HYDRAULIC SYSTEMS WHEN MACHINE IS FOLDED FOR TRANSPORT MAKE SURE CYLINDERS ARE COMPLETELY FILLED WITH HYDRAULIC FLUID TOAVOID FREE FALL OR SUDDEN MO...

Page 24: ...mpact Disc Location C C Hitch Both Sides Cont d Figure 8 XXX 86054197 P N 86054197 5 XXX 86054092 P N 86054092 7 86058185 X X X P N 86058185 8 88717373 C C 1 3 5 7 2 4 6 8 9 P N 88718824 4 P N EZA75759 6 P N EZDF10061 Amber 9 ...

Page 25: ...25 Safety High Speed Compact Disc Location D D Hitch Light Bracket Figure 9 Location E E Hitch Light Bracket Figure 10 88717373 D D 10 P N 105420 10 88717373 E E 11 P N EZDF10061 Amber 11 ...

Page 26: ...N WINGS MAY FALL RAPIDLY CAUSING BODILY INJURY IF HYDRAULIC SYSTEM FAILED OR IF HYDRAULIC LEVER IS ACCIDENTLY OPERATED ALWAYS INSTALL WING LOCK UP DEVICES IF PROVIDED WHEN WINGS ARE IN FOLDED UP POSITION ALWAYS CLOSE HYDRAULIC LOCK UP VALVES TO PREVENT ACCIDENTAL OPERATION OF HYDRAULIC SYSTEMS WHEN MACHINE IS FOLDED FOR TRANSPORT MAKE SURE CYLINDERS ARE COMPLETELY FILLED WITH HYDRAULIC FLUID TOAVO...

Page 27: ...f your equipment An untrained operator is unqualified to operate this equipment The following sign off sheet is provided for your record and to show that all personnel operating your Farm King equipment have taken time to read and understand this manual to ensure best performance and longevity of this equipment SIGN OFF SHEET Date Employee s Signature Employer s Signature Instructions are necessar...

Page 28: ...28 Safety High Speed Compact Disc ...

Page 29: ...ls 41 Installing Rear Blade Mounting Tubes 42 Disc Arm Blade Assembly 43 End Shield Assembly 46 Installing Wing Rockshafts 47 Installing The Attachment Rockshafts and Cage Rollers 48 Hydraulics 53 Installing The Depth Stops 59 Hose Clamp Installation 60 Light Installation 63 Light Harness Wire Routing 65 Wing and Center Frame Fold Cylinders 66 Hydraulic Jack Hose Identification 67 HS8525 and HS853...

Page 30: ...30 Assembly High Speed Compact Disc ...

Page 31: ... received the correct number of components to fully assemble the equipment 1 Center Frame 2 LH and RH Wing Frame 3 Hitch Frame Assembly 4 Attachment Assembly 5 Hydraulics ELECTROCUTION HAZARD To prevent serious injury or death from electrocution Be aware of overhead power lines Keep away from power lines when unloading and assembling the equipment Electrocution can occur without direct contact DO ...

Page 32: ...rame onto the support stands 4 Install a bushing 2 at each end on the right side of the center frame 5 Install a bushing at each end on the left side center frame 6 Apply a coat of anti seize to the inside of each bushing DO NOT permit bystanders to be in the work area when lowering raising or folding wing DO NOT work under suspended parts Keep away from moving parts Always use lifting devices veh...

Page 33: ...ter frame front and rear mounts 2 rear mount shown Figure 15 4 Install washers 1 Figure 15 as required between the center frame mount 2 and the LH wing mount while inserting the mounting pin 3 on the front and rear mounts NOTE Install washers as evenly as possible on both sides of the center frame mount Figure 16 5 Align the mounting pin 1 Figure 16 with the hole on the wing frame on the front and...

Page 34: ...ng frame onto the support stands and remove straps Figure 19 1 Connect straps to RH wing frame 1 Figure 19 and to an approved lifting device 2 Raise and move the RH wing frame to the RH side of the center frame 2 Repeat Figure 14 through Figure 18 procedures for the RH wing frame Hitch Frame To Center Frame Assembly Figure 20 1 Install straps on both ends of the hitch frame 1 Figure 20 Connect the...

Page 35: ... the hole on the wing frame 8 Install the bushing 2 spacer 3 and 5 8 x 2 bolt 4 through the mounting pin Figure 23 9 Install the 5 8 lock nut on the 5 8 x 2 bolt 1 Figure 23 and tighten 10 Install washers 2 as required between the wing and bolt hole 11 Install the 3 8 x 4 bolt 3 through the pin Install the 3 8 lock nut and tighten Repeat Figure 21 through Figure 23 procedures for the LH hitch fram...

Page 36: ... pin 3 3 Place a support 4 under the cylinder Repeat procedures for the 5 x 38 LH wing hydraulic cylinder Figure 27 1 Install the center attachment 3 1 2 x 8 hydraulic cylinder 1 Figure 27 base end to the cylinder mount at the rear of the center frame 2 2 Install the pin and cotter pin 3 Figure 28 1 Install the rear attachment 3 x 8 hydraulic cylinder 1 Figure 28 base end to the cylinder mount 2 o...

Page 37: ...ylinder mount plate on the LH wing frame Figure 31 1 Install the wing rockshaft 3 1 2 x 8 hydraulic cylinder 1 Figure 31 base end to the cylinder mount 2 on the RH wing frame 2 Install the pin and cotter pin 3 Repeat procedures for the LH wing rockshaft hydraulic cylinder Figure 32 NOTE Cylinder ports must be facing to the inside 1 Install straps and approved lifting device to the 6 x 38 RH center...

Page 38: ...nd cotter pin Repeat procedure for the LH 4 x 8 hitch frame rockshaft cylinder Installing The Hydraulic Jack Wing Cradle and Hitch Figure 35 1 Insert the base end of the cylinder 1 Figure 35 up through the opening in the hitch frame as shown 2 Install the cylinder pin 2 and cotter pin 3 Figure 36 3 Install the jack stand link arm 1 Figure 36 as shown to the hitch frame mount 2 Install pin and cott...

Page 39: ...k washers nuts 4 on each side and tighten Figure 38 1 Install the wing stop rubber pad 1 Figure 38 on the wing stop plate 2 Install four 3 8 x 1 1 2 bolts 2 and flat washers through the pad and mount 3 Install lock 3 8 washers 3 8 nuts on each bolt and tighten Repeat procedure for the LH wing stop Figure 39 1 Install the 1 2 x 2 bolt 1 Figure 39 wing lock arm 2 and 1 2 lock nut 3 in the lower hole...

Page 40: ...located inside the two tabs See Figure 43 2 Install four bearing liners 3 Figure 41 onto the rockshaft 3 Place strap 4 as shown and install a bolt 5 through the mount and strap both sides 4 Attach a lifting device to the straps Figure 42 5 Place the four large halves of the bearing castings 1 Figure 42 on the top of the bearing liners 6 Install a 3 4 x 7 bolt 2 in the front hole of the rockshaft b...

Page 41: ...g casting 12 Install 3 4 lock washers and 3 4 nuts 2 at the top of each bearing mount Tighten bolts Figure 45 13 With straps and approved lifting device rotate the rock shaft up and place a support stand 1 Figure 45 under the rockshaft tube 14 Lower the rockshaft onto the support stand Installing Hitch Frame Rockshaft Spindles and Wheels Figure 46 1 Insert the hub spindle 1 Figure 46 assembly into...

Page 42: ...ce to the center frame rear tube 1 Figure 48 2 Position the center frame rear tube under rear of the center frame 2 3 Raise the center frame rear tube up and align the mounting holes to the center frame mount holes 4 Install three 3 4 x 2 1 2 bolts 3 down through the center frame mount Install 3 4 flat washers 4 and 3 4 flange nuts 5 on the bolts Do not tighten at this time Figure 49 5 Adjust the ...

Page 43: ...s on the bolts Do not tighten at this time Figure 51 6 Adjust the RH rear tube 1 Figure 51 35 mm 1 3 8 from the end of the center frame rear tube 2 7 Tighten the four bolts on each mounting tube mount Repeat procedures Figure 50 and Figure 51 for the LH wing rear tube Disc Arm Blade Assembly Blade spacing on front and rear rows is 254 mm 10 with rear blades offset to front blades by 127 mm 5 Figur...

Page 44: ...e 55 1 Raise the disc blade arm 1 Figure 55 with slots up to the mounting tube and install two rubber inserts 2 as shown Figure 56 2 Place the disc arm mounting bracket 1 Figure 56 and two rubber inserts 2 as shown 3 Install four 5 8 x 2 3 4 bolts 3 through the mount bracket down through the disc arm 4 Install four 5 8 lock washers 4 and 5 8 nuts 5 on each bolt Do Not tighten bolts at this time Re...

Page 45: ...rms Figure 59 NOTE Rear disc blade installation should be preformed working from left side to right side of the disc Figure 59 NOTE Front disc blade installation should be preformed working from right side to left side of the disc 1 Install the disc blade 1 Figure 59 onto the bearing 2 Install the bolts 2 and tighten Repeat procedures for all disc blades Figure 60 When all blade assemblies are com...

Page 46: ...e end shield leg 1 Figure 63 up to the end shield tube and install two rubber inserts 2 4 Place the mounting bracket 3 and two rubber inserts 4 at the top 5 Install four 5 8 x 2 3 4 bolts 5 through the mount bracket down through the end shield leg 6 Install four 5 8 lock washers and 5 8 nuts on each bolt Tighten bolts Figure 64 7 Install the end shield 1 Figure 64 on the inside of the leg 2 8 Inst...

Page 47: ... smaller bearing castings 1 Figure 66 onto the bearing liners 6 On the backside of the bearing casting install a 3 4 x 7 bolt 2 up through the bottom of the bearing castings both sides 7 Install 3 4 lock washers 3 and 3 4 nuts 4 at the top of each bearing mount both sides Figure 67 8 Remove the two bolts previously installed and reinstall the two bolts 1 Figure 67 up through the bottom of the bear...

Page 48: ...olt Torque on page 158 Repeat Figure 65 through Figure 69 procedures for the RH wing rockshaft Installing The Attachment Rockshafts and Cage Rollers Figure 70 1 Install the bearing liners 1 Figure 70 and place the large half of the bearing castings 2 on top of the bearing liner both sides Figure 71 NOTE The LH and RH attachment rockshafts are the same 2 With straps and proper lifting device raise ...

Page 49: ...ove the bolt 3 4 x 7 bolt 3 previously installed and reinstall the bolt up through the bottom of the bearing casting both sides 8 Install 3 4 lock washers and 3 4 nuts at the top of each bearing mount both sides Tighten bolts Figure 73 1 With straps and proper lifting device raise the cage roller arm 1 Figure 73 up and align with the attachment rockshaft mount as shown 2 Install the four 3 4 x 3 b...

Page 50: ... side the rotation arrows 2 must be going in a counterclockwise rotation Figure 77 1 Install a strap and proper lifting device to the cage roller 1 Figure 77 2 Raise the cage roller and position the cage roller between the mounts 2 both sides Figure 78 NOTE The spacer 1 Figure 78 has a notch 2 that must be aligned with the bearing tab 3 3 Install two spacers 1 between the bearing and mount arm 4 I...

Page 51: ...e Figure 81 8 Install a strap and proper lifting device to the cage roller 1 Figure 81 9 Install a strap and proper lifting device to the cage roller arm 2 10 Remove the four bolts 3 4 x 3 bolts 3 nuts and lock washers Remove the cage roller arm Figure 82 11 Slide the cage roller 1 Figure 82 out from the bearing arm assembly on the opposite side 12 Install the correct amount of washers 2 onto the ...

Page 52: ...nuts Tighten bolts Figure 84 16 Install the washer 1 Figure 84 and 1 2 x 1 bolt 2 both sides Figure 85 1 With a strap and proper lifting device attached to the cage roller raise the cage roller and align with the rod end of the hydraulic cylinder 2 Install the 1 1 4 x 7 3 8 cylinder pin 1 Figure 85 and cotter pin 2 Repeat Figure 70 through Figure 85 for the two remaining cage rollers 1 2 3 2 B 171...

Page 53: ...lock washers 2 and tighten 3 Install and tighten the five straight fittings 3 on the rear side of the hydraulic valve 4 Install the 45 elbow fitting 4 on each side of the hydraulic valve Tighten fittings to the position shown Figure 87 5 Install and tighten the six straight fittings 1 Figure 87 on the front side of the hydraulic valve Figure 88 1 Install the two 90 fittings 1 Figure 88 into the hy...

Page 54: ...appropriate red tie hose 1 Figure 90 green tie hose 2 and blue tie hose 3 to the lock up valves 2 Route hoses 4 5 and 6 to the appropriate locations and tighten Center Frame Fold Circuit Red Tie Rockshaft Lift Circuit Green Tie Wing Fold Circuit Blue Tie Figure 91 1 Route the hoses 1 Figure 91 through the hose brackets 2 on the hitch frame to the manifold 3 2 Connect the hoses to the appropriate l...

Page 55: ...ten 6 Connect hose 2 and tighten Figure 95 1 Install the 90 elbow 1 Figure 95 into the rod end on the RH center frame fold cylinder and tighten 2 Install the tee fitting 2 into the rod end on the LH center frame fold cylinder and tighten 3 Connect hoses 3 and 4 and tighten Figure 96 4 Install the tee fitting 1 Figure 96 to the RH center fold cylinder base end and tighten 5 Install the 90 elbow 2 t...

Page 56: ...nder and tighten 2 Connect hoses 2 and 3 and tighten 3 Install the 90 elbows 4 to the base end of the RH wing fold cylinder and tighten 4 Install the tee 5 to the base end of the LH wing fold cylinder and tighten 5 Connect hoses 6 7 and 8 and tighten Figure 99 6 Install the 90 elbow 1 Figure 99 on the rod end of the RH wing fold cylinder and tighten 7 Connect hose 2 and tighten Figure 100 8 Instal...

Page 57: ...02 on the RH wing rockshaft cylinder and tighten 2 Connect hoses 2 and 3 and tighten Figure 103 1 Install the 90 elbows 1 Figure 103 on the LH wing rockshaft cylinder and tighten 2 Connect hoses 2 and 3 and tighten Figure 104 1 Install the fittings 1 Figure 104 on the LH hitch frame rockshaft cylinder and tighten 2 Connect hoses 2 and 3 and tighten B 17147 1 1 2 3 B 17154 2 1 1 3 B 17155 1 2 1 3 B...

Page 58: ...et and tighten Install the tee fitting 2 onto the bulkhead tee 2 Install the two bulkhead 90 elbows 3 into the bracket from the backside and tighten Figure 107 1 Connect hoses 1 7 Figure 107 and tighten Figure 108 1 Install the straight fittings 1 Figure 108 into hydraulic male quick coupler fittings 2 and tighten 2 Install the hydraulic hoses 3 onto hydraulic straight fitting and tighten B 17156 ...

Page 59: ...ket through the front of the hose holder Figure 111 1 Install a 1 2 nut 1 Figure 111 onto each side of the u bolt 2 thread the nuts fully onto the u bolt 2 Install the u bolt onto the bracket install 1 2 nuts and tighten Installing The Depth Stops Figure 112 1 Place twenty two depth stop plates 1 Figure 112 together and install a 1 2 x 7 bolt and spacer tube 2 through the center hole on the depth ...

Page 60: ...lic hoses into the clamp 3 Install the 2nd poly hose holder clamp on top of hoses with cover plate Install the 5 16 x 1 3 4 bolt and tighten NOTE Install P clip 2 with additional hydraulic hose on center cover plate Figure 114 1 Remove the bolt from the weld nut locations on the inner LH hitch tube front side of lock up valves and discard bolts 2 Place a poly hose holder clamp 1 Figure 114 on the ...

Page 61: ... on the weld nut place two hydraulic hoses into the clamps 3 Install the 2nd poly hose holder clamp on top of hoses with cover plate Install the 5 16 x 1 3 4 bolt and tighten Figure 116 1 Remove the bolts from the weld nut locations on the hitch frame and discard bolts 2 Install a poly hose holder clamp 1 Figure 116 on the weld nuts place two hydraulic hoses into the clamps 3 Install a poly hose h...

Page 62: ...ure 119 1 Install a rubber hose guard 1 Figure 119 near the base end of the RH wing fold cylinder as shown Install the hose clamp 2 around the hydraulic cylinder hose guard and the hose Tighten hose clamp Figure 120 1 Install two rubber hose guards 1 Figure 120 near the base end of the LH wing fold cylinder as shown Install the hose clamps 2 around the hydraulic cylinder hose guards and the hoses ...

Page 63: ...l the two 1 2 x 1 1 2 bolts 1 2 lock washers 1 2 nuts 2 and tighten 3 Install the amber light 3 into the slot on the bracket and secure with flat washer lock washer and nut 4 Tighten nut 4 Route the wire harness 5 to the amber light and connect the connectors 6 Secure the wire harness with P clips 7 5 Wrap access wire and secure with tie straps Figure 123 1 Align the RH brake tail light bracket 1 ...

Page 64: ...ntainer 1 Figure 125 with the holes on the inner right side of the hose bracket 2 Install two 5 16 x 3 4 bolts 2 5 16 lock nuts 3 and tighten Reinstall the cap 3 Install electrical storage plug 4 on the left side of the hose holder using one 1 4 x 5 8 bolt 5 1 4 lock washer and 1 4 nut 4 Route the light wire harness 6 along the hydraulic hoses through the front of the hose holder 5 Install the lig...

Page 65: ...65 Assembly High Speed Compact Disc LIGHT HARNESS WIRE ROUTING Figure 126 RH AMBER LIGHT LH AMBER LIGHT LH BRAKE TAIL LIGHT RH BRAKE TAIL LIGHT NOTE Arrows indicate 5 16 x 1 2 bolt with P clip ...

Page 66: ...ylinder Use the tractor hydraulic control to extend the RH wing cylinder 1 Figure 128 and align with the mount holes install the 1 1 4 x 7 3 8 pin 2 and cotter pin 3 Repeat procedure for the LH wing fold cylinder Close the wing fold circuit lock up valve Figure 129 1 Open the center frame fold circuit lock up valve 1 Figure 129 red tie Figure 130 1 Connect strap and proper lifting device to the LH...

Page 67: ...31 ITEM DESCRIPTION HOSE ROUTING QTY 1 130 HOSE ASSY From tractor to lock up valve yellow tie 1 2 156 HOSE ASSY From tractor to jack cylinder base end yellow tie 1 3 19 HOSE ASSY From lock up valve to jack cylinder base end 1 2 1 TO TRACTOR YELLOW TIE STRAP YELLOW TIE STRAP 2 3 1 ...

Page 68: ...4 x 8 LH ATTACHMENT ROCKSHAFT LIFT CYLINDER 4 x 8 RH ATACHMENT ROCKSHAFT LIFT CYLINDER 3 x 8 RH WING ROCKSHAFT LIFT CYLINDER 3 1 2 x 8 CENTER ATACHMENT ROCKSHAFT LIFT CYLINDER 3 1 2 x 8 LH WING ROCKSHAFT LIFT CYLINDER 3 1 2 x 8 LH HITCH FRAME ROCKSHAFT LIFT CYLINDER 4 x 8 2 4 3 5 7 9 6 8 11 13 12 RE WX LR WX 14 MANIFOLD LR LE GREEN TIE STRAP GREEN TIE STRAP TO TRACTOR ...

Page 69: ...E ASSY From manifold port LE to lock up valve 1 13 138 HOSE ASSY From lock up valve to tractor green tie 1 14 277 HOSE ASSY From manifold port LR to tractor green tie 1 ITEM DESCRIPTION HOSE ROUTING QTY 1 155 HOSE ASSY From RH attachment cylinder rod end to bulkhead tee fitting on center frame 1 2 138 HOSE ASSY From LH attachment cyl rod end to center attachment cyl base end 1 3 161 HOSE ASSY From...

Page 70: ...4 x 8 LH ATTACHMENT ROCKSHAFT LIFT CYLINDER 4 x 8 RH ATACHMENT ROCKSHAFT LIFT CYLINDER 3 x 8 RH WING ROCKSHAFT LIFT CYLINDER 3 1 2 x 8 CENTER ATACHMENT ROCKSHAFT LIFT CYLINDER 3 1 2 x 8 LH WING ROCKSHAFT LIFT CYLINDER 3 1 2 x 8 LH HITCH FRAME ROCKSHAFT LIFT CYLINDER 4 x 8 2 4 3 5 7 9 6 8 11 13 12 RE WX LR WX 14 MANIFOLD LR LE GREEN TIE STRAP GREEN TIE STRAP TO TRACTOR ...

Page 71: ... hitch frame rockshaft cyl rod end 1 6 285 HOSE ASSY From LH wing rockshaft cyl base end to LH hitch frame rockshaft cyl rod end 1 7 184 HOSE ASSY From RH wing rockshaft cyl rod end to tee fitting on center frame 1 8 184 HOSE ASSY From LH wing rockshaft cyl rod end to bulkhead tee fitting on center frame 1 9 115 HOSE ASSY From manifold port LR to tee fitting on center frame 1 10 42 HOSE ASSY From ...

Page 72: ...ation Fold Circuit Figure 134 HYD FOLD CIRCUIT RH CENTER FRAME FOLD CYLINDER 6 x 38 LH WING FOLD CYLINDER 5 x 38 RH WING FOLD CYLINDER 5 x 38 FE MANIFOLD BLUE TIE STRAP TO TRACTOR LH CENTER FRAME FOLD CYLINDER 6 x 38 WE WR RED TIE STRAP WR FE WE PR PURPLE TIE STRAP RED TIE STRAP BLUE TIE STRAP ...

Page 73: ...e 1 14 277 HOSE ASSY From manifold port WE to tractor blue tie 1 15 142 HOSE ASSY From lock up valve to tractor blue tie 1 16 142 HOSE ASSY From lock up valve to tractor red tie 1 ITEM DESCRIPTION HOSE ROUTING QTY 1 26 HOSE ASSY From RH wing fold cyl base end to LH wing fold cyl base end 1 2 120 HOSE ASSY From RH wing fold cyl rod end to LH wing fold cyl rod end 1 3 56 HOSE ASSY From LH wing fold ...

Page 74: ...74 Assembly High Speed Compact Disc ...

Page 75: ...g And Leaving The Operator s Position 79 INITIAL SET UP 80 Pintle Hitch Adjustment 80 Connecting The Equipment To The Tractor 81 Hydraulic Lines 83 Connect Electrical Harness 84 Folding And Unfolding Wings 84 Setting Tillage Depth 87 Setting End Shield and LH Rear Blade 88 OPERATING THE EQUIPMENT 89 Field Operation 89 Rephasing Rockshaft Cylinders 90 ...

Page 76: ...76 Operation High Speed Compact Disc ...

Page 77: ...8 Check condition of all hydraulic components for leaks Repair as required NOTE Do not operate with hydraulic leaks 9 Verify that the equipment is properly connected to the tractor with the safety chain MOVING PART HAZARD To prevent serious injury or death from moving parts Clear area of all bystanders before starting or moving the tractor and equipment Keep hands feet hair and clothing away from ...

Page 78: ...rmation will depend on tilling depth soil type field speed etc The HS8525 and HS8530 will require a tractor with minimum 335 to 425 HP The HS8535 will require a tractor with minimum 390 to 480 HP The HS8540 will require a tractor with minimum 450 to 550 HP B 17042 1 Wheel bolts must be kept tight If bolts are not tight bolts will loosen causing severe damage to hub wheel and tire Check wheel bolts...

Page 79: ...e and release the parking brake Leaving The Operator s Position Park the tractor equipment on a flat level surface Place all controls in neutral engage the park brake stop the engine and wait for all moving parts to stop Leave the operator s position B 17191 Follow the instructions in your tractor s operation manual for the correct procedure AVOID INJURY OR DEATH Before you leave the operator s po...

Page 80: ...TLE CAT 5 399 mm 15 7 455 mm 17 9 513 mm 20 2 569 mm 22 0 627 mm 24 7 683 mm 26 9 Pintle location to match drawbar height with the following conditions When equipment is in the transport position and hitch is at a 6 degree angle on level ground 35 FT 40 FT MACHINE PINTLE POSITION 1ST 2ND 3RD 4TH 5TH 6TH HEIGHT FROM GROUND HOLE 320 mm 12 6 376 mm 14 8 434 mm 17 1 490 mm 19 3 547 mm 21 6 609 mm 23 8...

Page 81: ...aulic hoses 6 Connect the equipment hydraulic hoses to tractor see Hydraulic Lines on page 83 Figure 138 7 Place the hydraulic lock up valve 1 Figure 138 for the hydraulic jack in the open position 8 Move to the operator s seat start the engine and release the parking brake see Entering The Operator s Position on page 79 9 Use the tractor s controls to raise or lower the equipment hydraulic jack u...

Page 82: ... chain 2 around the drawbar mount NOTE Always use a safety chain with a strength rating greater than the gross weight of the towed equipment 14 Enter the operator s position see Entering The Operator s Position on page 79 15 Use the tractor s hydraulics to raise hydraulic jack to the storage position See the tractor s owner s manual 16 Stop the tractor and leave operator s position see Leaving The...

Page 83: ...t Pull on the hydraulic lines to disconnect HIGH PRESSURE FLUID HAZARD To prevent serious injury or death from high pressure fluid Relieve pressure on system before repairing or adjusting Wear proper hand and eye protection when searching for leaks Use wood or cardboard instead of hands Keep all components in good repair Contain and dispose of any oil leakage in an environmentally safe manner Thor...

Page 84: ...y or death from electrocution Be aware of overhead underground powerlines Keep away from powerlines when transporting or folding unfolding wings Electrocution can occur without direct contact AVOID SERIOUS INJURY OR DEATH Do not stand under wings when folding unfolding Keep bystanders away AVOID EQUIPMENT DAMAGE Failure to open hydraulic lock up valves and unlock wing locks before unfolding the wi...

Page 85: ...wing cylinder hydraulic control in the float position 10 Extend the center frame fold cylinders until the rear rollers sit fully on the ground 11 Place the center frame fold cylinder hydraulic control in the float position 12 Place tractor in Park and exit operator s position see Leaving The Operator s Position on page 79 13 Install the desired amount of depth stops per blade depth guide see Blade...

Page 86: ... hitch cradles 6 Place tractor in Park and exit operator s position see Leaving The Operator s Position on page 79 Figure 145 7 Close all hydraulic lock up valves 1 Figure 145 prior to transport Figure 146 8 Remove the quick release pin 1 Figure 146 9 Install all hitch frame rockshaft lift cylinder depth stop plates 2 both sides for safety 10 Install quick release pin 1 NOTE When transporting the ...

Page 87: ...g Rockshaft Cylinders on page 90 NOTE The following process with need to be done to both rockshaft hitch cylinders and to the LH wing rear attachment rockshaft cylinder Figure 148 2 Remove the quick release pin 1 Figure 148 Figure 149 3 Adjust the number of depth stop plates 1 Figure 149 recommended to achieve a specified working depth see Blade Depth Guide on page 158 4 Install quick release pin ...

Page 88: ... the blade down will throw more soil which may result in a larger trench Figure 151 The end shield 1 Figure 151 needs to be set to move the soil coming off the last front blade and feed the soil into the void left from the last rear blade Loosen the four 5 8 bolts 2 on the end shield tube 3 and slide the end shield forward or back in slots To adjust the end shield up or down attach a strap and lif...

Page 89: ...ous injury or death from electrocution Be aware of overhead underground powerlines Keep away from powerlines when transporting or folding unfolding wings Electrocution can occur without direct contact AVOID SERIOUS INJURY OR DEATH Do not stand under wings when folding unfolding Keep bystanders away AVOID SEVERE EQUIPMENT DAMAGE When operating the equipment Always keep equipment level when operatin...

Page 90: ... equipment reaches desired tilling depth Rephasing Rockshaft Cylinders NOTE Periodically the hydraulic lift cylinders on wing frame will not be synchronized with center frame cylinders This will cause uneven cutting depth If this happens rephase the lift cylinders Procedure Fully lift the equipment completely out of the ground continue holding the tractor s control lever until all rockshaft cylind...

Page 91: ...every 100 hours 95 BLADES 95 Blade Arm Blade Bearing Inspection 95 WHEEL TIRE REPLACEMENT 96 Tire Pressure 97 HYDRAULIC MAINTENANCE 97 Hydraulic Hose Requirements 97 LUBRICATION 98 Recommendations 98 Greasing Requirements 98 Non greaseable Bearing Points 98 CLEANING 99 SAFETY SIGN DECAL INSTALLATION 99 Procedure 99 STORAGE AND RETURN TO SERVICE 100 Storage 100 Return To Service 100 ...

Page 92: ...92 Maintenance High Speed Compact Disc ...

Page 93: ... are not in float mode Shift hitch frame rockshaft cylinders hydraulic lever in tractor into float mode Blades are not cutting at an even depth across width of disc Wing fold cylinders are not in float mode Shift wing fold cylinders hydraulic lever in tractor into float mode Blades are digging in at front outer wings Wing tire pressure is low Set tire pressure to 46 psi Cylinders will not raise ce...

Page 94: ...ed hoses Lock up valves not completely open Excessive debris build up Set tractor hydraulic flow higher Fix crimped or pinched hoses Completely open lock up valves Remove excessive built up debris Trench at left hand end of disc End shield is not in correct position Adjust end shield End blade is not adjusted correctly Adjust left rear end blade up Warning or trail lights are not operating Electri...

Page 95: ...nting bolts 1 Figure 152 are tight Figure 153 Visually inspect the blades 1 Figure 153 for wear or damage daily Replace blade if worn or damaged Make sure bearings 2 turn free and bearing nut 3 and blade bolts 4 are tight Instructions are necessary before operating or servicing equipment Read and understand the Operator s Manual and safety signs decals on equipment Follow warnings and instructions...

Page 96: ...ent when tire wheel is raised off the ground Remove the wheel bolts or nuts and remove wheel Install the new tire with the valve stem facing out Reinstall ten wheel bolts 1 10 Figure 154 Tighten wheel bolts wheel nuts 1 10 in a criss cross pattern see Wheel Bolt Torque on page 158 CHECK WHEEL BOLTS AFTER 1 First five hours of field operation 2 First twenty five hours of field operation 3 First fif...

Page 97: ...inflating tires use a clip on chuck and extension hose long enough to allow you to stand to one side and NOT in front of or over the tire assembly HYDRAULIC HOSE REQUIREMENTS HOSE TYPE MAXIMUM OPERATING PRESSURE BURST PRESSURE 100R17 20684 kpa 3000 psi 82737 kpa 12000 psi 100R19 27579 kpa 4000 psi 110316 kpa 16000 psi Do not exceed the 3000 psi rated maximum operating pressure ...

Page 98: ...wo grease points at hitch to center frame pivots 1 Figure 156 Grease every 8 hours of operation Figure 157 Four grease points on wheel hubs 1 Figure 157 one at each axle hub Grease every 50 hours of operation Figure 158 Six grease points if OTICO roller option selected one at each roller end bearing 1 Figure 158 Grease every 20 hours of operation Non greaseable Bearing Points Blade mounting bearin...

Page 99: ...ion the safety sign decal in the correct location Remove a small portion of the backing paper on the safety sign decal Press on the safety sign decal where the backing paper has been removed Slowly remove the remaining backing paper pressing on the safety sign decal as the backing paper is removed Using the backing paper pressing firmly move the backing paper over the entire safety sign decal area...

Page 100: ...storage Lubricate the equipment Clean and inspect equipment Tighten loose hardware and replace damaged parts Inspect and repack wheel bearings with a SAE multi purpose type grease Check that tires are properly inflated Connect to a tractor and operate equipment verify all functions operate correctly Check for leaks Repair as needed Review the Operator s Manual AVOID SERIOUS INJURY OR DEATH Always ...

Page 101: ... 30 106 HITCH 35 40 110 FRAME CENTER 114 ROCKSHAFT HITCH 116 ROCKSHAFT WINGS 25 30 118 ROCKSHAFT WINGS 35 40 120 ROCKSHAFT REAR ATTACHMENT 122 WARNING LIGHTS 124 FRAME WING 25 126 FRAME WING 30 128 FRAME WING 35 130 FRAME WING 40 132 HYDRAULICS 25 30 134 HYDRAULICS 35 40 142 BEARINGS 4 BOLT AND MOUNTING ARMS 150 BLADES 152 ...

Page 102: ...102 Part Identification High Speed Compact Disc ...

Page 103: ... Speed Compact Disc Contact your Farm King dealer for additional part information WHEELS TIRES HITCH ITEM PART NUMBER DESCRIPTION QTY 1 88717162 ASSY MAIN HUB SPINDLE HSCD 2 2 88717301 TIRE M ASSY 600 50R 22 5 10 FK 2 3 EZA70545 NUT HEX FLANGE 3 4 NF 20 4 EZB075070 3 4 X 7NC HEX BOLT 2 5 EZBN075L NUT LOCK NYL 3 4 NC 2 6 86050059 STD GREASE LITHIUM AR 3 1 4 5 2 88717300 ...

Page 104: ...104 Part Identification High Speed Compact Disc WHEELS TIRES WINGS 3 1 4 5 2 88717299 ...

Page 105: ...UMBER DESCRIPTION QTY 1 88706266 HUB ASSY W SPINDLE 10 BOLT 2 2 88716540 TIRE W ASSY 600 50R 22 5 10 FK 2 3 EZA70545 NUT HEX FLANGE 3 4 NF 20 4 EZB050055 8 BOLT 1 2 X 5 1 2 HEX GR8 ZN 2 5 EZBN050L NUT HEX LOCK NYL 1 2 NC ZNCR 2 6 86050059 STD GREASE LITHIUM AR ...

Page 106: ...ct Disc HITCH 25 30 DETAIL A SECTION B B DETAIL C SECTION D D SECTION E E SECTION G G A B B C D E E G G 31 21 24 28 11 9 3 30 30 30 30 1 19 23 27 7 26 29 8 6 39 5 5 17 10 18 13 20 14 22 2 32 16 15 8 25 5 13 20 34 4 35 33 33 33 33 12 88718145 ...

Page 107: ...PACER METRIC 2 17 EZ10GN1 FITTING 1 4 UNF ST ZERK 4 18 EZA76128 PINTLE HITCH CATEGORY 4 1 19 EZB050015 BOLT HEX 1 2 NC X 1 1 2 4 20 EZB050020 BOLT HEX 1 2 NC X 2 2 21 EZB062025 BOLT HEX 5 8 NC X 2 1 2 8 22 EZBN037L NUT HEX NYL 3 8 NC 2 23 EZBN050 NUT HEX 1 2 NC ZNCR 4 24 EZBN062 N G5 P 5 8 86505599 8 25 EZBN062L NUT LOCK NYLON 5 8 NC 2 26 EZBN100SL Locknut 1 8 Top Lock Grc Pl 2 27 EZBW050L WASHER ...

Page 108: ...sc HITCH 25 30 CONTINUED DETAIL A SECTION B B DETAIL C SECTION D D SECTION E E SECTION G G A B B C D E E G G 31 21 24 28 11 9 3 30 30 30 30 1 19 23 27 7 26 29 8 6 39 5 5 17 10 18 13 20 14 22 2 32 16 15 8 25 5 13 20 34 4 35 33 33 33 33 12 88718145 ...

Page 109: ...109 Part Identification High Speed Compact Disc ITEM PART NUMBER DESCRIPTION QTY 38 EZBN037 NUT 3 8 UNC 8 39 86557158 ANTI SEIZE PER 86557157 AR 40 86050059 STD GREASE LITHIUM AR ...

Page 110: ...c HITCH 35 40 DETAIL A SECTION B B DETAIL C SECTION E E SECTION D D SECTION G G A B B C E E D D G G 31 5 21 24 28 11 10 3 30 30 30 30 1 19 23 27 8 9 7 39 6 6 18 13 15 22 2 32 17 25 9 6 16 33 36 37 38 12 20 35 12 14 4 12 34 14 4 20 35 26 29 88717982 ...

Page 111: ...84 SPACER PIN HOLD SUPPORT 2 17 9671405 SPACER METRIC 2 18 EZ10GN1 FITTING 1 4 UNF ST ZERK 4 19 EZB050015 BOLT HEX 1 2 NC X 1 1 2 4 20 EZB050020 BOLT HEX 1 2 NC X 2 2 21 EZB062025 BOLT HEX 5 8 NC X 2 1 2 8 22 EZBN037L NUT HEX NYL 3 8 NC 2 23 EZBN050 NUT HEX 1 2 NC ZNCR 4 24 EZBN062 N G5 P 5 8 86505599 8 25 EZBN062L NUT LOCK NYLON 5 8 NC 2 26 EZBN100SL Locknut 1 8 Top Lock Grc Pl 3 27 EZBW050L WASH...

Page 112: ...CH 35 40 CONTINUED DETAIL A SECTION B B DETAIL C SECTION E E SECTION D D SECTION G G A B B C E E D D G G 31 5 21 24 28 11 10 3 30 30 30 30 1 19 23 27 8 9 7 39 6 6 18 13 15 22 2 32 17 25 9 6 16 33 36 37 38 12 20 35 12 14 4 12 34 14 4 20 35 26 29 88717982 ...

Page 113: ...113 Part Identification High Speed Compact Disc ITEM PART NUMBER DESCRIPTION QTY 38 EZBN037 NUT 3 8 UNC 8 39 86557158 ANTI SEIZE PER 86557157 AR 40 86050059 STD GREASE LITHIUM AR ...

Page 114: ...114 Part Identification High Speed Compact Disc FRAME CENTER SECTION A A A A 4 6 3 5 1 7 2 6 3 6 6 88717967 ...

Page 115: ...MBER DESCRIPTION QTY 1 86534279 N FL G8 P 75 10 3 2 88713643 BUSHING WALKING BEAM PIVOT 4 3 88718468 TUBE W A BLADE MTG 1 4 88717916 FRAME W A CENTER HSCD 1 5 EZB075025 BOLT HEX 3 4NC X 2 1 2 3 6 EZDR13120 BUSHING SPRING 7 7 EZBW20081213F 2 Od X 13 16 Id X 135 3 ...

Page 116: ...116 Part Identification High Speed Compact Disc ROCKSHAFT HITCH DETAIL A A 2 5 1 2 4 3 88717911 ...

Page 117: ...eed Compact Disc ITEM PART NUMBER DESCRIPTION QTY 1 88713582 BEARING ROCKSHAFT 4 2 88713586 ASSY LIGHT ROCKSHAFT CASTING 4 3 88717910 ROCKSHAFT W A HSCD HITCH 1 4 EZDR13120 BUSHING SPRING 4 5 EZBW075L WASHER LOCK 3 4X1 1 4X3 16ZNCR 8 ...

Page 118: ...118 Part Identification High Speed Compact Disc ROCKSHAFT WINGS 25 30 SECTION A A A A 4 2 3 3 3 5 6 1 4 88717643 ...

Page 119: ...RT NUMBER DESCRIPTION QTY 1 EZDR13120 BUSHING SPRING 4 2 88717591 RCKSHAFT WA HSCD WING RH25 30 1 3 88713586 ASSY LIGHT ROCKSHAFT CASTING 4 4 88717590 RCKSHAFT WA HSCD WING LH25 30 1 5 EZBW075L WASHER LOCK 3 4X1 1 4X3 16ZNCR 8 6 88713582 BEARING ROCKSHAFT 4 ...

Page 120: ...120 Part Identification High Speed Compact Disc ROCKSHAFT WINGS 35 40 SECTION A A A A 2 3 3 4 1 4 5 6 88717297 ...

Page 121: ...RT NUMBER DESCRIPTION QTY 1 EZDR13120 BUSHING SPRING 4 2 88717186 RCKSHAFT WA HSCD WING RH35 40 1 3 88713586 ASSY LIGHT ROCKSHAFT CASTING 4 4 88717185 RCKSHAFT WA HSCD WING LH35 40 1 5 EZBW075L WASHER LOCK 3 4X1 1 4X3 16ZNCR 8 6 88713582 BEARING ROCKSHAFT 4 ...

Page 122: ...122 Part Identification High Speed Compact Disc ROCKSHAFT REAR ATTACHMENT DETAIL A DETAIL B A B 4 6 3 1 5 2 88717175 ...

Page 123: ...NUMBER DESCRIPTION QTY 1 88713582 BEARING ROCKSHAFT 6 2 88713586 ASSY LIGHT ROCKSHAFT CASTING 6 3 88717195 ROCKSHAFT W A RR WING ATT HSCD 2 4 88717217 ROCKSHAFT W A RR CENTER ATT HSCD 1 5 EZBW075L WASHER LOCK 3 4X1 1 4X3 16ZNCR 12 6 EZDR13120 BUSHING SPRING 6 ...

Page 124: ...124 Part Identification High Speed Compact Disc WARNING LIGHTS DETAIL A SECTION B B DETAIL C A B B C 9 10 12 11 14 13 4 3 2 14 13 4 3 2 3 2 7 6 15 16 1 5 8 88717372 ...

Page 125: ...B031005 BOLT HEX 5 16 NC X 1 2 14 6 EZB025010 BOLT HEX 1 4 NC X 1 2 7 967066 SLOW MOVING VEHICLE SIGN 1 8 88717312 WHA HSCD WARNING LIGHTS 1 9 88716089 PLATE LIGHT BRACKET VT RR RH 1 10 88716088 PLATE LIGHT BRACKET VT RR LH 1 11 88719543 PLATE LIGHT BRACKET RH 1 12 88719542 PLATE LIGHT BRACKET LH 1 13 88714690 AMBER LAMP 12V LED TURN SIGNAL 2 14 88714646 RED LAMP 12V LED W 3 PIN PLUG 2 15 80682 LW...

Page 126: ...NG 25 DETAIL A SECTION B B SECTION C C SECTION E E DETAIL D SECTION H H SECTION F F SECTION J J A B B C C E E D G H H F F J J 1 2 FRONT OF THE MACHINE 5 6 10 9 8 13 12 11 14 14 14 15 16 17 18 19 32 33 34 4 3 4 20 21 22 25 24 23 27 31 28 29 30 26 4 7 88719784 ...

Page 127: ...T ZERK 8 16 88719184 SPACER PIN HOLD SUPPORT 4 17 EZB075025 BOLT HEX 3 4NC X 2 1 2 16 18 EZBW20081213F 2 OdX 13 16 IdX 135 16 19 86534279 N FL G8 P 75 10 16 20 EZB062020 BOLT HEX 5 8 NC X 2 4 21 EZBW062L LW P 5 8 86505602 4 22 EZBN062 N G5 P 5 8 86505599 4 23 88718455 BRKT MTG BLADE ARM TOP 1 24 88718630 Nut 5 8 11 Hex Grade 8 ZnCr 4 25 88718629 CSHH G8 ZnCr 5 8X2 3 4 FULL 4 26 88719410 TUBE W A E...

Page 128: ...NG 30 DETAIL A SECTION F F SECTION B B SECTION C C SECTION E E DETAIL D SECTION H H SECTION J J A F F B B C C E E D H H J J 1 2 FRONT OF THE MACHINE 5 6 3 20 19 17 7 16 15 8 8 8 21 18 4 14 13 11 10 12 3 9 3 27 28 29 25 22 24 32 30 31 23 26 33 34 28 88717604 ...

Page 129: ...L NUT HEX NYL 3 8 NC 4 16 EZB037040 BOLT HEX 3 8 NC X 4 4 17 EZBN062L NUT LOCK NYLON 5 8 NC 4 18 88719184 SPACER PIN HOLD SUPPORT 4 19 9671405 SPACER METRIC 4 20 SXBHF0623008YZ BOLT FLG 5 8X3 00 G8 YZ 4 21 EZ10GN1 FITTING 1 4 UNF ST ZERK 8 22 88719415 ARM W A END SHIELD HSCD 1 23 88719410 TUBE W A END SHIELD HSCD 1 24 88717409 PLATE SIDE SHIELD HSCD 1 25 88718455 BRKT MTG BLADE ARM TOP 1 26 887173...

Page 130: ...NG 35 DETAIL A SECTION F F SECTION B B SECTION C C SECTION E E DETAIL D SECTION H H SECTION J J A F F B B C C E E D H H J J 1 FRONT OF THE MACHINE 2 6 5 4 9 4 11 10 12 4 20 19 17 18 3 8 8 16 15 7 14 13 8 21 26 32 30 31 27 28 29 25 23 22 24 33 34 28 88717197 ...

Page 131: ...L NUT HEX NYL 3 8 NC 4 16 EZB037040 BOLT HEX 3 8 NC X 4 4 17 EZBN062L NUT LOCK NYLON 5 8 NC 4 18 88719184 SPACER PIN HOLD SUPPORT 4 19 9671405 SPACER METRIC 4 20 SXBHF0623008YZ BOLT FLG 5 8X3 00 G8 YZ 4 21 EZ10GN1 FITTING 1 4 UNF ST ZERK 8 22 88719415 ARM W A END SHIELD HSCD 1 23 88719410 TUBE W A END SHIELD HSCD 1 24 88717409 PLATE SIDE SHIELD HSCD 1 25 88718455 BRKT MTG BLADE ARM TOP 1 26 887173...

Page 132: ...NG 40 DETAIL A SECTION F F SECTION C C SECTION E E DETAIL D SECTION B B SECTION H H SECTION J J A F F C C E E D B B H H J J FRONT OF THE MACHINE 1 2 21 20 18 17 15 3 6 19 6 6 14 13 16 5 12 11 9 8 10 4 4 4 7 26 27 28 29 25 23 22 32 30 31 24 33 34 28 88717293 ...

Page 133: ...5 8 NC 4 16 88719184 SPACER PIN HOLD SUPPORT 4 17 9671405 SPACER METRIC 4 18 SXBHF0623008YZ BOLT FLG 5 8X3 00 G8 YZ 4 19 EZ10GN1 FITTING 1 4 UNF ST ZERK 8 20 88717192 TUBE WA RR WING BLADE MT LH 40 1 21 88717180 TUBE WA RR WING BLADE MT RH 40 1 22 88719415 ARM W A END SHIELD HSCD 1 23 88719410 TUBE W A END SHIELD HSCD 1 24 88717409 PLATE SIDE SHIELD HSCD 1 25 88718455 BRKT MTG BLADE ARM TOP 1 26 8...

Page 134: ...gh Speed Compact Disc HYDRAULICS 25 30 WING LIFT ROCKSHAFT 27 27 LEFT WING FRONT OF MACHINE RIGHT WING 66 2 4 66 2 4 5 74 5 74 24 74 5 42 73 71 26 29 6 23 6 56 74 5 49 55 51 58 4 2 66 12 20 1 21 5 74 6 25 6 51 57 49 55 88719870 ...

Page 135: ...ation High Speed Compact Disc WING LIFT 34 61 32 64 40 28 64 41 60 32 58 35 28 61 41 34 6 11 51 35 6 11 D C A A B B DETAIL A DETAIL B DETAIL C DETAIL D C 66 2 4 51 6 51 51 30 50 51 61 34 40 LEFT WING RIGHT WING 88719870 ...

Page 136: ...High Speed Compact Disc ROCKSHAFT C B 37 A 59 RIGHT ROCKSHAFT CYLINDER LEFT ROCKSHAFT CYLINDER DETAIL A DETAIL B DETAIL C 36 58 61 39 37 23 23 29 29 26 26 74 5 74 5 55 55 54 54 74 76 39 74 16 58 61 16 74 3 28 74 76 59 88719870 ...

Page 137: ...137 Part Identification High Speed Compact Disc VALVE A A B DETAIL A DETAIL B B RIGHT ROCKSHAFT CYLINDER LEFT ROCKSHAFT CYLINDER 48 34 56 75 69 59 34 14 10 33 33 59 50 54 50 33 33 10 54 39 88719870 ...

Page 138: ... SHUT OFF VALVE 47 63 70 72 15 70 72 63 33 38 33 33 47 33 43 6 9 2 4 66 36 7 67 4 2 50 50 A DETAIL A DETAIL B DETAIL C DETAIL D B B D D C 52 31 22 6 5 14 13 8 53 45 59 19 19 59 31 45 59 19 65 33 46 44 74 15 17 70 72 61 53 2 4 68 7 16 74 18 88719870 ...

Page 139: ...6 CYL HYD 3 5IN DIA X 12 STR 1 18 88712949 STRAP 12 X 1 5 2 19 88713042 COUPLER 1 2 MALE NIPPLE 8 20 88716789 CHK VLV 4500 PSI CRK 04MB 1 2 HB 1 21 88716792 DRAIN HOSE WING CYL RELIEF VT 1 22 88716966 FITTING 6 MORF X 6 FORF STR 1 32 ORIFICE 1 23 88717214 4X8IN CYL DEPTH STOP REPH HSCD 3 24 88717215 CYL HYD 3 5IN DIA X 8IN STR REPH 3 25 88717216 CYL HYD 3 0 IN DIA X 8 IN STR REPH 1 26 88717255 CYL...

Page 140: ...OSE 06 06 00 06 00 130 1 54 88719020 HOSE 06 06 00 06 90 42 2 55 88719021 HOSE 06 06 00 06 90 266 2 56 88719873 HOSE 06 06 00 06 90 256 1 88718225 HOSE 06 06 00 06 90 270 1 57 88719874 HOSE 06 06 00 06 45 141 1 88718228 HOSE 06 06 00 06 45 155 1 58 9625123 FITTING RUN TEE 375 A 3 59 9626421 CONNECTOR 8MB 6MOR 6 8 F5OLO 24 60 9840328 FITTING TEE 6MB 6MOR 1 61 9840543 90 DEGREE ELBOW 375A 6 62 98436...

Page 141: ...141 Part Identification High Speed Compact Disc ITEM PART NUMBER DESCRIPTION QTY 74 EZBP37250 COTTER PIN 3 8X2 1 2 26 75 EZBW037L WASHER LOCK 3 8 X 11 16 X 3 32 4 76 EZDR5262 PIN CYLINDER 9 ...

Page 142: ...High Speed Compact Disc HYDRAULICS 35 40 WING LIFT ROCKSHAFT 27 27 LEFT WING FRONT OF MACHINE RIGHT WING 65 2 4 4 2 65 5 73 5 73 24 5 73 70 72 40 26 6 2 6 77 73 5 47 53 48 34 4 2 65 12 20 1 21 5 73 6 25 6 48 52 47 53 88718976 ...

Page 143: ...ation High Speed Compact Disc WING LIFT 33 60 32 63 38 28 63 39 59 32 57 34 28 60 39 33 6 11 48 34 6 11 D C A A B B DETAIL A DETAIL B DETAIL C DETAIL D C 4 2 65 48 6 48 47 30 52 47 61 33 38 LEFT WING RIGHT WING 88718976 ...

Page 144: ...High Speed Compact Disc ROCKSHAFT C B 35 A 58 RIGHT ROCKSHAFT CYLINDER LEFT ROCKSHAFT CYLINDER DETAIL A DETAIL B DETAIL C 54 57 60 37 35 23 23 29 29 26 26 73 5 73 5 53 53 56 56 75 73 37 73 16 57 60 73 16 28 3 75 73 58 88718976 ...

Page 145: ...145 Part Identification High Speed Compact Disc VALVE A A B DETAIL A DETAIL B B RIGHT ROCKSHAFT CYLINDER LEFT ROCKSHAFT CYLINDER 50 33 56 75 69 59 33 33 10 46 46 59 49 57 31 46 46 10 57 37 88718976 ...

Page 146: ... SHUT OFF VALVE 45 62 69 71 15 69 71 62 46 36 46 46 55 46 41 6 9 65 4 2 54 7 2 4 66 31 76 A DETAIL A DETAIL B DETAIL C DETAIL D B B D D C 50 31 22 6 73 13 14 8 58 19 19 58 31 43 51 43 58 19 64 46 42 44 5 15 17 71 69 60 51 67 4 2 7 16 73 18 88718976 ...

Page 147: ... CYL HYD 3 5IN DIA X 12 STR 1 18 88712949 STRAP 12 X 1 5 2 19 88713042 COUPLER 1 2 MALE NIPPLE 8 20 88716789 CHK VLV 4500 PSI CRK 04MB 1 2 HB 1 21 88716792 DRAIN HOSE WING CYL RELIEF VT 1 22 88716966 FITTING 6 MORF X 6 FORF STR 1 32 ORIFICE 1 23 88717214 4X8IN CYL DEPTH STOP REPH HSCD 3 24 88717215 CYL HYD 3 5IN DIA X 8IN STR REPH 3 25 88717216 CYL HYD 3 0 IN DIA X 8 IN STR REPH 1 26 88717255 CYLI...

Page 148: ... 06 06 00 06 45 169 35 1 88717976 HOSE 06 06 00 06 45 184 40 1 53 88718982 HOSE 06 06 00 06 90 285 35 2 88718982 HOSE 06 06 00 06 90 285 40 2 54 88719005 HOSE 06 06 00 06 00 200 1 55 88719006 HOSE 06 06 00 06 00 145 1 56 88719020 HOSE 06 06 00 06 90 42 2 57 9625123 FITTING RUN TEE 375 A 3 58 9626421 CONNECTOR 8MB 6MOR 6 8 F5OLO 24 59 9840328 FITTING TEE 6MB 6MOR 1 60 9840543 90 DEGREE ELBOW 375A 6...

Page 149: ...ART NUMBER DESCRIPTION QTY 74 EZBW037L WASHER LOCK 3 8 X 11 16 X 3 32 4 75 EZDR5262 PIN CYLINDER 9 76 88718110 HOSE 06 06 00 06 00 152 35 1 88718110 HOSE 06 06 00 06 00 152 40 1 77 88718982 HOSE 06 06 00 06 90 285 35 1 88719015 HOSE 06 06 00 06 90 300 40 1 ...

Page 150: ...150 Part Identification High Speed Compact Disc BEARINGS 4 BOLT AND MOUNTING ARMS VIEW B B VIEW A A B B A A 2 1 4 8 5 6 7 3 8 2 3 88717642 ...

Page 151: ...17317 INSERT RUBBER BLADE MTG 2 88717448 ARM ASSY 4 HOLE BRG 17 DEG 3 88717449 ARM ASSY 4 HOLE BRG 15 DEG 4 88718455 BRKT MTG BLADE ARM TOP 5 88718629 CSHH G8 ZnCr 5 8X2 3 4 FULL 6 88718630 Nut 5 8 11 Hex Grade 8 ZnCr 7 EZBW062L LW P 5 8 86505602 8 88719455 ARM ASSY ADJ HUB30 AS REQUIRED ...

Page 152: ...152 Part Identification High Speed Compact Disc BLADES 2 1 3 88717644 ...

Page 153: ...X FLG USR M12 X 25 PL 2 88717290 BLADE 20 X 6 5 MM NOTCHED 88717288 BLADE 22 X 6 5 MM NOTCHED 88719706 BLADE 24 X 8 MM NOTCHED 88717284 BLADE 26 X 8 MM NOTCHED 3 88717289 BLADE 20 X 6 5 MM PLAIN 88717287 BLADE 22 X 6 5 MM PLAIN 88719705 BLADE 24 X 8 MM PLAIN 88717275 BLADE 26 X 8 MM PLAIN AS REQUIRED ...

Page 154: ...154 Part Identification High Speed Compact Disc ...

Page 155: ...CHEMATIC 159 Rockshaft Lift Circuit 159 Hitch Frame and Wing Fold Circuit 160 OPTIONS 161 Blades and Hubs 161 Cage Rollers 162 Otico Rollers 162 HARDWARE TORQUE VALUES 163 Metric Chart 163 Imperial Chart 164 HYDRAULIC CONNECTION SPECIFICATIONS 165 O Ring Fitting Straight Thread 165 O ring Face Seal Connection 165 Flare Fitting 165 Port Seal O ring Boss Fitting 165 Tubelines And Hoses 165 ...

Page 156: ...156 Specifications High Speed Compact Disc ...

Page 157: ...9 633 lb est 14 629 kg 32 252 lb est Horsepower Required 20 Blade 335 425 est 335 425 est 390 480 est 450 550 est Blade Arm Angle front 17 17 17 17 Blade Arm Angle rear 15 15 15 15 Number of Blades front Front 31 Front 37 Front 43 Front 49 Number of Blades rear Rear 31 Rear 37 Rear 43 Rear 49 Number of Blade Bearings 62 74 86 98 Depth Control Recommended Maximum 63 5 mm 2 5 127 mm 5 63 5 mm 2 5 12...

Page 158: ...5 in dia x 8 in stroke retracted length 20 75 in re phasing 1 Wing R H Rear Attachment Cylinder 3 0 in dia x 8 in stroke retracted length 20 75 in re phasing 1 Wing L H Rear Attachment Cylinder 4 0 in dia x 8 in stroke retracted length 20 75 in re phasing w depth stop 1 DESCRIPTION TORQUE Wheel Bolts 9 16 diameter 203 N m 150 ft lb Wheel Bolts 5 8 diameter 325 N m 240 ft lb Wheel Bolts 3 4 diamete...

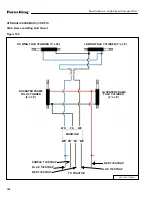
Page 159: ...CYLINDER 4 x 8 LH ATTACHMENT ROCKSHAFT LIFT CYLINDER 4 x 8 RH ATACHMENT ROCKSHAFT LIFT CYLINDER 3 x 8 RH WING ROCKSHAFT LIFT CYLINDER 3 5 x 8 CENTER ATACHMENT ROCKSHAFT LIFT CYLINDER 3 5 x 8 LH WING ROCKSHAFT LIFT CYLINDER 3 5 x 8 LH HITCH FRAME ROCKSHAFT LIFT CYLINDER 4 x 8 RE WX LR WX MANIFOLD LR LE GREEN TIE STRAP GREEN TIE STRAP TO TRACTOR ...

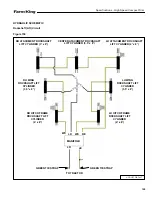
Page 160: ...g Fold Circuit Figure 160 HYD FOLD CIRCUIT RH CENTER FRAME FOLD CYLINDER 6 x 38 LH WING FOLD CYLINDER 5 x 38 RH WING FOLD CYLINDER 5 x 38 FE MANIFOLD BLUE TIE STRAP TO TRACTOR LH CENTER FRAME FOLD CYLINDER 6 x 38 WE WR RED TIE STRAP WR FE WE PR PURPLE TIE STRAP RED TIE STRAP BLUE TIE STRAP ...

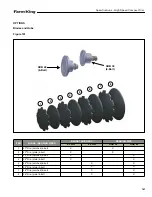
Page 161: ...THICKNESS BEARING SIZE 6 5 mm 8 0 mm HUB 30 HUB 40 1 20 Dia notched 4 bolt X X 2 20 Dia plain 4 bolt X X 3 22 Dia notched 6 bolt X X 4 22 Dia plain 6 bolt X X 5 24 Dia notched 6 bolt X X 6 24 Dia plain 6 bolt X X 7 26 Dia notched 6 bolt X X 8 26 Dia plain 6 bolt X X HUB 30 4 Bolt 1 2 3 4 5 6 7 8 HUB 40 6 Bolt ...

Page 162: ... 4 4 m 14 6 2 CENTER CAGE ROLLER 3 4 m 11 2 3 4 m 11 2 3 4 m 11 2 3 4 m 11 2 DIAMETER 609 mm 24 609 mm 24 609 mm 24 609 mm 24 1 2 1 DIMENSIONS ITEM DESCRIPTION HS8525 HS8530 HS8535 HS8540 1 WIDTH LH and RH ROLLER 2 1 m 6 11 2 9 m 9 6 3 6 m 11 1 4 4 m 14 6 2 WIDTH CENTER ROLLER 3 4 m 11 2 3 4 m 11 2 3 4 m 11 2 3 4 m 11 2 DIAMETER 527 mm 21 1 4 527 mm 21 1 4 527 mm 21 1 4 527 mm 21 1 4 1 2 1 SCRAPER...

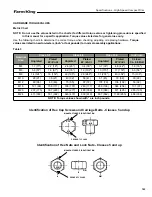
Page 163: ...ted W ZnCr Unplated Plated W ZnCr CL 8 w CL 8 8 Bolt M4 1 7 15 2 2 19 2 6 23 3 4 30 3 7 33 4 8 42 1 8 16 M6 5 8 51 7 6 67 8 9 79 12 102 13 115 17 150 6 3 56 M8 14 124 18 159 22 195 28 248 31 274 40 354 15 133 M10 28 21 36 27 43 32 56 41 61 45 79 58 30 22 M12 49 36 63 46 75 55 97 72 107 79 138 102 53 39 M16 121 89 158 117 186 137 240 177 266 196 344 254 131 97 M20 237 175 307 226 375 277 485 358 51...

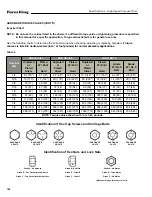
Page 164: ... 26 229 28 250 37 324 14 125 20 176 3 8 23 17 30 22 35 26 46 34 50 37 65 48 26 19 35 26 7 16 37 27 47 35 57 42 73 54 80 59 104 77 41 30 57 42 1 2 57 42 73 54 87 64 113 83 123 91 159 117 61 45 88 64 9 16 81 60 104 77 125 92 163 120 176 130 229 169 88 65 125 92 5 8 112 83 145 107 174 128 224 165 244 180 316 233 122 90 172 127 3 4 198 146 256 189 306 226 397 293 432 319 560 413 217 160 306 226 7 8 19...

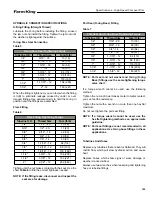
Page 165: ...t seal fitting NOTE If a torque wrench cannot be used use the hex flat tightening method as an approximate guideline NOTE Port seal fittings are not recommended in all applications Use O ring boss fittings in these applications Tubelines And Hoses Replace any tubelines that are bent or flattened They will restrict flow which will slow hydraulic action and cause heat Replace hoses which show signs ...

Page 166: ...166 Specifications High Speed Compact Disc ...

Page 167: ...167 Warranty High Speed Compact Disc WARRANTY WARRANTY 169 ...

Page 168: ...168 Warranty High Speed Compact Disc ...

Page 169: ...t as part of normal maintenance Farm King warrants that the High Speed Compact Disc blade bearing parts used and serviced as detailed in the Operator s Manual shall be free from defects in materials and workmanship for a period following delivery to the original retail purchaser for three 3 years First year 100 blade bearing parts and labor covered Second and third year 100 blade bearing parts onl...

Page 170: ...RM KING S SKILL OR JUDGMENT TO SELECT OR FURNISH GOODS FOR ANY PARTICULAR PURPOSE THE PURCHASER S ONLY AND EXCLUSIVE REMEDIES IN CONNECTION WITH THE BREACH OR PERFORMANCE OF ANY WARRANTY ON FARM KING S PRODUCTS ARE THOSE SET FORTH HEREIN IN NO EVENT SHALL FARM KING BE LIABLE FOR INCIDENTAL OR CONSEQUENTIAL DAMAGES INCLUDING BY WAY OF EXAMPLE ONLY AND NOT LIMITATION LOSS OF CROPS LOSS OF PROFITS OR...

Page 171: ......

Page 172: ...ta Canada T9C 1N6 Ph 204 822 4467 Fax 204 822 6348 Toll Free 888 524 1004 E mail info buhler com www farm king com Equipment shown is subject to change without notice 2018 Buhler Trading Inc Printed in Canada TSX BUI www farm king com ...

Reviews:

Related manuals for HS8525