OPERATING INSTRUCTIONS
BEFORE FIRST USE
1. Carefully unpack your Toaster and remove all packaging
materials.
2. To remove any dust that may have accumulated during
packaging, simply wipe the Toaster exterior with a clean,
damp cloth.
3. Do not use abrasive cleansers.
4. Do not put the Toaster, cord or plug in water.
5. Plug power cord into a 120V AC electrical outlet.
6. Before toasting for the first time, operate both pairs of the
Toasting Slots without bread and with both Browning Selector
Knobs set at Dark (#6), the maximum setting. This will help to
burn off any dust or manufacturing oils, etc. which may have
accumulated on the elements. The new elements may give off
an unpleasant smell but this is normal for a new Toaster.
Make sure the room is well ventilated while doing this.
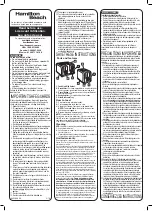
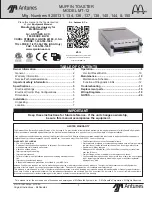
SELECTING TOAST COLOR
Both Browning Selector Knobs are located on the front of your
Toaster. Adjust one or both of the Knobs to the desired toast color:
Light (#1) is for warming and very light toasting; Dark (#6) for dark
toasting. The numbers are a guide to help you select your desired
color (the higher the number, the darker the toast).
The first time you toast, it is best to use all Toasting Slots; position
each Knob mid-way between Light and Dark settings (between #3
and #4); then adjust each subsequent toasting to your preference.
CANCEL BUTTONS
There are 2 CANCEL Buttons, one for
each pair of Slots.
If you wish to stop the toasting cycle
before it is complete, press the
CANCEL Button that corresponds to
the appropriate Slot(s). The elements
will be turned off, the toast or toaster
food will pop up.
DEFROST BUTTONS
There are 2 DEFROST Buttons, one for each pair of Slots.
Leave the Browning Selector(s) mid-way between Light and Dark
settings (between #3 and #4), place the frozen bread or toaster food
into the Toasting Slots, lower the Toasting Lever, then press the
DEFROST Button(s) that correspond to the appropriate Slots. The
DEFROST Light(s) will illuminate, and will stay on until
defrosting/toasting is complete. The toasting time will be altered
automatically to give the same degree of browning you get with
unfrozen bread.
NOTE:
With the flexibility of dual Selectors, you are able to toast
frozen bread in 1 pair of Toasting Slots and unfrozen bread in the
2nd pair of Toasting Slots at the same time.
TOASTING BREAD
1. Place your Toaster on a flat, level surface.
2. Plug power cord into a 120V AC electrical outlet. The unit may
emit an odor and / or smoke during the first few uses from oils
used in manufacturing. This is normal for a new Toaster.
3. Adjust the Browning Selector Knob(s) to the desired lightness or
darkness. Turn each Knob to the left for Light toast (#1) or to the
right for Dark toast (#6).
4. Remove all protective wrappings from food before placing in
Toasting Slots.
5. Avoid toasting torn slices of bread and broken pastries, which may
get lodged in Toasting Slots.
6. Place bread or toaster food into one or both pairs of Toasting Slots
and push down to lower the corresponding Toasting Lever(s).
Centering Guides will automatically center bread for even toasting.
When toasting a single slice, the bread may be placed in either
Toasting Slot, but may toast slightly darker on the inside than on
the outside.
6
5
FBW_FST400M/RM/BM/CBM_IB_19-8 08/20/2004 11:18 Page 7