12
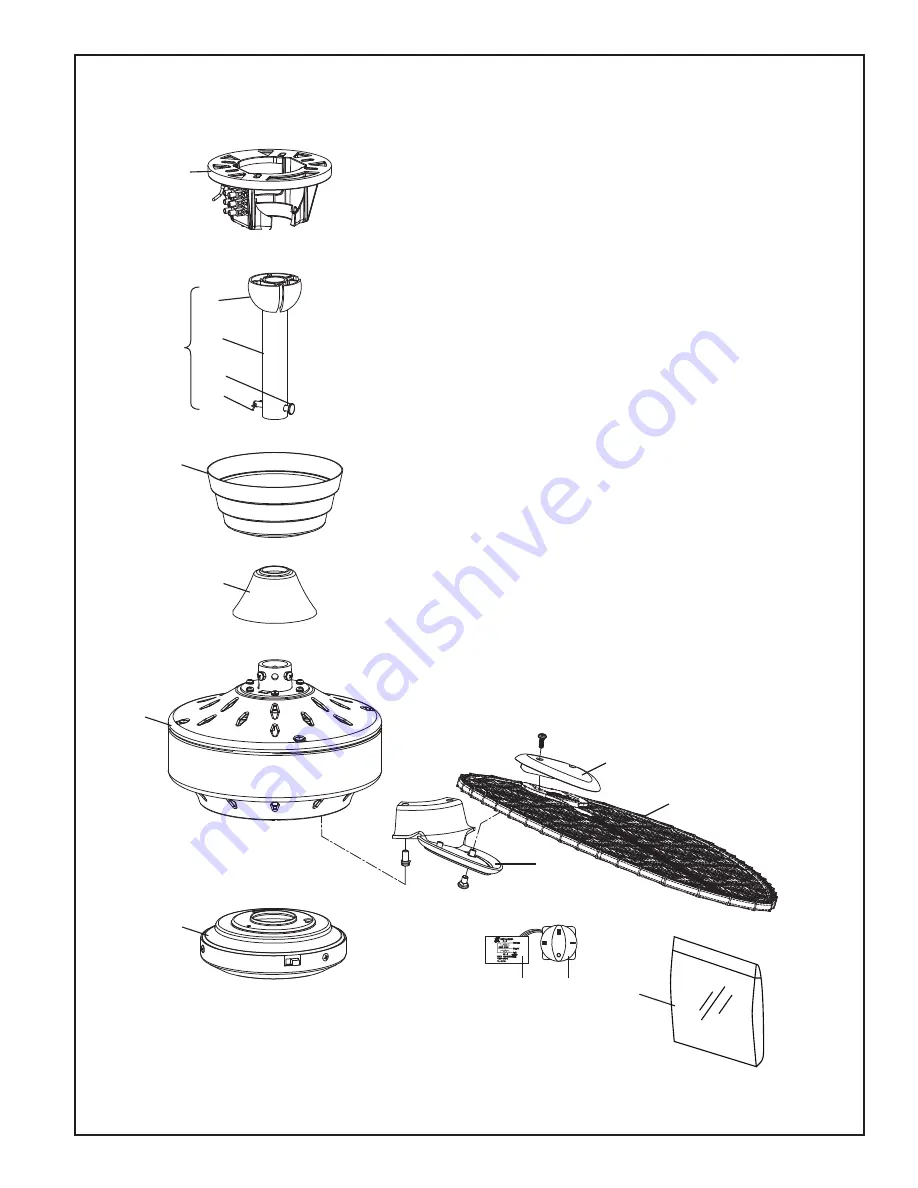
MW75**Exploded-View Drawing
NOTE:
The illustration shown is not to scale or its actual configuration may vary
Figure 1
11
3
4
5
8
6
7
9
1
2a
2b
2c2d
2
10
Optional Blade Set– Show is BPD4(Not inculded)
Page 1: ...ms missing parts Before returning to your retailer call our customer service department at 1300 469 326 ATTACH YOUR RECEIPT HERE READ AND SAVE THESE INSTRUCTIONS Purchase Date Net Weight 10 55 kg 23 26 lbs WINDPOINTE CEILING FAN ...
Page 2: ...ert foreign objects in between rotating fan blades WARNING This fan MUST be installed with an easily accessible isolating device to disconnect all poles of the fan from the main supply The contact distance in all poles must be 3mm minimum 6 Do not dispose of electrical appliances as unsorted municipal waste use separate collection facilities 7 Contact your local government for information regardin...
Page 3: ...y Hanger Bracket Ceiling Canopy Motor Coupling Cover Assembly Blade Holder Cover Set Blade Holder Set Fan Motor Assembly Downrod Hanger Ball Assembly Hanger Bracket Ceiling Canopy Motor Coupling Cover Assembly Switch Cup Housing Adapter Assembly Hardware Bags Blade Holder Cover Set Blade Holder Set Hardware bags 1 4 20 Pan head screws with lock washers blade holder to fan motor hub 3 16 24 Carriag...
Page 4: ...possible electrical shock WARNING This fan must be installed by a licensed electrician Electrical and Structural Re uirements s n a F g n i l i e C f o e s U t n e i c i f f E y g r e n E Ceiling fan performance and energy savings rely heavily on the proper installation and use of the ceiling fan Here are a few tips to ensure efficient product performance Turn Off When Not in the Room Ceiling fans...
Page 5: ...rod as follows Route the three 80 wires and cable through the hanger ball Position the pin through the two holes in the downrod and align the hanger ball so the pin is captured in the groove in the top of the hanger ball Pull the hanger ball up tight against the pin Securely tighten the setscrew in the Hanger Ball A loose setscrew could create fan wobble 6 While pulling up on the hanger ball secur...
Page 6: ...ten for wiring Securely attach the hanger bracket to a timber batten or other structural support using appropriate fasteners Figure 3 WARNING Failure to seat tab in groove could cause damage to electrical wires and possible shock or fire hazard WARNING To avoid possible shock do not pinch wires between the hanger ball assembly and the hanger bracket 2 Carefully lift the fan and seat the downrod han...
Page 7: ...lied and attach to wall INSTALLATION NOTE The O and the small corner cut out on the front of the switch mechanism must be at the top and top left respectively See Figure 3 IMPORTANT Fan installation must be completed including the installation of the fan blades before testing of the controls 4 Restore electrical power to the ceiling fan by turning the electricity on at the main fuse box 5 Check th...
Page 8: ...is completely installed Installing the fan with blades assembled may result in damage to the fan blades WARNING To reduce the risk of personal injury do not bend the blade holders when installing balancing the blades or cleaning the fan Do not insert foreign objects in between the rotating blades Figure 2 Blade Holder Figure 4 Blade Cover Screw 2 per blade holder Motor Assembly 2 Lay the side of t...
Page 9: ... 6 Figure 7 Figure 8 Figure 9 Cover Switch Cup Adapter Switch Cup Reverse Switch Reverse Switch Information Season Rotation Direction Switch Position Summer Counter Clockwise Left Winter Clockwise Right Figure 5 5 Disassemble the cover switch cup from the adapter switch cup by removing three screws Figure 5 Cover Switch Cup Adapter Switch Cup WARNING The color label on these two connectors must co...
Page 10: ...ning agents are not required and should be avoided to prevent damage to finish CAUTION Do not use water when cleaning your ceiling fan It could damage the motor or the blades and create the possibility of electrical shock Blade Cleaning Periodic light dusting of the blades is recommended A feather duster will work best Avoid using water cleansers or harsh rags which can warp and ruin the blades ...
Page 11: ...nce Kit B LKT Blade Mounting Hardware Bag Containing 3 16 24 Pan Head Serrated Screws 11 3 16 24 Carriage Head uts 11 Blade Holder Mounting Hardware Bag Containing 20 Pan Head Screws with Lock ashers 11 Phillips Screwdriver 10 cm Part P 610BL 220 D 1 6 220 PG165 AP1115 AP5053 AMAAUM7500 AP5063 P5005 5 M 500 06 01 C P065030 450 HDWAUM7500 How To Order Parts hen ordering repair parts always give the...
Page 12: ...12 MW75 Exploded View Drawing NOTE The illustration shown is not to scale or its actual configuration may vary Figure 1 11 3 4 5 8 6 7 9 1 2a 2b 2c 2d 2 10 Optional Blade Set Show is BPD4 Not inculded ...
Page 13: ...onnectors in switch housing are not rattling against each other or against the interior wall of the switch housing CAUTION Make sure main power is turned off 5 Tighten screws securely 6 Tighten set screw securely 3 FAN WOBBLES EXCESSIVELY 1 Setscrew in downrod support is loose 2 Setscrew in downrod hanger ball assembly is loose 3 Screws securing fan blade holders to motor hub are loose 4 Blade hol...
Page 14: ...Copyright 2016 Fanimation 2016 12 V 01 ...