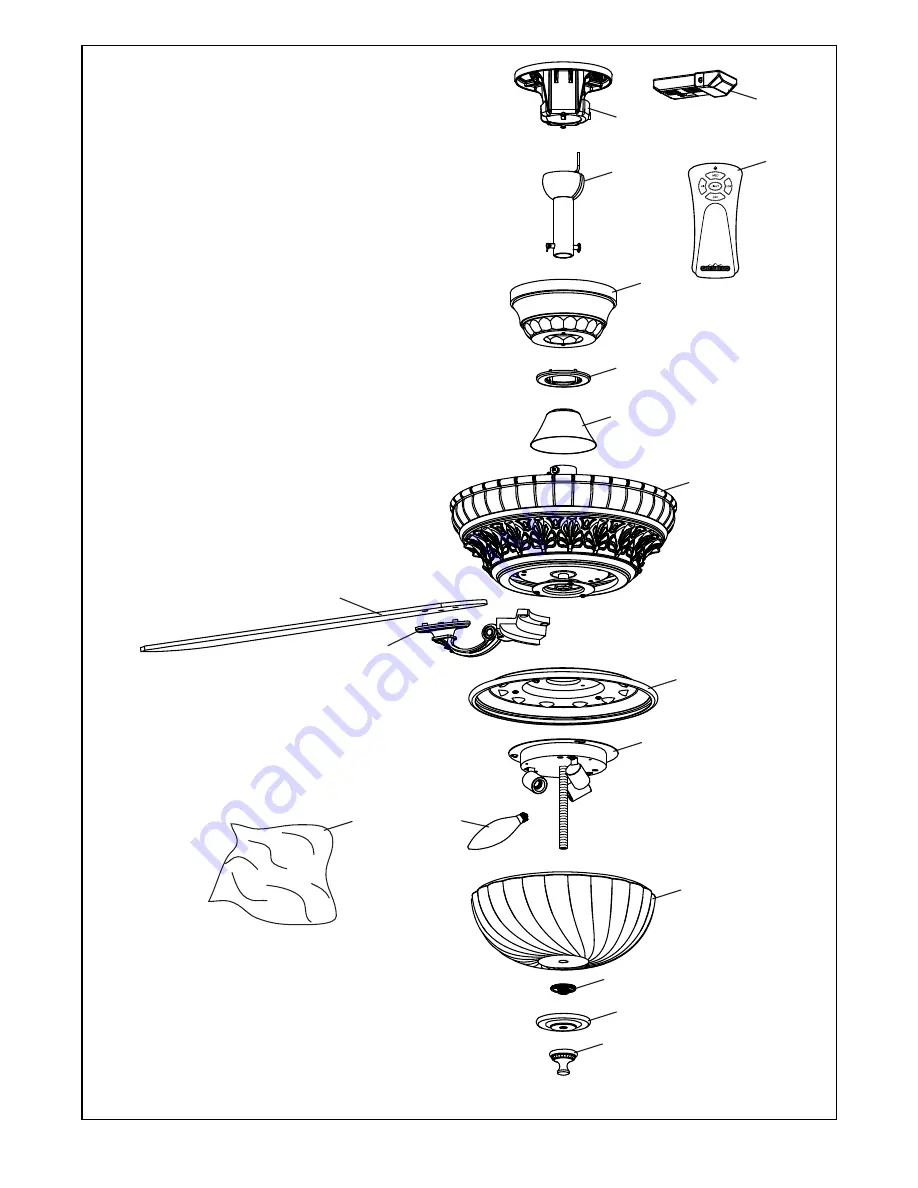
15
2
3
4
7
6
8
9
12
10
5
11
8 REF
14
1
13
NOTE:
The illustration shown is not to scale or its actual configurations may vary.
Page 1: ...Model No FP8032 OWNER S MANUAL READ AND SAVE THESE INSTRUCTIONS The Ventana Ceiling Fan Finish SB Net Weight 11 1 kg 24 48 lbs ...
Page 2: ...the defective fan is returned to our national service center Proof of purchase is required Customer shall be responsible for all costs incurred in the removal or reinstallation and shipping of the product for repairs or replacement 2 ONE YEAR MOTOR LABOR WARRANTY If your fan motor fails at any time within one year from the original purchase due to defects in materials or workmanship labor to repai...
Page 3: ...ion Substitution of parts or accessories not designated for use with this product by Fanimation could result in personal injury or property damage WARNING WARNING One wire stripper One 1 4 blade screwdriver Materials Wiring outlet box and box connectors must be of type required by the local code The minimum wire would be a 3 conductor 2 wire with ground of the following size NOTE Place the parts f...
Page 4: ...ollar savings could be realized with this simple step Electrical and Structural Requirements If your fan is to replace an existing light fixture turn electricity off at the main fuse box at this time and remove the existing light fixture Your new ceiling fan will require a grounded electrical supply line of 120 volts AC 60 Hz 15 amp circuit The outlet box must be securely anchored and capable of w...
Page 5: ... 4 Route wires through motor coupling cover canopy screw cover and canopy Figure 4 5 Reinstall the hanger ball on the downrod as follows Route the three 80 inch wires through the hanger ball Position the pin through the two holes in the downrod and align the hanger ball so the pin is captured in the groove in the top of the hanger ball Pull the hanger ball up tight against the pin Securely tighten...
Page 6: ... for advise as it must be grounded for safe operation The outlet box must be securely anchored Hanger bracket must seat firmly against outlet box If the outlet box is recessed remove wall board until bracket contacts box If bracket and or outlet box are not securely attached the fan could wobble or fall WARNING 2 Carefully lift the fan and seat the downrod hanger ball assembly on the hanger bracke...
Page 7: ...n Replace battery cover on the transmitter Figure 2 RECEIVER UNIT DETAIL CODE SWITCHES Figure 3 2 To set the receiver unit code slide code switches to the same positions as set on your transmitter Figure 3 3 Slide the receiver unit into the open end of the hanger bracket Figure 4 4 Connect green wires from hanger bracket and hanger ball to bare ground wire using wire connector supplied Connect bla...
Page 8: ...de of the outlet box Figure 6 CANOPY SHOULDER SCREWS 2 Figure 1 CANOPY COVER Figure 2 1 Remove one of the two shoulder screws in the hanger bracket Loosen the second shoulder screw without fully removing it Assemble canopy by rotating key slot in canopy over shoulder screw in hanger bracket Tighten shoulder screw Fully assemble and tighten second shoulder screw that was previously removed Figure 1...
Page 9: ...gh the holes located on the bottom of the motor support Figure 2 NOTE Periodically check blade holder hardware and resecure if necessary 3 Remove one of the three screws in the support bracket at the bottom of the motor assembly Slightly loosen the remaining two screws Assemble the light plate assembly to the support bracket using the two key slots in the socket plate Replace the third screw and s...
Page 10: ...ve finial nut glass support nut and rubber washer from threaded post on light socket plate Postion glass onto Light Socket Plate Post and secure with rubber washer and glass support nut Assemble finial nut onto threaded shaft Do not over tighten Figure 7 5 Remove one of the three screws in the housing light kit assembly Slightly loosen the remaining two screws Assemble the light socket plate to th...
Page 11: ...dium and low fan speeds as well as fan off and light on off Infinite light levels are available by holding the light on off button Figure 3 Check to see that all connections are tight including ground and that no bare wire is visible at the wire connectors except for the ground wire Do not operate fan until the blades are in place Noise and fan damage could result WARNING REVERSE SWITCH Figure 4 4...
Page 12: ...s are not required and should be avoided to prevent damage to finish Do not use water when cleaning your ceiling fan It could damage the motor or the finish and create the possibility of electrical shock CAUTION Periodic light dusting of the blades is recommended A feather duster will work best How to Clean Your Ceiling Fan Blades Avoid using water cleansers or harsh rags which can warp and ruin t...
Page 13: ...s are not recommended choose an alternative control method 6 Tighten screws securely 7 Tighten set screw securely 1 Blades not attached to fan 2 Loose screws in motor housing 3 Screws securing fan blade holders to motor flywheel are loose 4 Wire connectors inside housing rattling 5 Motor noise caused by solid state variable speed control 6 Screws holding blades to blade holders are loose 7 Lower h...
Page 14: ... Blade Set 5 11 C24 Hand Held Remote Control 12 RECAN65 Receiver Unit 13 HDWFP8032SB s t r a P e s o o L y l b m e s s A g a B 15 14 4 r o t c e n n o C e r i W Washer Head Screw 3 16 24 x 8 mm 16 6 1 6 1 3 r e h s a W r e b i F 14mm w Lock 11 x 0 2 4 1 w e r c S d a e H n a P 4 Phillips Head Screw Driver Balance Kit HOW TO ORDER REPAIR PARTS When ordering repair parts always give the following in...
Page 15: ...15 2 3 4 7 6 8 9 12 10 5 15 11 8 REF 8 REF 8 REF 14 1 13 NOTE The illustration shown is not to scale or its actual configurations may vary ...
Page 16: ...Copyright 2009 2009 11 10983 Bennett Parkway Zionsville IN 46077 Toll Free 888 567 2055 FAX 866 482 5215 Outside U S call 317 733 4113 Visit Our Fanimation Website www fanimation com ...