background image

English

   - 43 -

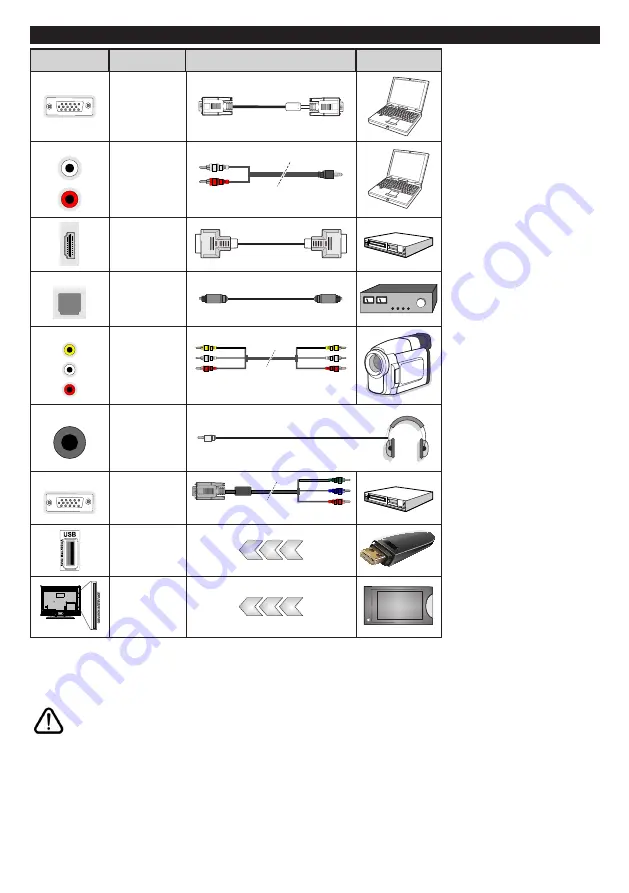
Connections

Connector

Type

Cables

Device

VGA


Connection


(back)

AUDIO IN


PC/YPbPr 

Audio


Connection


(side)

YPbPr/PC Audio Cable

HDMI


Connection


(back)

SPDIF


SPDIF


(Optical Out)


Connection


(back)

SIDE AV


Side AV


(Audio/Video)


Connection


(side)

Audio Video Cable

HEADPHONE

Headphone


Connection


(side)

YPBPR


YPbPr Video


Connection


(back)

PC to YPbPr Connection Cable

USB


Connection


(side)

CI


Connection


(side)

CAM 

module


NOTE: When connecting a 

device via the YPbPr or Side 

AV input, you must use the 

connection cables to enable 

connection.

 See the illustrations 

on the left side. | You can use 

YPbPr to VGA cable to enable 

YPbPr signal via VGA input. 

|


You cannot use VGA and YPbPr 

at the same time. | To enable PC/

YPbPr audio, you will need to use 

the side audio inputs with a 

YPbPr/PC audio cable for audio 

connection. | When using the 

wall mounting kit (available from 

third party in the market, if not 

supplied), we recommend that 

you plug all your cables into the 

back of the TV before mounting 

on the wall. | Insert or remove 

the CI module only when the TV 

is SWITCHED OFF. You should 

refer to the module instruction 

manual for details of the settings. 

| The/Each USB input of your TV 

supports devices up to 500mA. 

Connecting devices that have 

current value above 500mA may 

damage your TV. | By connecting 

an HDMI cable to your TV, you 

have to use only a shielded (high 

grade) HDMI cable to guarantee 

a sufficient immunity against 

parasitic frequency radiation. And 

make sure to use a High-Speed 

HDMI cable that can transmit 

high  definition  signals,  such  as 

4K contents, for trouble-free 

transmission.

 If you want to connect a device to the TV, make sure that both the TV and the device are turned off before making 

any connection. After the connection is done, you can turn on the units and use them.

Summary of Contents for FL2D6503UH

Page 1: ...Recording 45 Watching Recorded Programmes 46 Recording Configuration 46 Media Browser Menu 46 FollowMe TV if available 46 CEC and CEC RC Passthrough 46 E Manual if available 47 General TV Operation 52...

Page 2: ...dripping or splashing of liquids and do not place objects filled with liquids such as vases cups etc on or over the TV e g on shelves above the unit Do not expose the TV to direct sunlight or do not...

Page 3: ...in from your local dealer if not supplied with your TV Do not install the TV on a ceiling or on an inclined wall Use the specified wall mounting screws and other accessories Tighten the wall mounting...

Page 4: ...I source for 3 minutes it will go into standby When you next switch on the following message will be displayed TV switched to stand by mode automatically because there was no signal for a long time Pr...

Page 5: ...the mains Plug the power cable to the mains socket outlet Antenna Connection Connect the aerial or cable TV plug to the AERIAL INPUT ANT socket or satellite plug to the SATELLITE INPUT LNB socket loc...

Page 6: ...ure and operation humidity 0 C up to 40 C 85 humidity max Wireless LAN Transmitter Specifications Frequency Ranges Max Output Power 2400 2483 5 MHz CH1 CH13 100 mW 5150 5250 MHz CH36 CH48 200 mW 5250...

Page 7: ...ailable 15 Subtitles Turns subtitles on and off where available 16 Rapid reverse Moves frames backwards in media such as movies 17 Record Records programmes 18 Play Starts to play selected media 19 St...

Page 8: ...audio connection When using the wall mounting kit available from third party in the market if not supplied we recommend that you plug all your cables into the back of the TV before mounting on the wal...

Page 9: ...eiver and a direct satellite dish select this antenna type Press OK to continue Select an available satellite on the next screen and press OK to scan for services Single Satellite Cable If you have mu...

Page 10: ...e Media Browser Settings Recording Settings menu To record a programme you should first connect a USB disk to your TV while the TV is switched off You should then switch on the TV to enable the record...

Page 11: ...Media Browser preferences by using the Settings menu Loop Shuffle Mode Operation Start playback with the Play button and activate All files in the list will be continuously played in original order St...

Page 12: ...d only via the HDMI1 input System Audio Control Allows an Audio Amplifier Receiver to be used with the TV The volume can be controlled using the remote control of the TV To activate this feature set t...

Page 13: ...ess of the picture by pressing Left or Right buttons Picture Zoom Sets the desired image size format Film Mode Films are recorded at a different number of frames per second to normal television progra...

Page 14: ...rts AVL Automatic Volume Limiting Sets the sound to obtain fixed output level between programmes Headphone Lineout When you connect an external amplifier to your TV using the headphone jack you can se...

Page 15: ...y special feature sent from the broadcaster Audio Description A narration track will be played for the blind or visually impaired audience Press OK to see all available Audio Description menu options...

Page 16: ...Searches and stores analogue stations Satellite Searches and stores satellite stations Manual channel scan This feature can be used for direct broadcast entry Network channel scan Searches for the lin...

Page 17: ...f this maturity level is disabled disables access to the broadcast Note If the country option in the First Time Installation is set as France Italy or Austria Maturity Lock s value will be set to 18 a...

Page 18: ...time Press once more to exit If available sections in the teletext pages will become colour coded and can be selected by pressing the coloured buttons Follow the instructions displayed on the screen S...

Page 19: ...ailable To record a programme you should first connect a USB disk to your TV while the TV is switched off You should then switch on the TV to enable recording feature If you cannot record try switchin...

Page 20: ...z 25 1440x900 60Hz 26 1440x900 75Hz 27 1600x1200 60Hz 28 1680x1050 59Hz 29 1680x1050 60Hz 30 1920x1080 60Hz AV and HDMI Signal Compatibility Source Supported Signals Available Side AV PAL O SECAM O NT...

Page 21: ...s 1080P 60fps 135Mbps FLV flv MP4 mp4 mov 3GPP 3gpp 3gp MPEG transport stream ts trp tp ASF asf AVI avi MKV mkv Motion JPEG 720P 30fps 10Mbps AVI avi 3GPP 3gpp 3gp MP4 mp4 mov MKV mkv ASF asf VP8 1080...

Page 22: ...Hz 44 1KHz 48KHz 32Kbps 640Kbps AC3 ac3 AVI avi Matroska mkv mka 3GPP 3gpp 3gp MP4 mp4 mov m4a MPEG transport stream ts trp tp MPEG program stream DAT VOB MPG MPEG EAC3 32KHz 44 1KHz 48KHz 32Kbps 6 Mb...

Page 23: ...tle ts trp tp TS DVB Subtitle mp4 MP4 DVD Subtitle UTF 8 Plain Text mkv MKV ASS SSA UTF 8 Plain Text VobSub DVD Subtitle avi AVI 1 0 2 0 DMF0 1 2 XSUB XSUB External Subtitles Extension Subtitle Parser...

Page 24: ...your TV s connectors by using DVI converter cable DVI to HDMI cable not supplied you can refer to the following resolution information 56Hz 60Hz 66Hz 70Hz 72Hz 75Hz 640x480 800x600 1024x768 1280x768 1...

Page 25: ...anual Now you can enter the Manual IP and or Manual DNS values Select the related item in the drop down menu and enter the new values using the numeric buttons of the remote Press the OK button to sav...

Page 26: ...be able to access the shared files from your mobile device via the Media Browser of your TV Enter the Media Browser menu and the playback device selection OSD will be displayed Select your mobile devi...

Page 27: ...m to get information on the internal service area connection speed signal quality and other settings You need to have a high speed connection for your modem Disruption during playback or slow reaction...

Page 28: ...all the available video files will be listed To play other media types from this screen you can go back to main Media Browser screen and select the media type as desired and then perform the network...

Page 29: ...on the site you wish to add to the Speed Dial list highlight the Opera button and press the OK button Then highlight Add to Speed Dial option in the submenu and press the OK button again Name and Add...

Page 30: ...elete icon found on each row EPG You can view the broadcast schedules of selected channel lists through this tab You can also navigate through channels by pressing on the selected channel on the EPG g...

Page 31: ...the portal page by tapping on the Portal Launcher widget Note Internet connection is required This function will not work if a portal page is not in use Smart Remote Feature You can use your mobile de...

Reviews: