background image

-  13  -


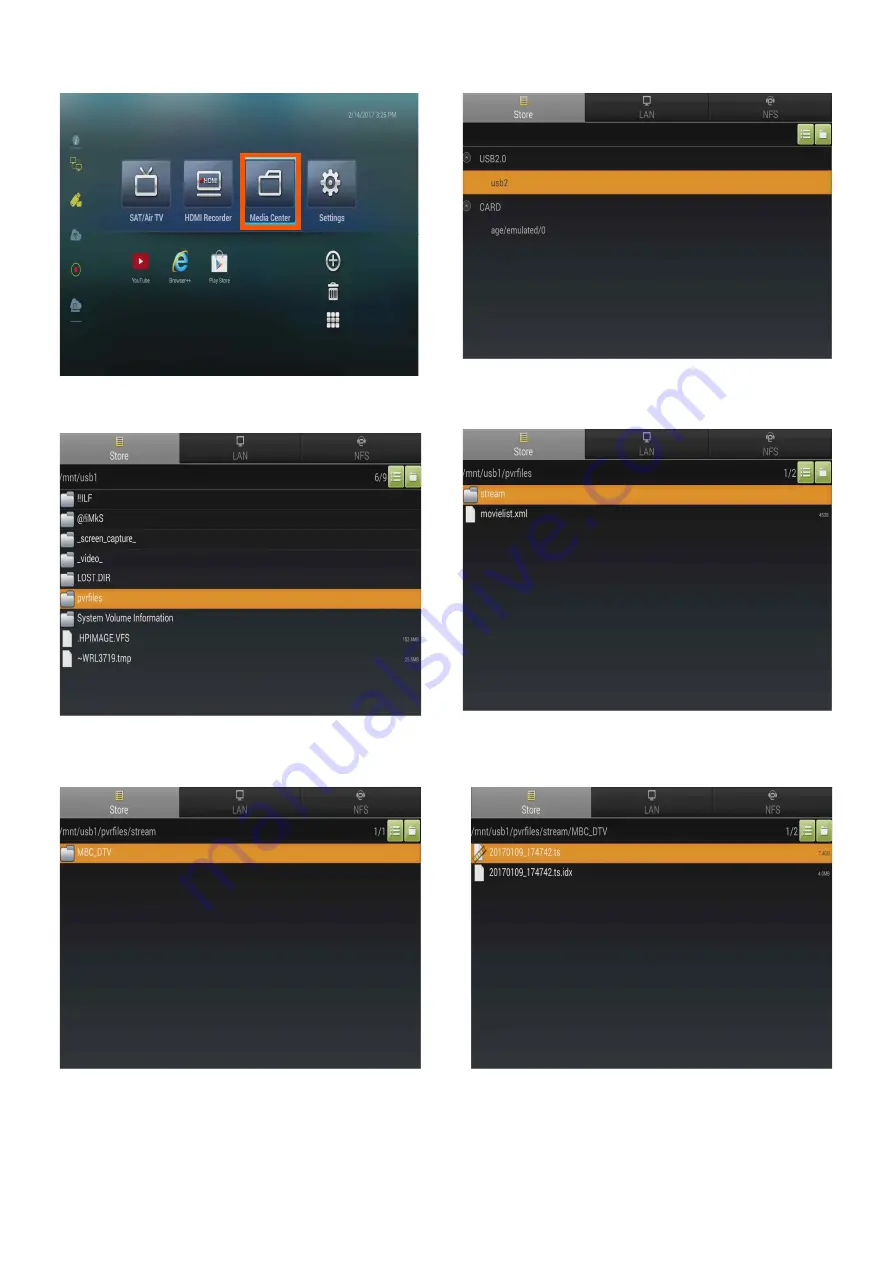
[Picture  3]  Click  pvrfiles.

[Picture  2]  Click  potable  storage  device(USB,   

                      HDD).

[Picture  4]  Click  stream.

[Picture  5]  Click  a  folder  where  recorded  video   

                        saved.

[Picture  6]  Click  a  video(pvr)  which  you  want.

[Picture  1]  Click  "Media  Center"  from  main         

                      screen.

Summary of Contents for 215FS

Page 1: ... Precaution Instructions and product specifications in this manual are based on the latest specification of date of preparation Instructions could be changed by addition improvement and alteration All rights of product and manual belong to manufacturer ...

Page 2: ...Product Function and Purpose of Use ...

Page 3: ...nsumption 16 55watt Temperature Range 0 to 50 Deg Tuner Tuner DVB S2 DVB C ISDB S ISDB T ATSC Each tuner module is optional Operationg power 12 24V DC Adpat power Comms WLAN IEEE 802 11b g n Ethernet 10 100 Mbit s USB 2 0 2 port 1 front 1 back e SATA 1 port Software Platform OS Android 4 4 2 Kitkat Apps Web broswer Media Player kodi with PVR Clinet DVB Support HDMI Recorder Protocols Miracast DLNA...

Page 4: ... cause fire or electric shock ventilation 1 Install it which is lack of dust well ventilated place 2 Do not install and use on the unstable furniture 3 Do not put on a carpet directly There are concerned Fire and electric shock by static electricity 4 Do not install and keep near direct sun light and heating apparatus 5 Do not put other materials on this product Water Caution Incase of cleaning Pr...

Page 5: ...and Time Setup 17 Wireless Network WIFI Setup 18 Wire Network Ethernet Setup 19 Other Network Setup 20 Hotspot 20 Screen of Output Display Setup 21 Custom Display Format Setup 21 Image Setting Setup 22 Display Area Set Setup 23 Backup and initialization Setup 24 Remote Control Mouse 25 Remote control mouse response speed 25 Firmware Update 26 5 Application APP Setup 27 Application APP Download 27 ...

Page 6: ...10 Rewind Play or rewind 11 Play Play a Video 12 Fast Forward Fast forwarding while playing 13 Volume setup Setup overall volume 15 GUIDE Open Guide TV 16 Menu Call out menu submenu TV 17 Cancel Use for cancel or back to the menu 18 20 21 22 Menu Move cursor up down left and right 19 Enter Choose a item and set 23 Program information Indicate program information 24 FAV Favourite 25 RED Freeze fram...

Page 7: ...m Contact to your manufacturer or distributor Basic Composition Option Item Quantity OUTDOOR SMART TV model 215FS 1 Remote Control 1 AAA Battery 1 DC Power Adapter 1 Instruction Manual 1 Antenna Satellite and Terrestrial Option Rechargable Battery Option Charged Battery Satellite Antenna Terrestrial Antenna ...

Page 8: ...inal ATSC Terrestrial Signal Input Terminal HDTV External Monitor Connection Terminal USB terminal for external USB device HDD SD card reader keyboard mouse etc ETHERNET Network connect terminal HDMI INPUT HDMI Input Terminal DC INPUT 12V 5A MAX Power cable connect terminal STBY LED LED Indicate for Energize REMOCON SENSOR Sensor for Remote Control ON OFF Switch Turn on off Main Power ...

Page 9: ...r Increase or decrease channel or volume MENU Open the menu BACK Return to former step HOME Return to Home Recharge Adapter ETHERNET HDTV Output Terminal Analog TV Satellite Antenna Terrestrial Antenna HDMI Input Terminal USB POWER MENU HOME BACK ...

Page 10: ...TV menu Picture 4 Select DCVB S S2 ATSC or Source Type which is fit with region and adjust Satellite as you want and click Scan All Picture 5 Wait for searching channel Picture 6 After searching click Yes Picture 1 Click a menu located in right bottom on the main screen Picture 2 Click Kodi ...

Page 11: ...e from Available Groups Picture 11 Click OK after selecting is finish Picture 7 Click SAT Air Tv from main screen Picture 8 After Click SAT Air Tv from main screen then click number 16 button of remote control and click Channel manager Picture 12 Click SAT Air Tv from main screen ...

Page 12: ... 7 Picture 16 Satellite connect screen 3 Picture 15 Satellite connect screen 2 Picture 14 Satellite connect screen 1 Picture 13 Click TV Channel list will show up Select what you want to watch ...

Page 13: ...ne stream If the removable disk is in FAT format during recording it can not record more than 4G For continuous recording you must format the USB and HDD as NTFS window or EXT4 linux file system Picture 1 Connect potable storage device USB HDD to product Picture 2 Click SAT Air TV on main menu Picture 3 Click red button of remote control button number 8 Recoding start with PVR information indicati...

Page 14: ... 2 Click potable storage device USB HDD Picture 4 Click a video TS which you want Picture 5 Recorded video screen Picture 3 Click a folder where recorded video saved Picture 1 Click Media Center from main screen ...

Page 15: ...on main menu Picture 2 Click Channel search Picture 3 When above screen is show up adjust ATSC from Tuner Selection Then Click Scan all Picture 4 After completed all channel Click Yes from a screen like above Picture 5 Click SAT Air TV on main menu Picture 6 Click TV ...

Page 16: ... 11 Picture 7 When click TV Channel list show up like above Select the channel what you want to see Picture 8 Select a channel what you want to watch by clicking OK button from remote control ...

Page 17: ...at used for HDTV broadcasts If the removable disk is in FAT format during recording it can not record more than 4G For continuous recording you must format the USB and HDD as NTFS window or EXT4 linux file system Picture 1 Connect potable storage device USB HDD to product Picture 2 Click SAT Air TV on main menu Picture 3 Click red button of remote control button number 8 Recoding start with PVR in...

Page 18: ... pvrfiles Picture 2 Click potable storage device USB HDD Picture 4 Click stream Picture 5 Click a folder where recorded video saved Picture 6 Click a video pvr which you want Picture 1 Click Media Center from main screen ...

Page 19: ... 14 Picture 9 Recorded video screen ...

Page 20: ...emselves also users can ide searched channel from channel list or change its name or remove channel Picture 4 Select channel want to delete Picture 1 Click SAT Air TV on main menu Picture 2 Click Channel Manager Picture 3 To delete channel click Delete Channel and Yes Picture 5 Click Delete Deletion is done ...

Page 21: ...ting reservation and watching from Timer of TV menu Picture 1 Click SAT Air TV on main menu Picture 2 Click Timer Picture 3 Click Add Timer Picture 5 Reservation is added like above screen Picture 4 Enter a desired channel time on Timer setup Click Yes ...

Page 22: ...etup the time Picture 1 Click setting from main screen Picture 2 Click Date and Time Picture 3 Lift Automatic Time Zone Picture 5 Select Time Zone you want Picture 6 Click Time Zone setting Automatically then Time and Date setup is finished Picture 4 Click Time Zone ...

Page 23: ...nt AP Connectable AP indicate automatically on the list Select WIFI AP to connect Enter connect password Select letters from keyboard on bottom of screen using remote control s arrow key Connecting keyboard and mouse through USB terminal control comfortably Finishing the input press ENTER right bottom on the screen Picture 1 Click setting from main screen Picture 2 Click WIFI Picture 3 Change Off ...

Page 24: ...ire network but in the majority of cases it is set by DHCP which is initial setting value setup for this product Don t need to additional setting Incase of using static network address static IP input assigned IP address Picture 2 Click ON on the right upper part and use ETHERNET Picture 1 After connect lan cable with product select ethernet from Wireless and Network of Menu ...

Page 25: ...rom main screen after turn on a hotspot function of mobile phone Picture 2 Click WIFI from setting screen Picture 5 Click ON right upper part Connect the mobile phone s wireless network Picture 4 After Connected message come out close setting screen and use network ...

Page 26: ... which support more than 1080p set adequate frequency to image output device Commonly used frequency for below countries PAL Television broadcast system for most of countries in Europe NTSC Television broadcast system for USA South Korea 60Hz USA 60Hz Europe 60Hz China 50Hz Japan 50Hz Middle East Asia 50Hz Picture 1 Click Setting from main screen Picture 2 Click Display from setting screen Picture...

Page 27: ...reen contrast chroma can setup through Image Setting Picture 1 Click Setting from main screen Picture 2 Click Display from setting screen Picture 3 Click Image settings Picture 4 Set up brightness chroma contrast Initial set points are all 50 ...

Page 28: ...rtical ratio Picture 1 Click Setting from main screen Picture 2 Click Display from setting screen Picture 3 Click Display area set from display Picture 4 Control screen rate by using arrow key Picture 6 setup Video aspaect ratio from setting main screen Picture 5 setup Video Output from setting main screen ...

Page 29: ...Backup Application data Wi Fi password and other settings at Google server Factory data reset make product initialize to as a first when you purchase product and remove everything saved in storage Picture 1 Click Setting from main screen ...

Page 30: ...ton from Remote Control Button Number 6 then pointer disappear Remote control mouse response speed How to adjust the mouse response speed of the remote control Picture 1 Click Setting from main screen Picture 1 Using Remote Control Mouse figure 1 Picture 2 Using Remote Control Mouse figure 2 Picture 2 Click Language and Keyboard Picture 3 Click the pointer speed Picture 4 Select the desired speed ...

Page 31: ...ware Update Picture 2 Click a list from USB 2 0 Picture 3 Click update file Picture 4 Click YES and update will be progressed Picture 1 Before you click Media Center on the main screen save upgrade file in USB ...

Page 32: ... Picture 1 Click Play Store in main screen Picture 2 Enter your account Picture 3 Click ON on right upper part and setup WIFI or LAN Picture 4 Login after enter a account Picture 5 Search application at Play Store Picture 6 Install application and open ...

Page 33: ... 28 Picture 7 Click a menu located in right bottom on the main screen Picture 8 Applications downloaded from Play Store are in the list ...

Page 34: ... Application Addition Application Remove Picture 1 Click shape on main menu Picture 2 Select application you want to add on main screen Picture 3 Application is added on main screen Picture 1 Click recycle bin on main screen Picture 2 Select application you want to remove Application disappear from main screen ...

Page 35: ...one or mirroring device Wi Fi Direct Connecting message show up Picture 5 After screen connecting device through Miracast Picture 1 Setup devices to smart phone or mirroring device wifi on smart view on samsung Picture 7 Click a menu located in right bottom on the main screen Picture 3 Click Miracast Application ...

Page 36: ...one or mirroring device Wi Fi Direct Connecting message show up Picture 5 After screen connecting device through Miracast Picture 1 Setup devices to smart phone or mirroring device wifi on Share view on LG Picture 3 Click Miracast Application Picture 7 Click a menu located in right bottom on the main screen ...

Page 37: ...al Laptop TV Playback Component and output equipment connect one to one Picture 2 Screen which is connected with Falcon 215FS Picture 1 After connecting input device and output device by HDMI cable Click HDMI recorder FALCON 215FS Input Terminal Output Device Output Device ...

Page 38: ...Format Method used in HDTV Broadcasting and other It can transmit video audio data at one stream If the removable disk is in FAT format during recording it can not record more than 4G For continuous recording you must format the USB and HDD as NTFS window or EXT4 linux file system YouTube is not recorded Picture 2 Click connected portable storage device USB HDD Picture 2 When press stop button fro...

Page 39: ...arate HDMI cable and reconnect 2 Turn off a device which is connected with HDMI terminal 3 Close HDMI recorder menu and retry it Picture 3 Click video Picture 4 Click a video TS which you want Picture 5 Recorded video screen Picture 3 Click a folder where recorded video saved ...

Page 40: ...ution and Bitrate Initial setting value is Auto but you can change setting optionally It cause image quality difference HDMI Recording Time Setup You can see record duration option by clicking blue button of remote control In activating HDMI recorder menu Button number 28 from remote control If storage capacity is enough maximum record time would be until 99hours 59minutes ...

Page 41: ...by clicking red button of remote control in activating HDMI recorder menu Button number 25 of remote control Still picture will be saved under a _ScreenCapture_ folder as JPG file format Picture 1 Click button number 25 from remote control after connect HDMI cable ...

Page 42: ...nal device USB HDD You can watch MPEG 1 2 4 H 264 VC 1 Realvideo AVC HD AVI WMV 3GP MPS MOV MPG VOB MKV FLV TS files Picture 2 Click connected potable storage device USB HDD Picture 3 Click a folder where video exist Picture 4 Click video Picture 5 Screen of Play a video file Picture 1 Click Media Center on main menu ...

Reviews: