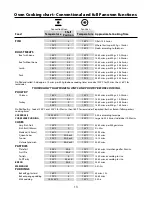


23
Conversion to LP
If the appliance is to be converted to LP gas do the
conversion at this point. See the conversion section of
these instructions.
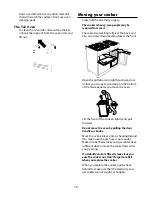
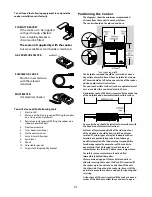
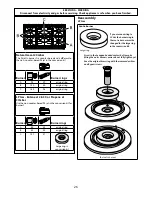
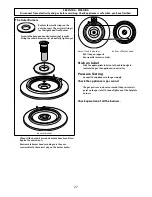
Levelling
You are recommended to use a spirit level on a shelf in
one of the ovens to check for level.
Place the cooker in its intended position taking care not
to twist it within the gap between the kitchen units as
damage may occur to the cooker or the units.
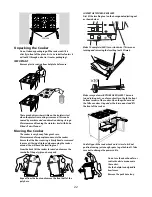
The front feet and rear rollers can be adjusted to level
the cooker. To adjust the height of the rear of the cooker
use the levelling tool supplied to turn the adjusting nuts
at the front bottom corners of the cooker. To set the front
feet turn the bases to raise or lower.
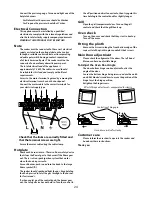
Gas Connection
Fitting a stability bracket
A stability bracket or chain (not supplied by with the
cooker) should be fitted when the cooker is connected to
a flexible gas supply. Any restraining device should be
secured to the fabric of the building and should be able
to be released so that the cooker can be pulled out for
cleaning and maintenance.
When fitting a stability bracket read these instructions
together with the leaflet supplied with the bracket.
a)
Position and level the appliance.
b)
Draw a pencil line 70mm from the front edge of
the levelling feet.
c)
Mark off 350mm from the RH side of the unit to
indicate the centre line for the bracket.
d)
Remove the range.
e)
Mark off 500mm to locate the front edge of the
lower bracket. Fix bracket to floor.
f)
Measure the height from floor level to the top
edge of the rear channel. Add 3mm to this
dimension and assemble the stability bracket to
this height (i.e. from floor level to underside of top
member)
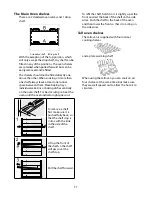
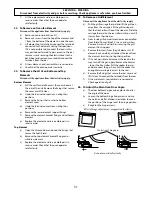
Gas Connection
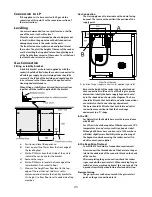
The Gas supply needs to terminate with a down facing
bayonet. The rear cover boxes limit the position of the
supply point.
View from the rear
A - position for gas supply connector, B - appliance gas inlet
Because the height of the cooker can be adjusted and
each connection is different it is difficult to give precise
dimensions. Ideally the house supply bayonet should
be in the shaded area shown in the diagram. The hose
should be fitted so that both inlet and outlet connections
are vertical so that the hose hangs downwards.
The hose should be fitted so that both inlet and outlet
connections are vertical so that the hose hangs
downwards in a ‘U’ shape.
In the UK:
For Natural Gas the flexible hose must be in accordance
with BS 669.
For LP Gas it should be capable of 50mbar pressure, 70°C
temperature rise and carry a red stripe, band or label.
Although a 900 mm hose can be used, a 1250 mm hose
will allow slightly more flexibility in the positioning of
the bayonet and make moving the cooker easier. If in
doubt contact, your supplier.
In the Republic of Ireland:
Consult IS 813 for details of connection requirements.
Screw connect the threaded end of the hose into the gas
inlet in the underside of the connector block on the back
of the cooker.
After completing the gas connection, check the cooker
is gas sound with a pressure test. When checking for gas
leaks do not use washing up liquid - this can corrode. Use
a product specifically manufactured for leak detection.
Pressure testing
The gas pressure can be measured at the pressure test
point on the gas connection block.


