Falcon 210 GEO T DL User Manual Download Page 9

9

Multi-function oven functions

The Multi-function oven has many varied 
uses. We suggest you keep a careful eye on 
your cooking until you are familiar with each 
function. Remember - not all functions will be 
suitable for all food types.
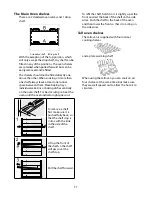
 Defrost

This function operates the fan to circulate 

cold air only. No heat is applied. This enables 
small items such as desserts, cream cakes 
and pieces of meat, fish and poultry to be 
defrosted.
Defrosting in this way speeds up the process 
and protects the food from flies. Pieces of meat, 
fish and poultry should be placed on a rack, 
over a tray to catch any drips. Be sure to wash 
the rack and tray after defrosting.
Defrost with the oven door closed.
Large items, such as whole chickens and 
joints should not be defrosted in this way. We 
recommend this be carried out in a refrigerator.
Defrosting should not be carried out in a warm 
oven or when an adjoining oven is in use or still 
warm.
Ensure that dairy foods, meat and poultry are 
completely defrosted before cooking.

 Fan oven

This function operates the fan and the 

heating element around it. An even heat is 
produced throughout the oven, allowing you 
to cook large amounts quickly.
Fan oven cooking is particularly suitable for 
baking on several shelves at one time and is a 
good ‘all-round’ function. It may be necessary 
to reduce the temperature by approximately 
10°C for recipes previously cooked in a 
conventional oven.
If you wish to pre-heat the oven, wait until the 
indicator light has gone out before inserting 
the food.

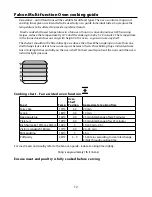
 Fanned grilling in the oven

This function operates the fan whilst the 

top element is on. It produces a more even, less 
fierce heat than a conventional grill. For best 
results, place the food to be grilled, on a grid 
over a roasting tin, which should be smaller 
than a conventional grill pan. This allows 
greater air circulation. Thick pieces of meat 
or fish are ideal for grilling in this way, as the 
circulated air reduces the fierceness of the heat 
from the grill. The oven door should be kept 
closed whilst grilling is in progress, so saving 
energy. You will also find that the food needs 
to be watched and turned less than for normal 
grilling. Pre-heat this function before cooking.

 Fan assisted oven

This function operates the fan, circulating 

air heated by the elements at the top and the 
base of the oven. The combination of fan and 
conventional cooking (top and base heat) 
makes this function ideal for cooking large 
items that need thorough cooking, such as a 
large meat roast. It is also possible to bake on 
two shelves at one time, although they will 
need to be swapped over during the cooking 
time, as the heat at the top of the oven is 
greater than at the base, when using this 
function.
This is a fast intensive form of cooking; keep 
an eye on the food cooking until you have 
become accustomed to this function.

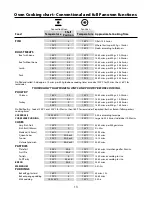
 Conventional oven (top and base 
heat)

This function combines the heat from the top 
and base elements. It is particularly suitable for 
roasting and baking pastry, cakes and biscuits. 
Food cooked on the top shelf will brown and 
crisp faster than on the lower shelf, because 
the heat is greater at the top of the oven than 
at the base, as in ‘Fan assisted oven’ function. 
Similar items being cooked will need to be 
swapped around for even cooking. This means 
that foods requiring different temperatures can 
be cooked together, using the cooler zone in 
the lower half of the oven and hotter area to 
the top.

Summary of Contents for 210 GEO T DL

Page 1: ...900 Dual Fuel Deluxe 210 GEO T DL User s Manual Installation and Servicing Instructions U104551 02 ArtNo 000 0008 Falcon logo shaded...

Page 2: ...dour This should stop after a little use Before using for the rst time make sure that all packing materials have been removed and then to dispel manufacturing odours turn the ovens to 200 C and run fo...

Page 3: ...unction oven functions 9 Falcon Multi function Oven cooking guide 12 Oven Cooking chart Conventional and full Fan oven functions 13 Cleaning your cooker 14 Moving your cooker 16 Troubleshooting 17 Gen...

Page 4: ...help the contents boil more quickly Pans and kettles with concave bases or down turned base rims should not be used Simmering aids such as asbestos or mesh mats are NOT recommended They will reduce b...

Page 5: ...it is stable and that the Wok is sitting level in the ring The cradle will get very hot in use allow plenty of time for it to cool before you pick it up Wok Cooking A Wok may be used for 5 traditional...

Page 6: ...on the grill grid slide the grill carriage into the grill chamber Make sure it is pushed right in The neon indicator light by the grill control will come on For best results preheat for 2 minutes wit...

Page 7: ...13g 8 Lamb Chop 12 Lamb Kidneys 8 9 Lamb s Liver 5 Pork Chops 12 Pork Sausage 57g 8 Pork Kebabs 10 FISH Time minutes Cod Fillet 7 Halibut Steaks 10 11 Herring Fillets in Oatmeal 7 Lemon Sole Fillets 5...

Page 8: ...lement and element de ector when placing or removing items from the oven For more detail on this oven see the section Multi function oven The fan in the right hand oven circulates hot air continuously...

Page 9: ...ces a more even less erce heat than a conventional grill For best results place the food to be grilled on a grid over a roasting tin which should be smaller than a conventional grill pan This allows g...

Page 10: ...ack of the oven Baking trays meat tins et cetera should be placed level centrally on the oven s wire shelves Keep all trays and containers away from the sides of the oven as overbrowning of the food m...

Page 11: ...results pre heat the oven until the oven indicator light goes out To remove a shelf rst make sure it is pushed fully back so that the shelf stop is in line with the kink in the side of the shelf Lift...

Page 12: ...ave at least one runner space between them Place baking trays individual cake tins or baking dishes centrally on the oven shelf For best results pre heat the oven until the oven indicator light goes o...

Page 13: ...25mins per 500g 20 25mins 200 C 2 3 190 C 15 20mins per 500g 15 20mins Turkey 160 C 2 150 C 20 25mins per 500g 20 25mins 200 C 2 190 C 15 20mins per 500g 15 20mins Stu ed Poultry Cook at 200 C or at 2...

Page 14: ...urface Cleaner Rinse with cold water and thoroughly dry with a clean soft cloth Ensure all parts are dry before repositioning Hotplate burners The burner heads and caps can be removed for cleaning Mak...

Page 15: ...with age To regain a polished nish these areas should be cleaned using a proprietary cleaner such as Brasso Stubborn marks on the aluminium burner rings can be removed using a similar cleaning materia...

Page 16: ...t hand oven door so that you can get a good grip on the bottom of the fascia panel as you move the oven Lift the front of the cooker slightly and pull forward Do not move the oven by pulling the door...

Page 17: ...a large item be prepared to turn it round during cooking If two shelves are used check that space has been left for the heat to circulate When a baking tray is put into the oven make sure it is place...

Page 18: ...rk unless speci ed otherwise in this guide All parts of the cooker become hot with use and will retain heat even after you have stopped cooking Take care when touching cooker to minimize the possibili...

Page 19: ...bubble up and over the sides of the pan Carefully watch for spills or overheating of foods when frying at high or medium high temperatures Never try to move a pan of hot fat especially a deep fat frye...

Page 20: ...and reference should be made to the current ETCI rules for electrical installation Provision of Ventilation This appliance is not connected to a combustion products evacuation device Particular attent...

Page 21: ...late level a gap of 75mm should be left between each side of the cooker and any adjacent vertical surface For non combustible surfaces such as unpainted metal or ceramic tiles this can be reduced to 2...

Page 22: ...l need the levelling tool From the back tilt the cooker forward and remove the rear half of the polystyrene base pack Repeat from the front and remove the front half of the poly base LOWER THE TWO REA...

Page 23: ...el Add 3mm to this dimension and assemble the stability bracket to this height i e from oor level to underside of top member Gas Connection The Gas supply needs to terminate with a down facing bayonet...

Page 24: ...the ow of gas to the burner if the ame goes out There is also a spark ignition system that works when the knob is pressed in For each burner push in and turn the knob to the large ame symbol The igni...

Page 25: ...0millibar A conversion kit for LP gas is supplied with the cooker Injectors Remove pan supports and burner heads Burner head Brass venturi Burner base Burner ring Undo the large brass nuts and remove...

Page 26: ...rs easier do not fully tighten yet Save the original brass ring with the removed ori ces and bypass screws the centre burner Natural Gas at 20mbar The 95 jet in burner A is counter bored and is di ere...

Page 27: ...uris have been tted tighten the venturi nuts Reassemble burner heads making sure they are reassembled in the correct way on the burner bodies base of cook top burner bottom of burner head Re t the pan...

Page 28: ...the three neons Disconnect the earth lead and lift the panel clear of the unit f Replace all parts in reverse order g When replacing any electrical connections refer to the wiring diagram 3 To Remove...

Page 29: ...burner heads b Undo the bezel venturi and remove the bezel from the hotplate The spark ignition wire will be pulled through the electrode clearance hole c Disconnect the spark electrode from the igni...

Page 30: ...the appliance from the electricity supply a Pull the unit forward to access the cover boxes at the appliance rear Remove the xings that secure the cover and lift it clear b Undo the terminal connecti...

Page 31: ...H oven door and undo the xings that secure the heat shield b Remove the top element bracket xings and withdraw element c Replace the element and re assemble parts in reverse order Check that the oven...

Page 32: ...de A3 Grill element right hand side B1 Left hand MF oven thermostat B2 Left hand MF oven function control B3 Left hand MF oven base element B4 Left hand MF oven top element outer pair B5 Left hand MF...

Page 33: ...ing handles Space for fixing See Positioning of Cooker Minimum space above hotplate 800mm Ratings Natural Gas L P Gas Hotplate Input Injector Bypass Input Injector Bypass Centre Burner 5 0kW 165 96 5k...

Page 34: ...34...

Page 35: ...35...

Page 36: ...ArtNo 000 0001 Aga address block...

Reviews: