The “automatic stop timer” delays stopping of the hood, which will
continue functioning for 15 minutes at the operating speed set at the
time this function is activated.
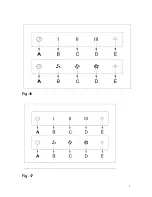
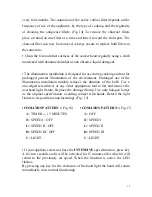
•COMANDS PATTERN :
( Fig.18)
A= Filtering system / Set clock
B= Delay Timer
C= Speed S1/ “-” adjust / off
D= Digital display
E= Speed S1/ “+” adjust / off
F= Alarm
G= Light
When the Key A is flashing, at the same time
“
”
is flashing on the
digital display, it reminds the user to clean the filters. After it’s cleaned and
then assemble back, push the key A till the light is off to set the function
again.
When pushing key A for 3 seconds, the clock “
”
on the digital
display flashing, push key A to switch to set hours and minutes, and then
push C or E to set the correct time. The Clock’s system is 24 hours.
When the motor is on, push the key B, the light is on, at the same time it
shows
“
”
is flashing as well on the digital display
,
and to
push key B to switch hours and minutes, and it’s to set the time to
automatically shut off the motor by pushing key C or E. Push key B for 3
seconds to stop the delay timer.
Push key C or E, the first speed is on, and it shows
“
”
on the digital
display
,
and push key C once again to turn off
;
To run the 2
nd
, 3
rd
and
“Turbo” speed, then push Key E. If it’s
“
Turbo
”
speed on, then push
E once again to turn off; and to push key C down to 3
rd
, 2
nd
and 1
st
speed. On the special function set, after the speed “TURBO” runs for
2 minutes, it automatically switches to 3
rd
speed.
Push the key F, the light is flashing, and it shows
“
”
flashing on
the digital display
,
to push key F to switch hours and minutes
,
and to set
the alarm time by pushing the key C or E. To stop the alarm, push the
key F. And to cancel the alarm set, then push the key F for 3 seconds.
Push the key G, the light is on, and it shows
“
”
on the digital display,
and push the G again to turn off the light.
16
Summary of Contents for HEE82-900MM
Page 1: ...USE AND CARE GUIDE ISLAND HOOD ...
Page 2: ...Fig 1 Fig 2 2 ...
Page 3: ...Fig 3 Fig 4 3 ...
Page 4: ...Fig 5 Fig 6 4 ...
Page 5: ...Fig 7 Fig 8 5 ...
Page 6: ...Fig 9 Fig 10 6 ...
Page 7: ...Fig 11 Fig 12 7 ...
Page 8: ...Fig 13 Fig 14 Fig 15 8 ...
Page 9: ...Fig 16 Fig 17 9 ...

