


5
Before you begin:
find a spot which is:
ó free form any obstacles in the attic area
ó free from obstacles in the ceiling
ó big enough to carry out the installation
ó big enough to use a step ladder
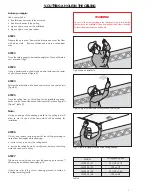
STEP 1
Prepare the work area. Remove the furniture and cover the floor
with a drop cloth. Remove children and pets to a safe distant
area.
STEP 2
Put on the safety goggles, dust mask and gloves. These will protect
your eyes and lungs.
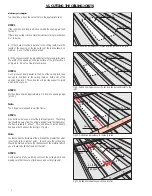
STEP 3
Using a hammer and a chisel make an initial hole near the center
of your chosen location (Figure 5).
STEP 4
Enlarge the initial hole with a hand saw until you can see the joist
(Figure 6)
STEP 5
Trace the cutting lines on the ceiling for the installation opening.
Make sure that one of the traced lines is parallel to the ceiling joist
(Figure7, table 2).
Note:
Having one edge of the opening parallel to the ceiling joist will
allow to use it as part of the frame which will be needed for
installation.
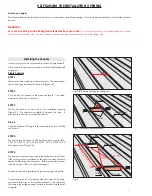
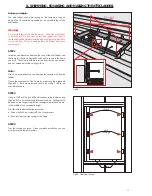
STEP 6
Cut out and remove remaining part of the ceiling according to
traced lines (rectangle) while observing:
a. not to cut any joists, only the ceiling board
b. remove the ceiling board by small pieces, because the ceiling
materials can be very heavy.
STEP 7
If there are no joists along or across the opening go to section 7
ď
Framing the installation opening
Ē
pg. 7-9.
If there are joists in the cut out opening proceed to section 6
ď
Cutting the ceiling joists
Ē
.
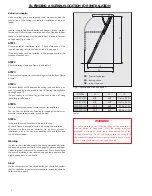
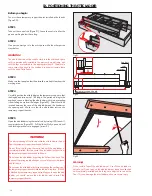
V. CUTTING A HOLE IN THE CEILING
WARNING!
Do not cut, file nor nail anything to the ceiling until you are sure that the
chosen space for installation is free from dangers and other obstacles.
Contact with electric wires can be deadly.
Fig.7. Draw a ractangle the size of the ceiling opening.
Fig.5. Make an initial hole.
Fig.6. Enlarge the initial hole so that you can see the joist.
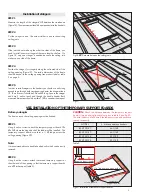
MODEL
Ceiling opening size
LWS-P 22/47
LWS-P 25/47
22-1/2
Ē
x 47
Ē
25
Ē
x 47
Ē
LWS-P 22/54
LWS-P 25/54
22-1/2
Ē
x 54
Ē
25
Ē
x 54
Ē
Table 2


