18
•
Do not operate charger with damaged cord or plug -
have them replaced immediately
.
•
Do not operate charger if it has received a sharp blow, been dropped, or otherwise damaged in any way.
Take
it to an authorized service centre.
•
Do not disassemble charger; take it to an authorized service centre when service or repair is required.
Incorrect reassembly may result in a risk of electric shock, electrocution or fi re.
• In case of damaged power supply cord the supply cord must be replaced immediately by the manufacturer, its service agent or
similar qualifi ed person to prevent any hazard.
•
Disconnect the charger from the outlet before attempting any cleaning. This will reduce the risk of electric shock.
Removing the battery pack will not reduce this risk.
•
NEVER
attempt to connect 2 chargers together.
•
The charger is designed to operate on standard 230V household electrical power. Do not attempt to use it on any
other voltage.
This does not apply to the vehicular charger.
SAVE THESE INSTRUCTIONS
Chargers
This charger requires no adjustment and is designed to be as easy as possible to operate.
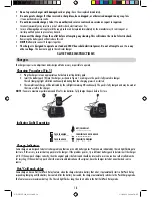
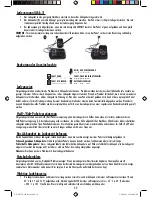
Charging Procedure (Fig.1)
1. Plug the charger into an appropriate outlet before inserting battery pack.
2. Insert the battery pack (D) into the charger, as shown in Figure 1, making sure the pack is fully seated in charger.
The red (charging) light will blink continuously indicating that the charging process has started.
3. The completion of charge will be indicated by the red light remaining ON continuously. The pack is fully charged and may be used at
this time or left in the charger.
NOTE :
To ensure maximum performance and life of Li-Ion batteries, fully charge the pack before fi rst use.
Indicator Light Operation
Charge Indicators
Some chargers are designed to detect certain problems that can arise with battery packs. Problems are indicated by the red light fl ashing at a
fast rate. If this occurs, re-insert battery pack into the charger. If the problem persists, try a different battery pack to determine if the charger
is OK. If the new pack charges correctly, then the original pack is defective and should be returned to a service centre or other collection site
for recycling. If the new battery pack elicits the same trouble indication as the original, have the charger tested at an authorized service
centre.
Hot/Cold pack delay
Some chargers have a Hot/Cold Pack Delay feature: when the charger detects a battery that is hot, it automatically starts a Hot Pack Delay,
suspending charging until the battery has cooled. After the battery has cooled, the charger automatically switches to the Pack Charging mode.
This feature ensures maximum battery life. The red light fl ashes long, then short while in the Hot/Cold Pack Delay mode.
PACK CHARGING
PACK CHARGED
HOT/COLD DELAY
PROBLEM PACK OR CHARGER
PROBLEM POWERLINE
D
NU-CL3.CC18S_0316.indd 18
3/30/2016 10:14:05 AM
Summary of Contents for CL3.CC18SD
Page 108: ...108 1 2 EL NU CL3 CC18S_0316 indd 108 3 30 2016 10 21 03 AM...
Page 109: ...109 RCD RCD 3 off on 4 5 NU CL3 CC18S_0316 indd 109 3 30 2016 10 21 03 AM...
Page 110: ...110 6 CCA NU CL3 CC18S_0316 indd 110 3 30 2016 10 21 06 AM...
Page 112: ...112 FACOM FACOM 2 230V NU CL3 CC18S_0316 indd 112 3 30 2016 10 21 15 AM...
Page 113: ...113 1 1 2 D 1 3 D NU CL3 CC18S_0316 indd 113 3 30 2016 10 21 19 AM...
Page 116: ...116 3A 1mm2 30 FACOM 3 D C 2 A 2 B 3 D C NU CL3 CC18S_0316 indd 116 3 30 2016 10 21 34 AM...
Page 118: ...118 1 2 FACOM FACOM FACOM NU CL3 CC18S_0316 indd 118 3 30 2016 10 21 47 AM...
Page 177: ...177 1 a 2 a RCD RCD 3 a BG NU CL3 CC18S_0316 indd 177 3 30 2016 10 26 36 AM...
Page 178: ...178 4 a 5 a 6 a NU CL3 CC18S_0316 indd 178 3 30 2016 10 26 37 AM...
Page 179: ...179 V W Hz min no min RPM IPM BPM A NU CL3 CC18S_0316 indd 179 3 30 2016 10 26 42 AM...
Page 180: ...180 FACOM 40 C 105 F ON li ion 15 FACOM NU CL3 CC18S_0316 indd 180 3 30 2016 10 26 48 AM...
Page 181: ...181 FACOM 230V 1 1 2 D 1 3 D NU CL3 CC18S_0316 indd 181 3 30 2016 10 26 50 AM...
Page 185: ...185 1 2 30 FACOM 3 D C 2 2 4 G G 4 3 D C NU CL3 CC18S_0316 indd 185 3 30 2016 10 27 09 AM...
Page 187: ...187 1 2 FACOM FACOM FACOM NU CL3 CC18S_0316 indd 187 3 30 2016 10 27 20 AM...
Page 245: ...245 1 2 a RU NU CL3 CC18S_0316 indd 245 3 30 2016 10 32 00 AM...
Page 246: ...246 3 a 4 5 NU CL3 CC18S_0316 indd 246 3 30 2016 10 32 00 AM...
Page 247: ...247 6 CCA NU CL3 CC18S_0316 indd 247 3 30 2016 10 32 03 AM...
Page 249: ...249 15 FACOM FACOM 2 230 NU CL3 CC18S_0316 indd 249 3 30 2016 10 32 13 AM...
Page 250: ...250 1 1 2 D 1 3 Li Ion D NU CL3 CC18S_0316 indd 250 3 30 2016 10 32 16 AM...
Page 253: ...253 3 A 1 2 30 FACOM 3 D C 2 2 3 D C NU CL3 CC18S_0316 indd 253 3 30 2016 10 32 31 AM...
Page 255: ...255 1 2 FACOM FACOM FACOM NU CL3 CC18S_0316 indd 255 3 30 2016 10 32 45 AM...
Page 268: ...268 CL3 BA1830 CL3 CH1018 NU CL3 CC18S_0316 indd 268 3 30 2016 10 33 45 AM...
Page 269: ...269 NOTA NU CL3 CC18S_0316 indd 269 3 30 2016 10 33 45 AM...
Page 270: ...270 NOTA NU CL3 CC18S_0316 indd 270 3 30 2016 10 33 45 AM...
Page 271: ...271 NOTA NU CL3 CC18S_0316 indd 271 3 30 2016 10 33 46 AM...


