C
HAPTER
5
PROCESS
5-10
EDITING RUNS
To Edit a Run
Header
:
Select a single Run or multiple Runs and use
EDIT/RUN HEADER
. You may change whatever
information you need to correct. Be very careful not to change the footspacing or Metric/Imperial
information unless you are sure of what you are doing. The most common Run Header changes are to the
Run Name, Start Point Elevation, and the Operator Name. If you select many Runs at once, you may
make "batch editing" changes, such as changing the slope or operator's name.
To Reverse a Run:
Select a Run, and then use EDIT/REVERSE. This will have the effect of "reversing" the Run so that it
appears that you collected it in the opposite direction. The IRI and elevations are not changed at all by
this action. This is useful for when you have collected several Runs in opposite directions and you want
to graph them together, all facing the same direction, to see how they compare.
To Rotate a Run:
Select a Run, and then use EDIT/ROTATE. This will have the effect of "rotating" the Run so that it
becomes parallel to the X axis. This makes it much easier to visualize the roughness of the profile, by
removing the elevation change from one end to the other. The graph display will now be "Zoomed in" to
allow you to see minor variations in the profile better. This won't help very much with extremely long
Runs that go all the way over small hills and valleys, but it is very useful in helping you to visualize the
roughness of short runs on a slope.
TO EDIT A RUN'S
READINGS:
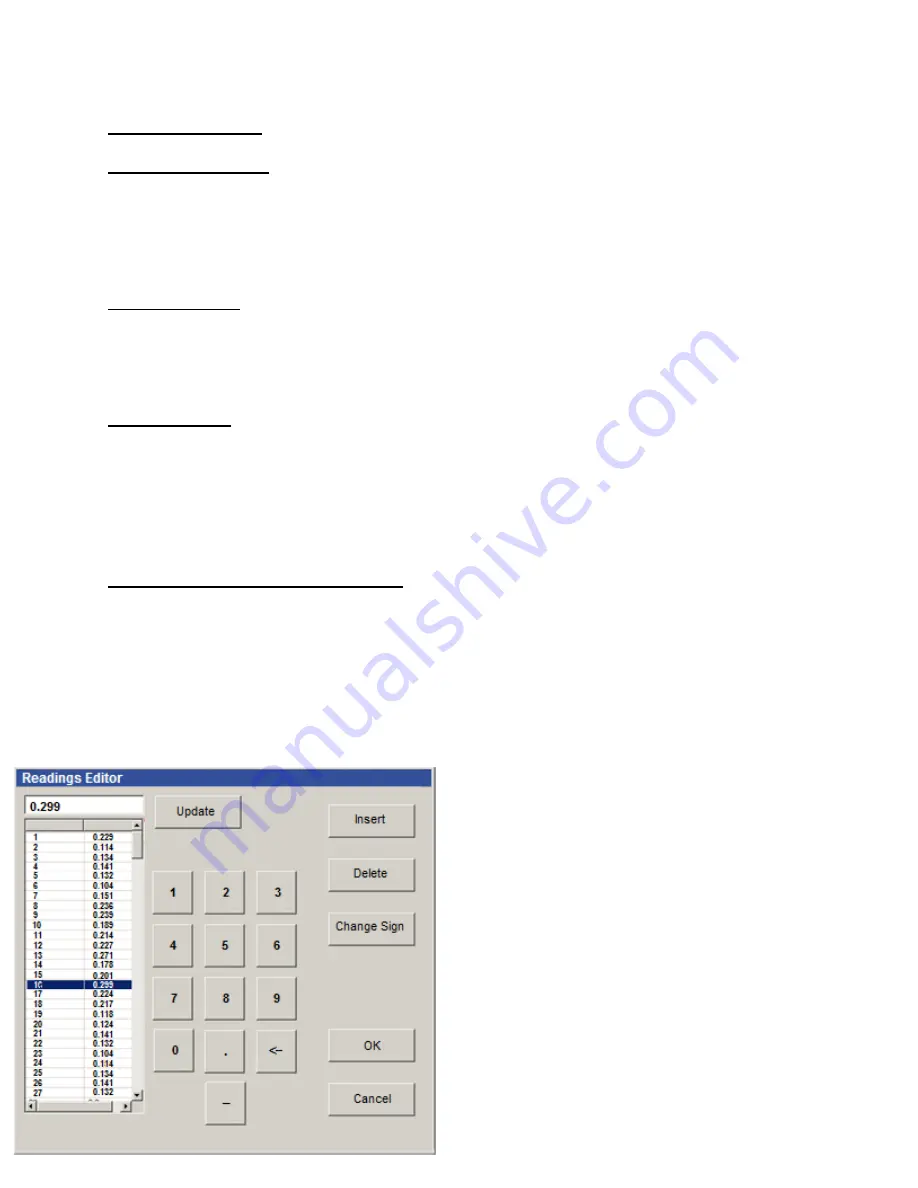
Select a Run, then use EDIT/READINGS.
Scroll down to the reading you want to change and click on it. The reading you select will be
displayed at the top of the screen where you may change it as appropriate. Type in the desired
reading, being sure to include a "-" sign, if required, and tap “Update” (on the Tablet) or press
<Enter>
(on your desktop PC) and the cursor will move down to the next lower reading on the list.
Readings are assumed to be positive unless you place a minus "-" sign in front of the reading.
Scroll down and click on the next reading you want to change. Continue entering your readings in
the same manner until all are entered. (You may make corrections by using the arrow,
backspace
, and
delete
keys.) When you have finished with this reading, tap “Update” or press press <Enter>, and the
cursor will move down to the next lower reading
on the list.
To
insert
a reading: Select (highlight) the place
where you want to insert a Reading, then click the
INSERT button.. A blank Reading will be
inserted just above where the cursor is located.
All you need to do is enter the correct value of the
reading.
To
delete
a reading: Select (highlight) the
Reading you want to delete and press the
“DELETE” button. The old Reading disappears.
Be sure you want to do this. If you want to delete
a
False Reading
, use "Remove False Reading"
(see below)
Summary of Contents for Dipstick 2200 Series
Page 2: ...This page is intentionally blank...
Page 7: ...DIPSTICK 2277 PARTS LIST v The Dipstick 2277 Case Behind the Top Foam Lid...
Page 10: ...This page is intentionally blank...
Page 24: ...This page is intentionally blank...
Page 42: ...This page is intentionally blank...
Page 60: ...This page is intentionally blank...
Page 68: ...This page is intentionally blank...
Page 80: ...This page is intentionally blank...
Page 86: ...This page is intentionally blank...


