FabianoSteel SVH 326 User Manual Download Page 14

EN

1. Touch the heating zone selection control button


 to select the cooking zone you wish to set timer for.

Note: For model 

SVH 646

, touch the

 "+"  or  "-" 

button of corresponding cooking zone to active it.

2. Touch the timer control button      , the number in timer  indicator flashing.

Note: 

For model 

SVH 646

, directly touch the

 "+"  or  "-"  

button of timer to active it.

3. Then adjust Timer setting

.

Setting the timer to turn cooking zone OFF

Note: 

By continuous touch the timer control button, the  slider works at below consequence: “Single Digit-Tens 

Digit-Confirm Setting-Single Digit-…”
3. When the minute minder is set, it will begin to count down immediately, the display will show the remaining 
time. 
4. Buzzer will beep for 30 seconds and timer indicator shows “- - “when the setting time finished. Any efficient 
touching of control buttons during it, would end up the buzzer beeps.

1) Touch control models: 

• Set heat setting by touching the "+"  or  "-" button.

• If press and hold either of the two buttons, the value will adjust down or up rapidly in circle.

Note: 

When the timer indicator flashing, touch timer control button another time, can quick confirm the timer 

setting.

2) Slider Touch control models:

• Touch the timer control button       once, the number of  single digit in timer indicator flashing, then adjust single 
digit of minute minder setting by sliding the slider control.
• Press the timer control button again, the number of tens  digit in timer indicator flashing, then adjust tens digit of 
minute minder setting by sliding the slider control.

4. When the timer is set, it will begin to count down immediately, the display will show the 

remaining time.

NOTE: 

The red dot next to power level indicator will illuminate for those zones be set with timer. 

You can check
timer setting of different cooking zone which set with timer, by active this cooking zone.

NOTE:

 If more than one heating zone has timer setting,  the timer indicator will show the lowest 

time. The red dot next to power level indicator will flash.
5. When cooking timer expires, the corresponding cooking zone will be switch off automatically.

Note: 

By continuous touch the timer control button, the slider  works at below consequence: “Single Digit-Tens 

Digit- Confirm Setting -Single Digit-…”

Note: 

The default setting of minute reminder and timer is 30 minutes.

Note: 

After adjusting, the setting in timer indicator will flashing for 5 seconds and then stop flashing, then the 

setting be confirmed.

Note: 

The minute reminder and timer can be use at same time, timer indicator shows the lowest time setting. If 

the lowest setting is minute reminder, the red dot next to timer indicator will flash. If the lowest setting is timer 

setting, the red dot of corresponding cooking zone power level indicator will flash.
Note: If indicator shows timer setting of cooking zone. To check minute reminder setting, press the timer control 

button       , the indicator will show minute reminder setting.
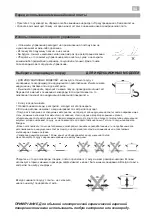
TIMER

 function 

 for all models      

Summary of Contents for SVH 326

Page 1: ...EN Built In Electric Induction hob User manual UA RU Models SVH 326 SVH 646 SIH 322 SIH 643 SIH 540 FHBI 3201 Lux FHI 172 iTC2 F L E X Z O N E F L E X Z O N E...

Page 2: ...Presentation Sunum Prezentare 1 2 1 Heating zones Is tma b lgeleri Zone de incalzire i 2 Control panel Kontrol Paneli Panou de control...

Page 3: ...ble fire hazards The induction generator complies with current EU l e g i s l a t i o n W e howeverrecommend that anyone fitted with a device such as a pacemaker should refer to their physician or if...

Page 4: ...stem like with any electrical appliance It is advised to refrain from using the induction hob during the pyrolytic cleaning function in the case of pyrolytic ovens due to the high temperature that thi...

Page 5: ...ck control button 6 ON OFF button Control panel 1 Cooking Zone selection button 2 Child Lock control button 3 Stop Go control button 4 Heating level Timer slider control 5 Booster function control but...

Page 6: ...Heating level Timer slider control 7 Booster function control button 8 Timer control button 9 ON OFF button Model SVH 646 NOTE Product diagrams in the manual for reference only there might be slightl...

Page 7: ...ually product improvements Control panel Model FHI 172 iTC2 1 Cooking Zone selection button 2 Stop Go control button 3 Timer control button 4 Heating level Timer slider control 5 Child Lock control bu...

Page 8: ...the pan you want to check 2 If does not flash in the display and water is heating the pan is suitable Cookware made from the following materials is not suitable for an induction hob pure stainless ste...

Page 9: ...and heat level control button for each cooking zone for these models Set heat setting by touching the or button for corresponding cooking zone If press and hold either of the two or buttons the value...

Page 10: ...when hob is working follows below 1 Active the cooking zone you want to use booster function Touch the heating zone selection control button to select the cooking zone you want to use boost function 2...

Page 11: ...be controlled separately When working as a single zone a cookware is moved from one zone to the other one within the flexible area keeping the same power level of the zone where the cookware original...

Page 12: ...for example children accidentally turning the cooking zones on by active Child Lock function When the controls are locked except the ON OFF control button and Child Lock control button all other touc...

Page 13: ...use the timer in two different ways You can use it as a minute minder In this case the timer will not turn any cooking zone off when the set time is up You can set it to turn either or more than one...

Page 14: ...utton again the number of tens digit in timer indicator flashing then adjust tens digit of minute minder setting by sliding the slider control 4 When the timer is set it will begin to count down immed...

Page 15: ...perature inside the hob When an excessive temperature is monitored the hob will auto stop operation Over heat Protection for all models Beware of hot surfaces When the hob has been operating for some...

Page 16: ...cleaning products or tools that could scratch the surface or steam operated equipment Light dirt not stuck to the surface can be cleaned using a damp cloth and a gentle detergent or warm soapy water...

Page 17: ...produce heat The container is not appropriate it does not have a ferromagnetic bottom or is too small Check that the bottom of the container attracts a magnet or use a larger container A humming is he...

Page 18: ...RU 8 8 o o...

Page 19: ...RU 20 3 25...

Page 20: ...RU Model SVH 326 1 2 Stop Go 3 Model SIH 643 4 5 6 ON OFF 1 2 3 Stop Go 4 5 6 7 ON OFF...

Page 21: ...RU 1 2 3 4 5 Stop Go 6 7 8 9 ON OFF Model SVH 646 1 Stop Go 2 3 4 ON OFF Model FHBI 3201 Lux...

Page 22: ...RU Model SIH 322 1 2 Stop Go 3 4 5 6 ON OFF Model FHI 172 iTC2 1 2 Stop Go 3 4 5 6 ON OFF 7 Boost Model SIH 540 1 4 5 Stop Go 6 7 Boost 8 9 ON OFF...

Page 23: ...1 2 140 RU...

Page 24: ...Minimum mm Maximum mm 160mm 140 160 180mm 140 180 210mm 160 210 280mm 230 280 200 400 x 200 1 3 2 3 3 SVH 646 0 9 1 1 2 1 3 3 4 0 9 5 5 5 RU...

Page 25: ...1 1 0 2 I T 1 Boost Booster Booster 5 1 2 Boost b 5 Booster Note 1 2 2 2 Boost Boost Boost Boost Boos Boos Model FHBI 3201 LUX RU SIH 540 SIH 540 BOOST...

Page 26: ...Model FHBI 3201 LUX RU...

Page 27: ...Lo 1 2 3 Lo 3 Note Stop Go Stop Go RU...

Page 28: ...99 1 2 1 Note Note SVH 646 1 2 RU...

Page 29: ...1 SVH 646 2 3 4 30 SVH 646 3 1 Note 2 Note 4 5 30 5 RU...

Page 30: ...Notes 1 2 2 3 1 H Failure Inspection for hob RU...

Page 31: ...RU 1 1 0 0 1 8 2 8 3 8 4 4 5 4 6 4 7 4 8 2 9 2 b BOOST 10 5 9 0 H...

Page 32: ...RU FabianoSteel PE LD EPS...

Page 33: ...RU E N 6 0 3 5 0 2...

Page 34: ...UA 8...

Page 35: ...UA 20 25 3...

Page 36: ...UA Model SVH 326 i 1 1 2 Stop Go 3 Model SIH 643 4 5 6 ON OFF 1 2 3 Stop Go 4 5 6 7 ON OFF i...

Page 37: ...UA 1 2 3 4 5 Stop Go 6 7 8 9 ON OFF Model SVH 646 1 Stop Go 2 3 4 ON OFF Model FHBI 3201 Lux...

Page 38: ...UA Model SIH 322 1 2 Stop Go 3 4 5 6 ON OFF Model FHI 172 iTC2 1 2 Stop Go 3 4 5 6 ON OFF 7 Boost Model SIH 540 1 4 5 Stop Go 6 7 Boost 8 9 ON OFF...

Page 39: ...1 2 140 UA...

Page 40: ...i Minimum mm Maximum mm 160mm 140 160 180mm 140 180 210mm 160 210 280mm 230 280 200 400 x 200 1 3 2 3 3 i SVH 646 0 9 i 1 1 1 2 1 3 3 ON OFF 4 0 9 5 5 5 UA...

Page 41: ...1 1 0 2 BOOST 1 2 Boost b 5 Booster Note 1 2 2 2 Boost Boost BOOST Model FHBI 3201 LUX UA SIH 540 SIH 540 BOOST...

Page 42: ...Model FHBI 3201 LUX I I UA 200...

Page 43: ...Lo 1 2 3 Lo 3 Note Stop Go Stop Go UA...

Page 44: ...1 Note Note SVH 646 1 UA...

Page 45: ...2 1 Note 2 4 5 30 UA...

Page 46: ...UA...

Page 47: ...UA 1 0 0 1 8 2 8 3 8 4 4 5 4 6 4 7 4 8 2 9 2 b BOOST 10 5...

Page 48: ...UA FabianoSteel PE LD EPS EN60350 2...

Page 49: ...UA...

Page 50: ...aims the appliance NOT to be considered as domestic waste and to warn for delivery to electrical and electronic waste collection centres Appliance disposal must be conducted in accordance with local...

Page 51: ...r mm Dimensiuni in mm Do not use silicone or glue for installation of the hob STANDARD SEAL AND FASTENER ONLY Oca n montaj i in silikon veya yap t r c kullanmay n YALNIZCA STANDART CONTA VE BA LANTI E...

Page 52: ...DARD INSTALLATION SYSTEM FAST CLICK SYSTEM Oven FIRIN CUPTOR Installation Kurulum Instalare M inimum distance Minimum mesafe Distanta minima Measurements in mm l mler mm Dimensiuni in mm Oven FIRIN CU...

Page 53: ...aims the appliance NOT to be considered as domestic waste and to warn for delivery to electrical and electronic waste collection centres Appliance disposal must be conducted in accordance with local...

Reviews: