background image

Version 07/11- Page 9

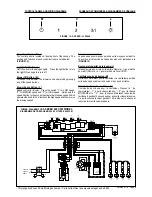
Rangehood Control Panel

The control panel is located on the side front of the canopy.  The 

position and function of each control button are noted below 

(FIGURE 12)

.

Light On/Off Button ( L )

On/Off switch for the halogen lights.    Press the light button to turn 

the light ON. and again to turn off.

Blower Off Button  ( M )

Off switch for the blower. The blower can be operated by pressing 

any of the speed buttons


Blower Speed Button ( V )

Speed control for blower.  


Press the switch "1" for LOW speed, 

"2" for MEDIUM speed and "3" for HIGH speed.  Hold down the 

speed 3 button for 5 seconds to activate the intensive speed. Which 

operates the hood for 10 minutes on the high speed and then returns 

the previous speed.

WIRING  DIAGRAM FOR 

3-SPEED 600 CFM MODEL

DIAGRAMME DE CÂBLAGE MOD

È

LE 3 VITESSE 600 PCM

• This rangehood uses 20 watt Halogen Lamps. / Cette hotte utilise les ampoule halogènes de 20 W.

CONTROL PANELS AND WIRING DIAGRAMS

PANNEAU DE COMMANDES & DIAGRAMMES DE CÂBLAGE

Panneau de commandes

Le panneau de commandes est situé sur le moyen sous la hotte. 

La position et la fonction de chaque bouton sont indiquées à la 

(

FIGURE 12

)

Bouton marche-arrêt de la lumière (L)

Interrupteur marche-arrêt pour la lumière. Régler à « 1 » pour mettre 

en circuit (ON) et à « 0 » pour mettre hors circuit (OFF).

Ventilateur outre de bouton (M)

Outre du commutateur pour le ventilateur. Le ventilateur peut être 

actionné en appuyant sur les boutons l'uns des de vitesse

Bouton de vitesse du ventilateur (V)

Commande  de  vitesse  pour  le  ventilateur.  Pressez  le  "  de 

commutateur ; 1" ; pour à vitesse réduite, " ; 2" ; pour la vitesse 

MOYENNE et le " ; 3" ; pour la vitesse. Maintenez le bouton de 

la vitesse 3 pendant 5 secondes pour activer la vitesse intensive. 

Ce qui fonctionne le capot pendant 10 minutes sur la vitesse et 

renvoie alors la vitesse précédente.

L

M

V

0

1

2

3

4

5

6

7

8

9

Creato da.

Rev :

Ver :

DOLCE CORRADO

Materiali: non deveno contenere Pb, Cr6+, Hg, PBB, pbde, ai sensi della direttiva 2002/95 CE

SCHEMA ELETTRICO M8-4V ESB FARETTI

Non rilevare quote dal grafico non apportare modifiche senza l'autorizzazione d'ufficio progettazione

a termini di legge ci riserviamo la proprieta' del presente disegno con divieto di riproduzione totale o parziale

Code :

Disegno N :

Data:

08.Set.2010

LINE IN
120Vac
60Hz ~

L
N

Y-G

WIRING BOX

BLU

RED

BLK

WHT

Y-G

1

2

3

4

5

6

BLK

V1

MC

F

V2

ESB

0

MOTOR

1

MOTOR

BR

W

G

R

Y

BL

U

1

2

3
6

5

4
7

8

9

1

2

3
6

5

4

9

8

7

RED

M8 4V

120V ~

W

H

T

BRW

2

SPEED

BL

U

BL

K

1

1

BL

K

BL

K

W

H

T

2

2

W

H

T

O

R

G

BR

W

3

3

BR

W

G

R

Y

4

4

G

R

Y

RED

WHT

BLU

Y-

G

BL

U

5

5

BL

U

3/I

SPEED

R

ED

6

6

R

ED

W

H

T

7

7

W

H

T

VL

T(

O

R

G

)

8

8

VL

T(

O

R

G

)

R

ED

(O

R

G

)

9

9

R

ED

(O

R

G

)

R

ED

10

10

R

ED

VL

T

11

11

VL

T

0-1

LIGHT

12

12

TOROIDAL

TRANSFORMER

W

H

T

4
3

BL

K

RED

2
1

BL

K

N

L

V4

L

V3

O

R

G

2
1

R

ED

O

R

G

4
3

VL

T

WHT

1

2

3

4

5

6

O

R

G

WHT

BRW

GRY

O

R

G

RED(ORG)

VLT(ORG)

R

ED VL

T

PRI.

SEC.

ELECTRONIC

TRNSFORMER

VL

T

R

ED

HALOGEN

LAMPS

VL

T

INCANDESCENT

LAMP

R

ED

HALOGEN

LAMPS

HALOGEN

LAMPS

HALOGEN

LAMPS

FIGURE  12 - 3-SPEED / 

3 VITESSE 

Summary of Contents for GLASSY

Page 1: ...oth sides of this unit must be a minimum of 18 above the cooking surface or countertop Consult the cooktop or range installation instructions given by the manufacturer before making any cutouts LISEZ...

Page 2: ...ll A hole cut through wood must be sanded until smooth A hole through metal must have a grommet WARNING TOREDUCETHERISKOFFIREORELECTRIC SHOCK do not use this fan with any solid state speed control dev...

Page 3: ...ication avec lui pour toute information Fermez le courant avant tout entretien et veillez a ce qu il reste ferm Si on ne peut pas verrouiller le panneaux du service lectrique affichez un avis de dange...

Page 4: ...upper chimney that came with hood Une chemin e sup rieure de 40 po HIGH1 OPTIONAL ACCESSORIES AVAILABLE AND DIMENSIONS ACCESSOIRES POUR L INSTALLATION dimensions d installatioN DIMENSIONS ACCESSORIES...

Page 5: ...ows Makesurethatthereisaminimumof 24 of straight duct between elbows if more than one is used Do not install two elbows together If you must elbow right away do it asfarawayfromthehood sexhaustopening...

Page 6: ...ts 5 For the most secure installation the MOUNTING SCREWS D in FIGURE 1 which mount the CANOPY SECTION Ain FIGURE 1 should be installed into wood Mark the wall along the horizontal line 4 9 16 in from...

Page 7: ...he side vent holes on the top towards the ceiling or flip the chimney and hide the holes under the lower chimney Install the UPPER CHIMNEY COVER B in FIGURE 1 by slightly widening the two sides and ho...

Page 8: ...hed in the dishwasher Stainless steel cleaner should be used on stainless rangehoods Abrasives and scouring agents can scratch stainless steel finishes and should not be used to clean finished surface...

Page 9: ...ut tre actionn en appuyant sur les boutons l uns des de vitesse Bouton de vitesse du ventilateur V Commande de vitesse pour le ventilateur Pressez le de commutateur 1 pour vitesse r duite 2 pour la vi...

Page 10: ...umbing 2 Service calls to repair or replace range hood light bulbs fuses or filters Those consumable parts are excluded from warranty coverage 3 Repairs when your range hood is used for other than nor...

Page 11: ...ou sans conduit Pour une installation avec conduit la ventilation peut s effectuer par le mur ou le plafond Pour une ventilation par le mur un coude de 90 est utilis AVERTISSEMENT AVANT DE FAIRE UNE...

Page 12: ...iqu dans X le SCH MA5 et installent les VIS de SUPPORT sur le mur partant au sujet de 1 4 entaillez entre le mur et la t te de la vis D terminez l endroit appropri pour chaque parenth se et installez...

Page 13: ...esaccrochant derri re les SUPPORTS de CHEMIN E e Fixez les c t s aux SUPPORTS de CHEMIN E avec les 4 VIS G de CHEMIN E Installez la COUVERTURE INF RIEURE de CHEMIN E c en largissant l g rement les deu...

Page 14: ...l acier inoxydable sur les hottes en acier inoxydable Ne pas utiliser de produits abrasifs ou de r curants car ils peuvent gratigner le fini en acier inoxydable et ils ne devraient pas tre employ s p...

Page 15: ...les de votre maison ou pour corriger votre c blage ou votre syst me de plomberie 2 Les appels de service pour remplacer ou r parer les ampoules les fusibles ou les filtres de votre hotte de cuisini re...

Reviews: