background image

11

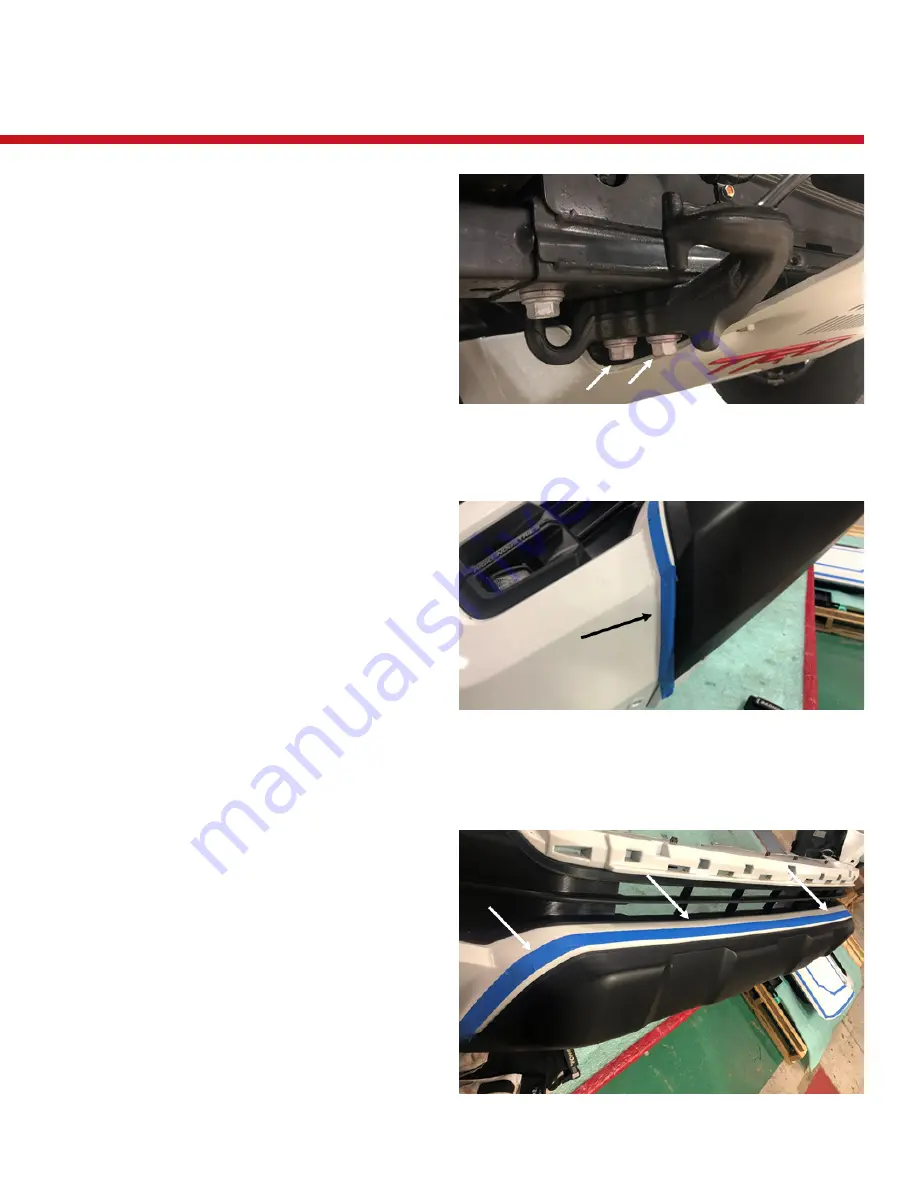
Figure 14

Figure 13

Figure 15

15.  Reverse the steps 1-8 to reinstall the 

bumper and grill.

14.  Take the OEM bumper and use 1” blue tape 

to create a cutting line around the plastic insert. 

On the lower face align the tape along the black 

plastic insert. On the upper face align the tape 

along the chamfered edge that surrounds the 

insert. Cut along the outside edge of the blue 

tape. (Figure 14-15)

13.  Use a 17mm socket wrench to remove the 

two bolts holding the passenger side tow hook. 

(Figure13)

Installation

Summary of Contents for N365X

Page 1: ...Installation manual winch mount Front Bumper Product number N365X Application 2016 19 toyota tacoma...

Page 2: ...jury Always use extreme caution when drilling a vehicle Always disconnect power before welding Thoroughly inspect the area to be drilled on both sides of material when possible prior to drilling and r...

Page 3: ...Table of contents SAFETY DISCLAIMER TABLE OF CONTENTS A MESSAGE FROM THE OWNER GETTING STARTED PROVIDED MATERIAL DISASSEMBLY INSTALLATION CONTACT 2 3 4 5 6 7 11 14...

Page 4: ...n of cutting edge technology for metal cutting and forming and an American workforce that puts its heart and pride into every product From design and manufacturing to quality and delivery Fab Fours mi...

Page 5: ...oduct we suggest laying out all materials and parts on a pad or protective surface Failure to fully account for all components before beginning installation may leave vehicle immobile until part is ac...

Page 6: ...ging all the OEM bolts when removing from the vehicle Failure to keep track of parts could lead to an inability to properly reinstall components Organization We recommend two people perform the instal...

Page 7: ...To release these clips lift up on the center portion and then pull the whole clip upwards With the clips removed pull firmly outward on the grille shell and it should pop loose Figure 2 Figure 1 Figu...

Page 8: ...he bumper cover on the inside of each side of the vehicle Figure 4 Figure 6 5 Using a 10mm socket wrench remove the two 2 screws at the bottom center of the bumper cover Figure 5 Figure 5 6 Using a 10...

Page 9: ...body panel pry tool remove the six 6 push lock clips from the top of the bumper cover Figure 7 8 Using a plastic body panel pry tool reach inside the bumper cover and pinch the two 2 clips holding the...

Page 10: ...0 Remove the impact bar from the vehicle Figure 10 Figure 11 11 Using a 17mm socket wrench remove the screw on either end of the bottom of the core support Leave the crash bars in place Figure 11 Figu...

Page 11: ...ting line around the plastic insert On the lower face align the tape along the black plastic insert On the upper face align the tape along the chamfered edge that surrounds the insert Cut along the ou...

Page 12: ...talling a winch Do so now by installing the front winch bolts into the winch leaving them a 1 4 loose Slide the winch into place and tighten the front bolts with a wrench The rear winch bolts can be i...

Page 13: ...ch to install the OEM bolt removed during step 11 Figure 18 Figure 18 20 Fully tighten all mounting hardware Maintenance Care Periodically check and tighten all fasteners Stripped fractured or bent bo...

Page 14: ...Fab Fours Inc 2213 Industrial Park Road Lancaster SC 29720 Phone 866 385 1905 Fax 866 574 1423 Email support fabfours com www fabfours com Contact information...

Page 15: ...If you re looking for more of the same Then you ve come to the wrong place Greg Higgs...

Reviews: