English | 19
www.ffgroup-tools.com
zle should only be directed at surfaces that can
withstand high pressure such as concrete or un-
painted metal. Do not use at clean wood.
f
Yellow - 15˚: This nozzle delivers a powerful 15˚
spray pattern for intense cleaning of small ar
-
eas. This nozzle should only be directed at sur
-
faces that can withstand high pressure such as
concrete or unpainted metal.
f
Green - 25˚: This nozzle delivers a 25˚ spray pat
-
tern for intense cleaning of larger areas. This
nozzle should only be directed at surfaces that
can withstand high pressure such as concrete or
unpainted metal.
f
White - 40˚: This nozzle delivers a 40˚ spray pat
-
tern and less powerful stream of water. This
nozzle can cover a wide area and should be used
for most general cleaning jobs.
f
Black - Detergetnt: This nozzle is used to apply
special chemical and cleaning solutions. The
output pressure of the machine should also be
lowered when this nozzle is used.
USING CHEMICALS
WARNING
Use only detergents specially designed for pressure
washers. Non suitable detergents can damage the
pump.
To use detergent with the pressure washer (Fig. 11):
1.
Attach the detergent hose onto the detergent
inlet port of the pump.
2.
Put the other end of the detergent hose into
the detergent container.
3. Attach the detergent nozzle on the lance (Fig.
10).
4. Spray the detergent onto a dry surface.
5.
Allow the detergent to act on the surface for
three to five minutes.
6. Rince the detergent from the surface with
clean water.
WARNING
After using detergent it is important that you clean
the pressure washer with clean water. Run clean wa
-
ter through the pressure washer for a couple of min
-
utes, after removing the detergent supply.
STOPPING THE UNIT
WARNING
Avoid stopping the engine suddenly at high speed or
under heavy load to avoid engine failure.
To stop the machine:
1. Move the ON / OFF switch to the “OFF” position
(Fig. 17.2).
2. Move the fuel valve lever to the “OFF” position.
3. Turn off the water supply.
4. Press the gun lever until the remaining water in
the pump, hoses and gun is released.
MAINTENANCE AND CLEANING
WARNING
Never do maintenance or cleaning with the unit run
-
ning. Always work on a cool unit. Before cleaning or
doing maintenance work, disconnect the spark plug
cap and read the relevant instructions. Always wear
proper clothing and protective gloves whenever
your hands are at risk.
Any adjustments or maintenance operations not de
-
scribed in this manual must be carried out by your
Dealer or a authorized Service Centre with the nec
-
essary knowledge and equipment to ensure that the
work is done correctly maintaining the machine’s
original safety level. Any operations performed in
unauthorized centers or by unqualified persons will
totally invalidate the Warranty and all obligations
and responsibilities of the Manufacturer.
Keep all nuts and screws tight to be sure the machine
is always in safe working condition. Routine mainte
-
nance is essential for safety and for maintaining a
high-performance level.
WARNING
Never use the machine with worn or damaged parts.
Faulty or worn-out parts must always be replaced
and not repaired. Only use original spare parts.
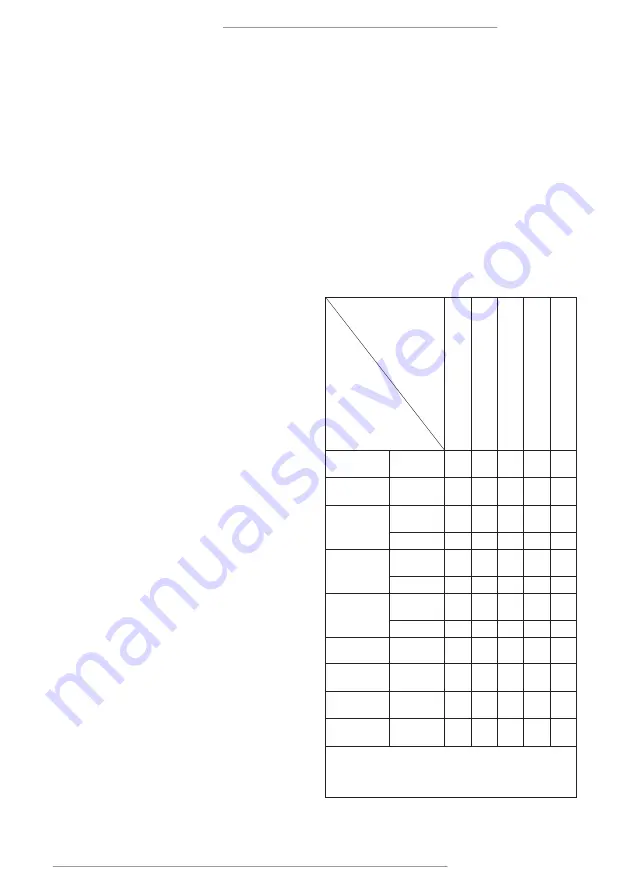
MAINTENANCE SCHEDULE
Items
B
ef
o
re e
ac
h u
se
A
ft
er 1
st m
o
nt
h o
r 1
0
hr
s o
f
op
er
at
ion
Ev
er
y 3 m
o
nt
hs o
r 5
0
hr
s o
f
op
er
at
ion
Ev
er
y 6 m
o
nt
hs o
r 1
0
0
hr
s o
f
op
er
at
ion
Ev
er
y 1
2 m
o
nt
hs o
r 2
0
0
hr
s o
f
op
er
at
ion
Complete
unit
Check
√
Control
handles
Check
√
Εngine oil
Check-
Refill
√
Replace
√
√
Pump oil
Check-
Refill
√
Replace
√
√
Air filter
Check-
Clean
√*
√
Replace
√
Fuel filter
Check -
Clean
√*
Fuel tube
Check -
Clean
√*
Deposit cup
Check -
Clean
√
Valve clear
-
ance
Check -
Adjust
√**
*These items should be replaced if needed.
**These items should be maintained and repaired only by
authorised dealer, that have the appropriate tools and the
required mechanical proficiency.
Frequency
GHPW 220 PRO | GHPW 270 PRO
Summary of Contents for GHPW 220 PRO
Page 4: ...4 5 4 GHPW 220 PRO GHPW 270 PRO ...
Page 5: ...www ffgroup tools com 5 6 7 1 3 4 2 1 2 3 4 GHPW 220 PRO GHPW 270 PRO ...
Page 6: ...6 8 9 2 1 1 2 2 1 3 1 2 GHPW 220 PRO GHPW 270 PRO ...
Page 7: ...www ffgroup tools com 7 10 11 2 1 0 15 25 40 GHPW 220 PRO GHPW 270 PRO ...
Page 8: ...8 12 13 14 2 1 4 3 1 2 GHPW 220 PRO GHPW 270 PRO ...
Page 9: ...www ffgroup tools com 9 15 16 17 OFF ON 1 CHOKE RUN 1 1 2 GHPW 220 PRO GHPW 270 PRO ...
Page 10: ...10 18 20 19 2 1 6 5 4 1 2 3 7 1 2 GHPW 220 PRO GHPW 270 PRO ...
Page 11: ...www ffgroup tools com 11 22 21 3 5 4 4 2 1 1 2 3 GHPW 220 PRO GHPW 270 PRO ...
Page 69: ...www ffgroup tools com 69 GHPW 220 PRO GHPW 270 PRO ...
Page 70: ...70 GHPW 220 PRO GHPW 270 PRO ...
Page 71: ...www ffgroup tools com 71 GHPW 220 PRO GHPW 270 PRO ...


