background image

5

2� Option B: Wireless Connection

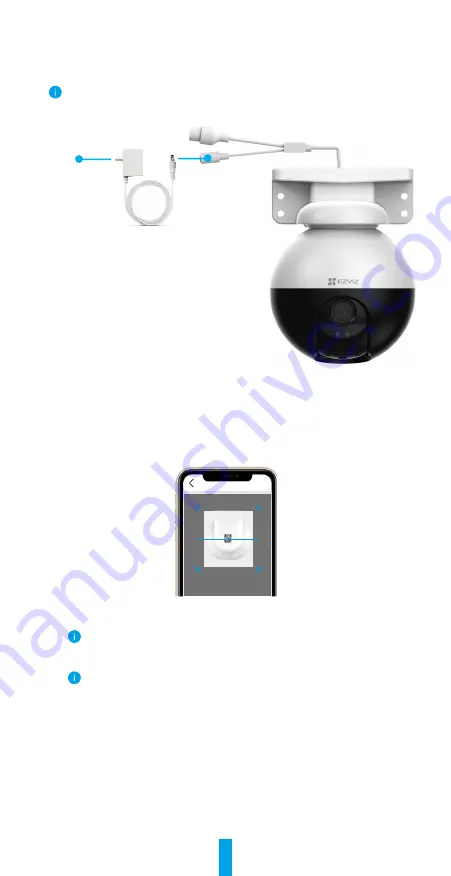
1. Connect the power adapter cable to the camera’s power port.

2. Plug the power adapter into an electrical outlet.

The LED turning fast-flashing blue indicates that the camera is powered on and ready for 

network configuration.

Outlet

Power Adapter

DC12V 1A

3. Add camera to EZVIZ.


-

Log in to your account using the EZVIZ app.


-

On the Home screen, tap “+” on the upper-right corner to go to the Scan QR 

Code interface.


-

Scan the QR code on the Quick Start Guide cover or on the body of the camera. 

Scan QR Code


-

Follow the EZVIZ app wizard to add the camera to EZVIZ.

• 

Please connect your camera to the Wi-Fi to which your mobile phone has been 

connected.

• 

The band of the Wi-Fi must be 2.4 GHz.

Press and hold the reset button for about 4s, and you can restart the camera and 

restore all parameters to default.

Press and hold the reset button for about 4s in any of the following cases:

• 

The camera fails to connect to your Wi-Fi network.

• 

You want to connect the camera to another Wi-Fi network.

Summary of Contents for CSH81H3

Page 1: ...INFRINGEMENT OF THIRD PARTY IN NO EVENT WILL EZVIZ ITS DIRECTORS OFFICERS EMPLOYEES OR AGENTS BE LIABLE TO YOU FOR ANY SPECIAL CONSEQUENTIAL INCIDENTAL OR INDIRECT DAMAGES INCLUDING AMONG OTHERS DAMAG...

Page 2: ...Connection 4 2 Option B Wireless Connection 5 Installation 6 1 Micro SD Card Installation Optional 6 2 Installation Location 6 3 Installation Procedure 6 4 Waterproof Kit Installation Optional 9 Opera...

Page 3: ...illing Template x1 Waterproof Kit x1 Screw Kit x1 Regulatory Information x1 Quick Start Guide x1 The power adapter s appearance is subject to the one you have bought 2 Basics Ethernet Port Power Port...

Page 4: ...SD card error Solid Blue App visiting camera Slow flashing Blue Camera running properly Fast flashing Blue Camera ready for Wi Fi connection Get the EZVIZ App 1 Connect your mobile phone to Wi Fi sug...

Page 5: ...ed on and ready for network configuration 3 Connect the camera to the LAN port of your router with the Ethernet cable purchase separately The LED turning slow flashing blue indicates that the camera i...

Page 6: ...to go to the Scan QR Code interface Scan the QR code on the Quick Start Guide cover or on the body of the camera Scan QR Code Follow the EZVIZ app wizard to add the camera to EZVIZ Please connect your...

Page 7: ...it The status will then change to Normal and then videos can be stored 2 Installation Location Choose a location with a clear unblocked field of view and with a good wireless signal Make sure the wall...

Page 8: ...7 Drilling Template Anchor Screw Fig 1 Ceiling Mount Drilling Template Screw Anchor Fig 2 Wall Mount...

Page 9: ...8 Pole Mount 1 Remove the protective film from the lens 2 Use the cable tie not provided in the package to fix the camera to the pole Fig 3 Pole Mount...

Page 10: ...Insert the gasket into the Ethernet port of the camera Ethernet Port Gasket 2 Thread A through the nut the gasket and the endcap A B Nut Gasket Endcap 3 Tighten the nut and the endcap A B Nut Endcap 4...

Page 11: ...to see more icons Icon Description Share Share your device with anyone you want Settings View or change the device settings Snapshot Take a snapshot Record Manually start stop recording Pan Tilt Rotat...

Page 12: ...Picture Tap to generate a 360 degree view picture Time Zone You can select time zone as needed here Date Format You can select date format as needed here Wi Fi Make your device offiline first and then...

Page 13: ...EZVIZ account so that Alexa can control your EZVIZ devices 6 You will see EZVIZ has been successfully linked then tap DISCOVER DEVICES to allow Alexa to discover all your EZVIZ devices 7 Go back to A...

Page 14: ...rks with Google and search for EZVIZ where you will find EZVIZ skills 5 Enter your EZVIZ username and password and tap Sign in 6 Tap the Authorize button to authorize Google to access your EZVIZ accou...

Page 15: ...nd enter the Device Details interface if the Initialize Storage Card button appears you need to initialize the micro SD card first 2 The micro SD card recording for the motion detection is enabled by...

Page 16: ...want to disconnect the device from the power source please unplug the DC power terminal that connects the power adapter and device Warning Flame may spread outside and ignite nearby combustible mater...

Page 17: ...of the quick start guide FCC Compliance Statement This device complies with part 15 of the FCC Rules Operation is subject to the following two conditions 1 This device may not cause harmful interferen...

Reviews: