background image


15 

7.7.2 Auto-Download 

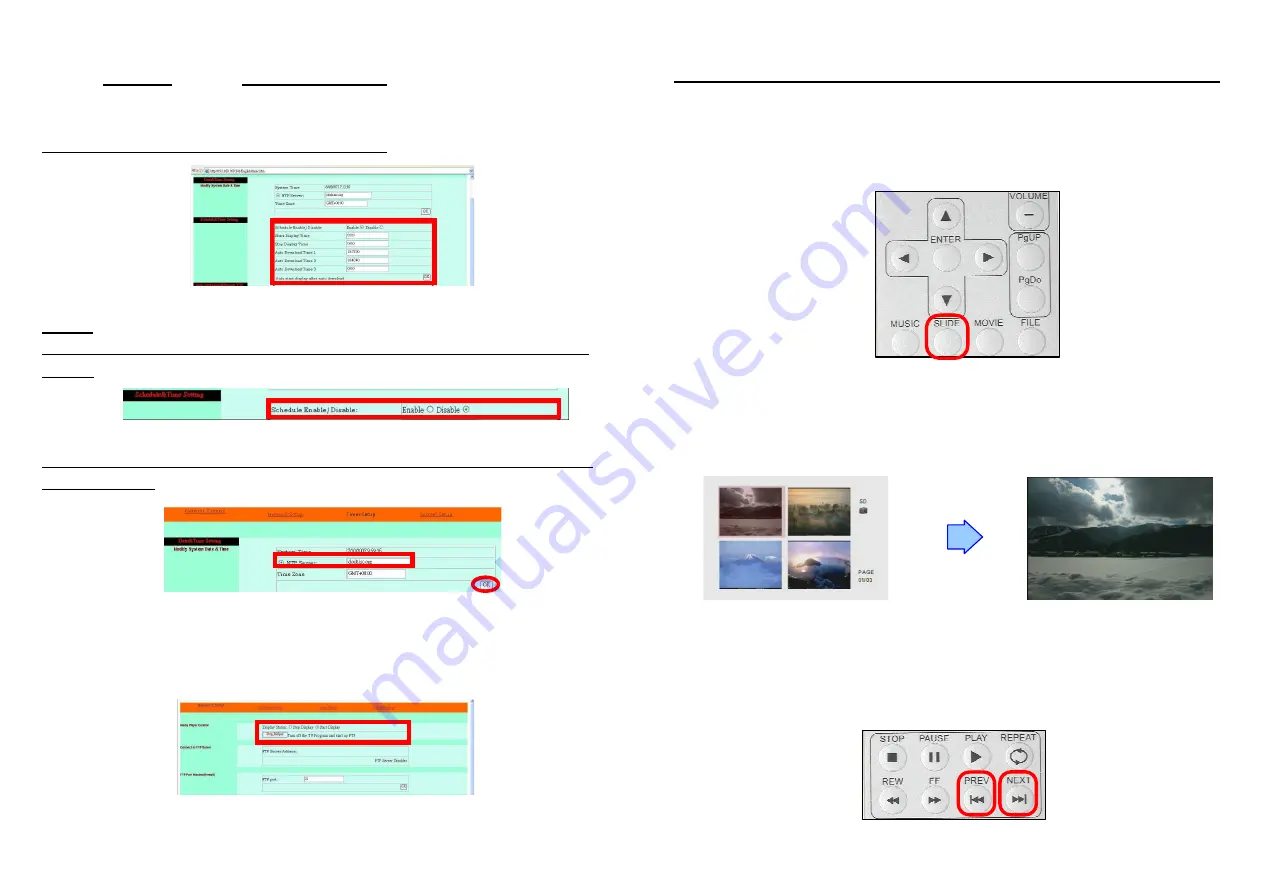
Select the “Timer Setup” first. In the “Schedule & Timer Setting” item, type in the auto download time. 

The P102-9 will auto download the latest files to memory card at the designated time from the 

designated server. 

PS. The P102-9 can define up to 3 auto download times per day. 


NOTE


1.  The  Auto-Download  function  must  be  disabled  before  setting  up  the  Manual  Download 

function. 


2. If the NTP server time synchronization error, please change the NTP server (clock.isc.org) 

to 204.152.184.72. 


7.8 REMOTE CONTROL TO DISPLAY MEDIA FILES 

Select “Stop Display” / “Start Display”, then click “Stop Display” / “Start Display” to stop or start display 

media files.   


16 

8. USING THE P102-9                                                     

Copy files (music, picture and movie) to the memory card first. 

8.1 PLAY PICTURE FILE 

Step 1: Press the “SLIDE” button on the remote control from any menu. 


Step 2: The preview mode will show all the picture files on the memory card. 

Use the “

” buttons to select the picture file, and press the “ENTER” button to play the 

picture file. 


Step 3: If the “SLIDESHOW MODE” is disabled, press the “NEXT” button to play the next picture file, 

the “PREV” button to play the previous file. 


Summary of Contents for P102-9

Page 1: ...ALLATION 6 7 1 Login P102 9 for the First Time 6 7 2 Router Quick Setup DMZ Function Setup 8 7 3 Connecting Multiple P102 9 to a Router 9 7 4 Limitation of the FTP Protocol 11 7 5 Connecting to ADSL 12 7 6 Auto Display Function 14 7 7 FTP Download Function 14 7 8 Remote Control to Display Media Files 15 8 Using the P102 9 16 8 1 Play Picture File 16 8 2 Play Music File 17 8 3 Play Movie File 18 8 ...

Page 2: ... 2 TFT LCD display and stereo speakers Includes a full function infrared remote control Network Function Uses Ethernet RJ 45 10 100 Base T Network Remote control function start and stop through the IE Browser Embedded FTP Server Upload delete download and rename media files under the CF card Support multiple network services HTTP User Interface FTP File Management PPPoE Fixed IP Address is recomme...

Page 3: ...horizontally Set the screen type to 16 9 or 4 3 No function Set the Brightness Contrast Color Hue Sharpness of the panel To save and quit the setting screen of panel Adjust the Brightness Contrast Color Hue Sharpness of the panel 4 6 SETTING UP Press the SETUP button on the remote control to open the SETUP MENU MAIN PAGE shown in the following figure There are five groups of sub menu in the setup ...

Page 4: ... TV type to PAL OSD LANG Select the OSD language ENGLISH FRENCH GERMAN ITALIAN JAPANESE PORTUGUESE SPANISH and NEDERLANDS OSD MESSAGE Turn the OSD message function on off RESET Reset all settings to the original factory settings FIRMWARE New F W can upgraded from the memory card EDITION Show the F W versions UPDATE Used to update the F W 6 7 NETWORK INSTALLATION 7 1 LOGIN P102 9 FOR THE FIRST TIME...

Page 5: ...Step 5 For example key in the following parameters and click Submit Login to the P102 9 Default IP Address http 192 168 1 100 Default User ID root Default User Password admin NOTE After setting up the Network reboot the system 8 7 2 ROUTER QUICK SETUP DMZ Function Setup If your network connection is setup as the figure below you will need to setup the router Method 1 Assign the DMZ function to the...

Page 6: ... a Local Virtual IP address and open a port for the P102 9 The following figure is an example you need to ask your Internet Service Provider 1 P102 9 IP 192 168 1 100 HTTP Port 6666 FTP Port 7777 2 P102 9 IP 192 168 1 101 HTTP Port 8888 FTP Port 9999 Step 3 On a Local PC enter the IP address http 192 168 1 100 or http 192 168 1 101 to log in the P102 9 1 or 2 Step 4 On a Remote PC enter in the IP ...

Page 7: ...ange the Remote PC to use a real IP address or change the P102 9 to use a real IP Address Method 1 Change the Remote PC to use a Real IP address Method 2 Change the P102 9 to use a Real IP address 12 Set up the Internet Explorer for the FTP client by checking the item Use Passive FTP for firewall and DSL modem compatibility Internet Option 7 5 CONNECTING TO ADSL We suggest that you connect to ADSL...

Page 8: ...lay files at the designated time 7 7FTP DOWNLOAD FUNCTION Complete the server setup first Timer Setup Auto Download Remote FTP Remote FTP Enable Disable FTP Address Type in the domain name of the FTP site or IP address as was given to you by your Web hosting provider FTP Port Number The default port for FTP is 21 In most cases you should not change this number If the FTP site uses a port other tha...

Page 9: ...rver clock isc org to 204 152 184 72 7 8 REMOTE CONTROL TO DISPLAY MEDIA FILES Select Stop Display Start Display then click Stop Display Start Display to stop or start display media files 16 8 USING THE P102 9 Copy files music picture and movie to the memory card first 8 1 PLAY PICTURE FILE Step 1 Press the SLIDE button on the remote control from any menu Step 2 The preview mode will show all the ...

Page 10: ...le Step 3 Press the NEXT button to play the next music file the PREV button to play the previous file 18 8 3 PLAY MOVIE FILE Step 1 Press the MOVIE button on the remote control from any menu Step 2 The preview mode will show all the video files on the memory card Use the buttons to select the movie file and press the ENTER button to play the movie file Step 3 Press the NEXT button to play the next...

Page 11: ... 20 9 TROUBLESHOOTING Situation Check Point No Picture 1 Check if the power supply is connected 2 Make sure the P102 9 is turned on No response from the remote control 1 Make sure there is a clear view between the remote control and the device 2 Change the remote control s batteries Memory card 1 Push cards gently and securely 2 If the card does not insert easily check the direction 3 Confirm form...

Reviews: