background image


10

8. USING THE B500B                           

8.1 USB AUTO-COPY FUNCTION 

Step1: 

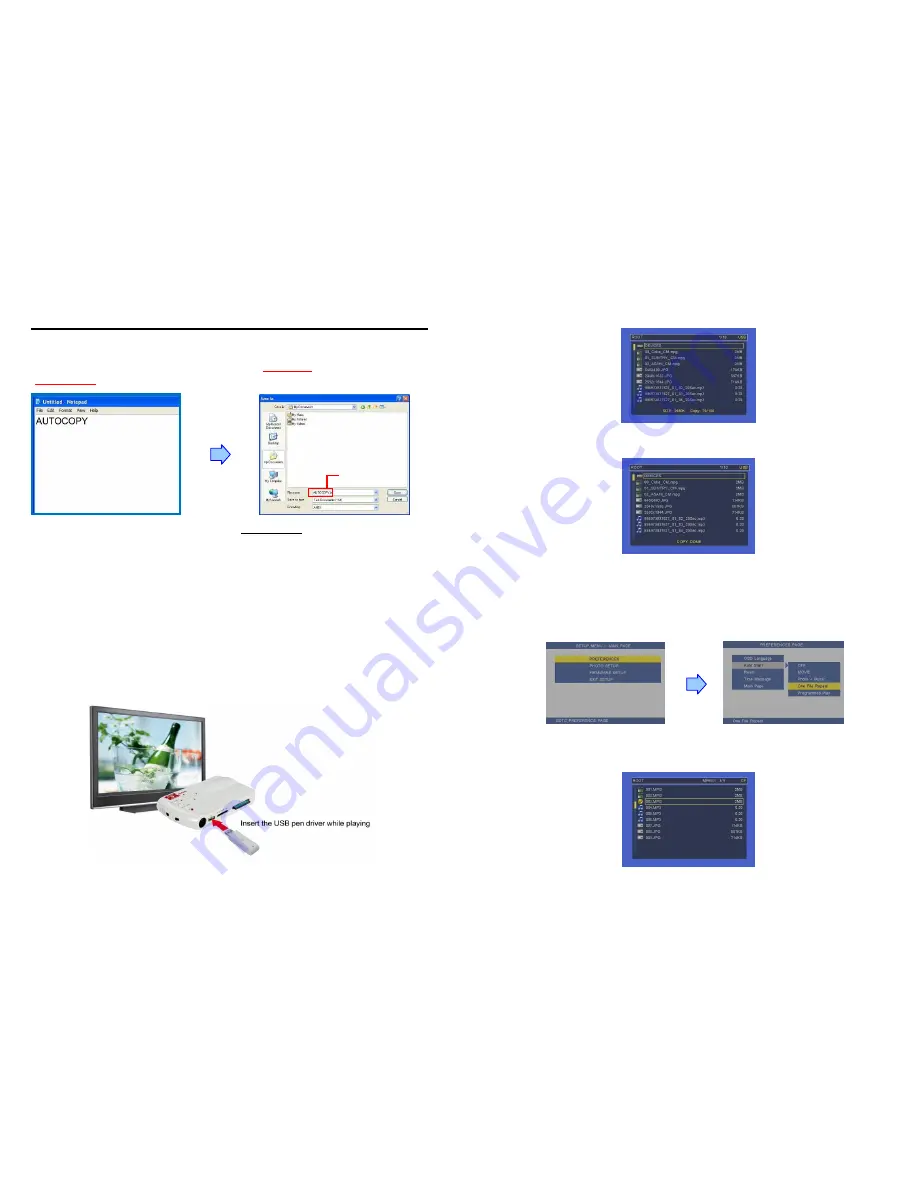
Use the “Notepad” to create a file on your PC. Type 

“AUTOCOPY

 and named the file 

“AUTOCOPY.ini”

.


Step2: 

Put the files that you want to copy and the file


AUTOCOPY.ini

” to the USB pen driver. 

NOTE:  

1. If the file “

AUTOCOPY.ini

” is not on Pen Driver, the B500B will not execute the Auto-Copy function. 

2. Please confirm there are no “Folder”, “Hidden File” and “System File” on the USB pen driver and CF card. 

How to see the hidden file: 

Browse your USB pen driver or CF card using “My Computer”. From the file menu click on “TOOLS” 

 “FOLDER 

OPTIONS”, then click on the “VIEW” tab. Select the option “SHOW HIDDEN FILES AND FOLDERS” inside the 
“Advanced Settings” box. If there are hidden files on the USB pen driver or CF card, they will now appear in your file 
list. 
3. If the total size of the files on the USB pen driver is bigger than the CF card size, the auto-copy function will stop 
after the CF card is full 
4. The transfer rate is up to 10MB per minute.


Step3: 

Insert the CF card and turn on the B500B. 

Step4: 

Insert the USB pen driver while playing media files. 


AUTOCOPY.ini 


11

Step5: 

The B500B will copy all files from USB pen driver to the CF card automatically. 

NOTE:

 All files on the CF card will be deleted before copying. 


Step6: 

After copying has finished, the message “COPY DONE” will appear. Remove the USB pen 

driver, and the B500B will play the files automatically. 


8.2 ONE FILE REPEAT FUNCTION 

Step1: 

Confirm the 

ONE FILE REPEAT

 function is enabled. 

<

PREFERENCES

 <

Auto Start

 <

One File Repeat

Please restart the B500B after setting, and the B500B will play the file automatically. 


Step2: 

Press the “STOP” button to stop playing, and the file list will be shown. Use the 

 and


buttons to select file, and press the “ENTER” button to confirm the selected file (the check mark will 
appear on the left side of the selected file). 


Step3: 

Restart the B500B after setting, and the B500B will execute the One File Repeat function. 

Summary of Contents for B500B

Page 1: ...ng Up 7 7 1 Preferences 7 7 2 Photo Setup 9 7 3 Firmware Setup 9 8 Using the B500B 10 8 1 USB Auto Copy Function 10 8 2 One File Repeat Function 11 8 3 Programmed Play Function 12 9 Optional Function...

Page 2: ...et the files to play on the list and make them in the order you like One File Repeat Function Repeat only the selected file USB Auto Copy Function Supports USB host for copying the media files from Pe...

Page 3: ...he pictures List all the music List all the videos Open the file library list all the files Pause resume playback Stop playback Play the selected file Select the repeat mode Forward videos or music Re...

Page 4: ...abled after power on the main menu will appear as shown in the following figure There are six items in the main menu Power Off Turn off the power switch or press the POWER button on the remote control...

Page 5: ...t the files to play on the list and make them in the order you like Reset Reset all settings to the original factory settings Timer Message Turn on off the time message displayed on the screen 9 7 2 P...

Page 6: ...rd size the auto copy function will stop after the CF card is full 4 The transfer rate is up to 10MB per minute Step3 Insert the CF card and turn on the B500B Step4 Insert the USB pen driver while pla...

Page 7: ...Programmed Play list NOTE Use the or button to select the Clear item and press the ENTER button to clear the Programmed Play list all the play lists will be deleted Step4 After finish setting press th...

Page 8: ...chedule In the Basic Schedule mode you can select files that you want to play and set up the volume and the play times of each file Add Click this button to add a file The following diagram appears z...

Page 9: ...n the Advance Schedule mode you can select files that you want to play and can also set up the volume the play times and the initial and end time of each file There are Time Setup and File Setup in th...

Page 10: ...Schedule or Advance Schedule can be saved Please add and edit a new schedule file first 19 Date Setup Error There are some errors in the Advance Schedule Check the date time of the schedule for confl...

Page 11: ...p6 When the meida files finishes playing the B500B resumes playing the default file repeatedly till the PIR Sensor detects any motion 21 9 5 PLAY BUTTON BOX Step1 Connect the Play Buttons to the Play...

Page 12: ...onding demo file If the B500B finishes playing the demo file without having any buttons be pressed it will resume playing the default file 00_xxx automatically 23 9 7 BAR CODE SCANNER 9 7 1 Using the...

Page 13: ...ng mode barcode 2 beeps Low high Step2 Scan barcode for the desired feature 1beep Step3 Scan Enter Exit programming mode barcode to save the configuration 2 beeps long short UPC EAN JAN Japanese Bookl...

Page 14: ...26 Code 39 Enable Code 39 Disable 27 Codabar Enable Codabar Disable...

Page 15: ...28 UPC EAN JAN Enable UPC EAN JAN Disable 29 ITF 2 of 5 Enable ITF 2 OF 5 Disable...

Page 16: ...30 Chinese Post Code Enable Chinese Post Code Disable 31 Code 128 Disable...

Page 17: ...32 Code 93 Enable Code 93 Disable 33 EAN 128 Enable EAN 128 Disable...

Page 18: ...34 Code 32 Enable Italian Pharmacy Code Code 32 Disable Italian Pharmacy Code 35 MSI enable MSI Disable...

Page 19: ...36 EAN 13 Convert to ISBN ISSN Enable EAN 13 Convert to ISBN ISSN Disable 37 UPC EAN ADD ON OFF ADD ON 5 only...

Page 20: ...38 ADD ON 2 only ADD ON 2 or 5 39 EAN UPC Add on none mandatory EAN UPC Add on mandatory...

Page 21: ...function is on 2 Check if the volume is set properly Can t execute auto copy function 1 Confirm the file AUTOCOPY ini is in the USB pen driver refer to the section 8 1 Can t execute Programmed Play f...

Reviews: