background image


23 

8.5 RS-232 FUNCTION (RS-232 cable is optional) 

Use  the  tool  “Hyper  Terminal”  or  other  tools  to  control  the  Eyezone  B1080PW-1  with  ASCII 
command. 
NOTE. 1.The available baud rates is 38400. 


2. The reaction time of B1080PW-1 is around three seconds. 


Keyboard Layout 

q

POWER 

-

VOL - 

w

SLOW 

R

RETURN 

*

MUTE 

>

NEXT 

!

REPEAT 

S

SELECT 

<

PREW 

~

SETUP 

A

Auto Download 

u

UP 

#

TV MODE 

p

PLAY 

d

DOWN 

%

AutoPlay 

P

PAUSE/STEP 

l

LEFT 

i

INFO 

x

STOP 

r

RIGHT 

m

NTSC/PAL 

f

FFW 

s

ENTER 

$

SEARCH 

b

REW 

C

CLEAR 

+

VOL + 

(XXXXX.XXX)

Play The File (xxxxx.xxx is the file name) 

NOTE

Must include the round brackets. 

﹝﹝﹝﹝

number

﹞﹞﹞﹞

: Play the file by index. (numbers < lowercase letter < upper case letters) 


Pin Assignment 

D Sub 9Pin Female 

D Sub 9Pin Female 

Pin 1 

Pin 4 

Pin 2 

Pin 3 

Pin 3 

Pin 2 

Pin 4 

Pin 1 

Pin 5 

Pin 5 

Pin 6 

Pin 6 

Pin 7 

Pin 8 

Pin 8 

Pin 7 

Pin 9 

Pin 9 


24 


Confirm that the Eyezone B1080PW-1 is already connected to the network. (Refer to 7.1) 


Confirm the “Local HTTP Server” function has been enabled, and the “Local HTTP Server 

Setup” set has been completed (refer to 7.2). 


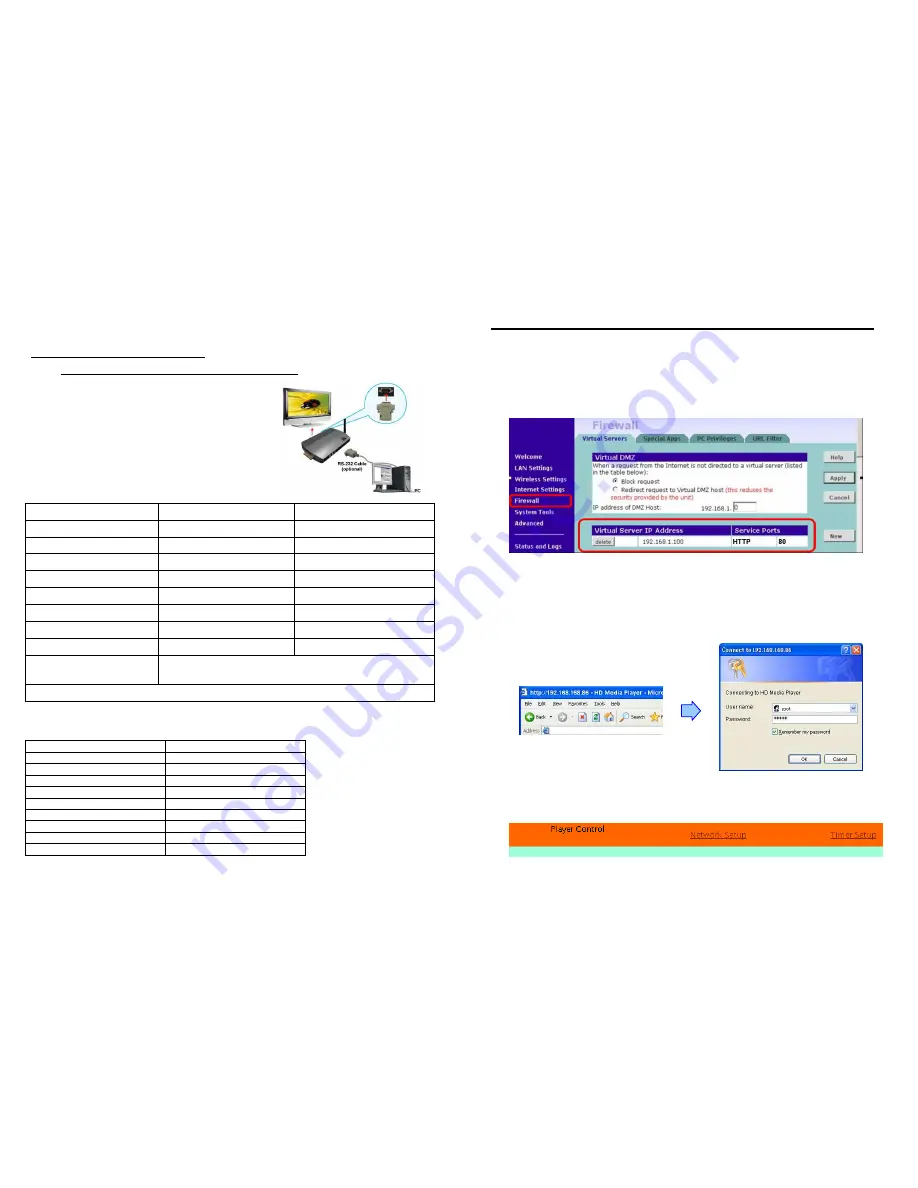
Set your router or firewall, and open a port 80 for the Eyezone B1080PW-1. The following 

figure is an example, please refer to your user’s manual of router for opening ports. 


Start IE on PC and type the HTTP site or IP


                In the local PC, please type “http://192.168.1.100”. 

                In the remote PC, please type “http://61.30.13.40:80”. 


Type the “User Name”, “Password” and click “OK” to log on. (Default User Name: root 

Default Password: admin) 


There are three items: “Player Control”, “Network Setup” and “Timer Setup” in the window. 


9. HTTP COMMAND FUNCTION 

Summary of Contents for B1080PW-1

Page 1: ...7 3 Video Setup 9 7 4 Other Setup 9 8 Using the B1080PW 1 11 8 1 Play Media Files on the CF Card 11 8 2 Download Function 14 8 3 Play the Media Files on the PC 17 8 4 Download Upload Media Files 20 8...

Page 2: ...Mode 60Hz 480P 720P 1080i PAL Mode 50Hz 576P 720P 1080i HDMI Output 480P 720P 1080i 1080P VGA output supports resolution 640x480 800x600 1024x768 1280x1024 1360x768 Supports RS 232 port for computer c...

Page 3: ...ile Open the setup menu Mute sound OSD display function on off Auto play function on off Mute sound Volume up down Move the cursor Confirm the selection entry Go back one layer Select the TV type NTSC...

Page 4: ...emote control to select the SETUP item then press the ENTER button You will be presented with the Eyezone B1080PW 1 settings screen You can also press the SETUP button on remote control to directly op...

Page 5: ...ssword are case sensitive Wi Fi Connection Status Shows the Wi Fi information SSID Name Quality Channel Connection Speed 8 7 2 FTP SETUP Local FTP Server Turn on off the Eyezone B1080PW 1 server If yo...

Page 6: ...SPDIF Out Supports Analog DPCM audio output Speakers Out Supports 2 channel amplifier output Lock Remote Controller Enable disable the auto key lock function The B1080PW 1 will auto lock when there is...

Page 7: ...URE LIBRARY 8 USING THE B1080PW 1 RETURN 12 8 1 1 Using the Remote Control When Media File Is Playing SETUP Press the button to adjust the brightness contrast or saturation while the movie or picture...

Page 8: ...e network Refer to 7 1 Network Setup Please use the button to select the DOWNLOAD item and press ENTER button The Eyezone B1080PW 1 will connect to the FTP server and download files automatically Befo...

Page 9: ...pe the User ID ipmedia Password 0000 and Port 21 Please enter the Network Timer NTP window of Eyezone B1080PW 1 and set up the Download Time then the Eyezone B1080PW 1 will download all the files from...

Page 10: ...ndows Media Player Version 11 and the window below will appear Step 3 Click the Library tab and then click Add to Library Step 4 Click Add and select the folder containing the media files you want to...

Page 11: ...AUDIO PICTURES you want to play and then press the ENTER button on remote control 20 Step 11 Select the file you want to play and press ENTER or PLAY button on the remote control to play the file NOTE...

Page 12: ...zone B1080PW 1 will be listed You can download and upload the media files between CF card and your PC NOTE After file being download upload will stop playing After downloading files the Eyezone B1080P...

Page 13: ...emale D Sub 9Pin Female Pin 1 Pin 4 Pin 2 Pin 3 Pin 3 Pin 2 Pin 4 Pin 1 Pin 5 Pin 5 Pin 6 Pin 6 Pin 7 Pin 8 Pin 8 Pin 7 Pin 9 Pin 9 24 Confirm that the Eyezone B1080PW 1 is already connected to the ne...

Page 14: ...the CF card on the Eyezone B1080PW 1 will be listed You can download and upload the media files between CF card and your PC Volume Control Enter the value for volume 0 30 Auto Play Select the auto pl...

Page 15: ...ample There are 6 demo files on the CF card The file names are a01 xxx 33 xxx b55 xxx 1abc xxx 07 xxx and A01 xxx xxx is extension of the file Default File 07 xxx Demo File 1 1abc xxx Demo File 2 33 x...

Page 16: ...epeat All when the demo file finishes playing The functions can be set in the setup menu Other Setup Play Button Repeat Default Eyezone B1080PW 1 will automatically play the default file when the demo...

Reviews: