background image

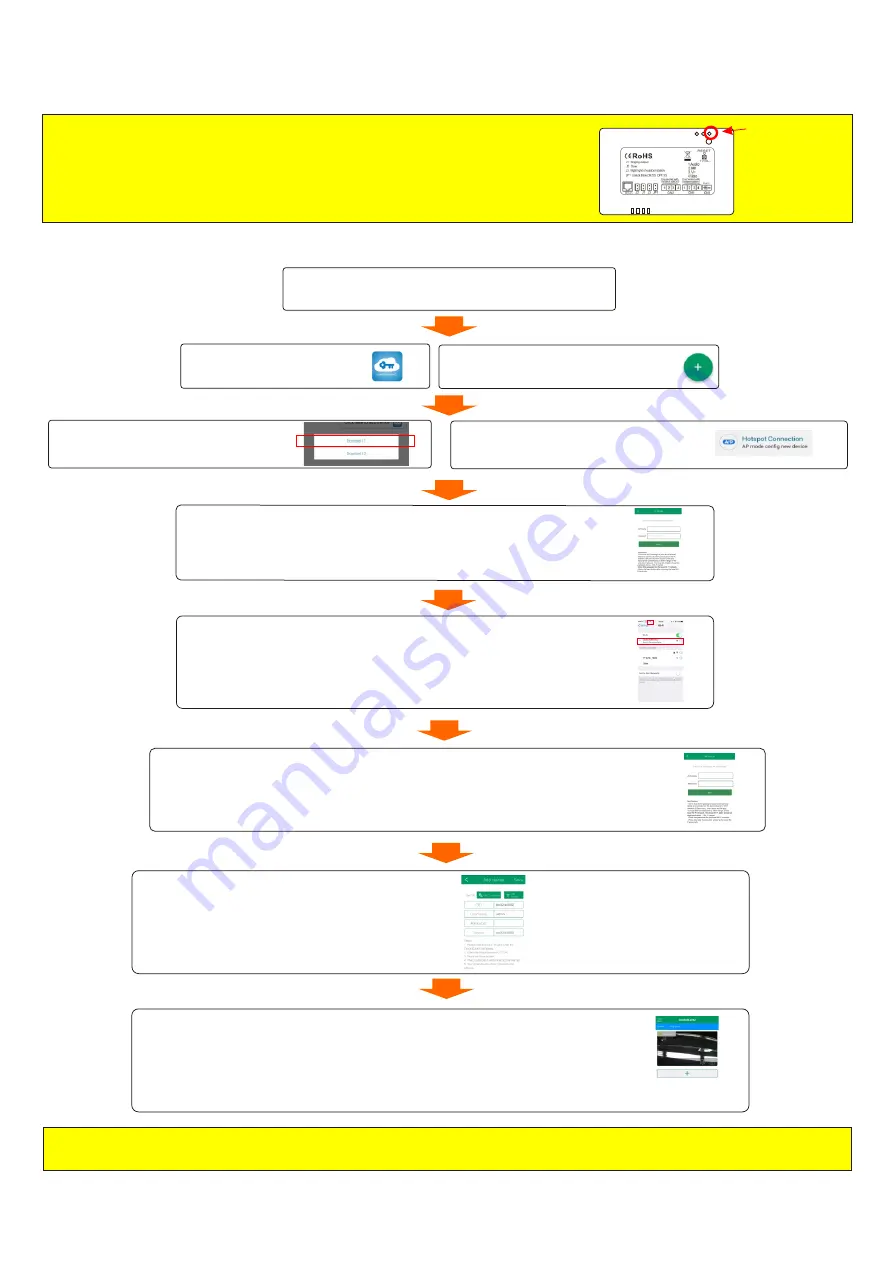
iOS Device Preliminary Setup

NOTE: This is the absolute FIRST step which is critical and must be 
performed to allow the unit to be configured to your settings

Press and hold the “RESET” button on the backside of the Net Link 
for 5 seconds WHILST the unit is powered ON and release 
the button after hearing the beep.

Reset Button

7. Minimize the controlcam2 APP and GOTO the WiFi settings on your 

phone/tablet and connect to the network named“LIDAW.....” 

6. Then the name of your local Wi-Fi network should then appear as shown.

Do not enter the password yet.

eyevision

1. After performing the preliminary hard reset (see above)

ensure your device is connected to the home WiFi network.

2. Enter the ControlCam2 APP

3. Press the “+” button to add a device

5. Press the 

button.

Hotspot Connection 

On the following screen press 

.

Next

4. Choose the Doorbell 1/Type 1 option.

Do not change the GID number

Do not change the GID number

Username

 is 

admin

Password

 is 

1234

Name 

is the display name within the 

APP such as “Home”

8. Then you will see the below details screen, 

enter the default password (1234) 

and the name of the device. 

Then press 

Save

.

9. Wait for approx 1 minute for the device to complete its automatic restart and 

connect to the WiFi network.

10. Press the thumbnail image to view live video.

NOTE: 

once the outdoor station is added to the app you will be able to connect to it over the internet either via Wi-Fi or mobile(3G/4G) data.

eyevision

7. Return to the controlcam2 APP, enter the WiFi password correctly and accurately then

press 

Next

Note: If the password is entered incorrectly it will present a connection issue and 

the process must be performed again including the initial hard reset.

eyevision

********

Page 17

Summary of Contents for EV-H298

Page 1: ...4 Wire Video Intercom System with Net link EV H7 EV H298KP EV H298FKP EV H304KP EV H304 4B EV H304FKP EV H304F 4B EV H298 Eyevisi n Net Link Eyevisi n Eyevisi n Eyevisi n Eyevisi n Eyevisi n Eyevisi n...

Page 2: ...it with netlink Page 10 Home System Wiring cont Two indoor to two outdoor units with netlink Four indoor to two outdoor units without netlink Page 11 Home System Wiring cont Four indoor to two outdoor...

Page 3: ...wet areas high temperature dust caustic and oxidation gas in order to avoid any unpredictable damage Every installation may vary slightly according to the user s requirements The recommended height fo...

Page 4: ...th 1 5mm Pair up to 200m Eyevisi n System jumper settings Remove the RING jumper J1 from the NETLINK only to eliminate a dual ringing tone on the outdoor unit There is no need to remove the ring jumpe...

Page 5: ...cm If the door station is mounted to low the camera may fail in seeing the guests face and will also present issues for communication Page 3 DC AC OUT OUT Standard 12V Power Adapter Max distance is 3m...

Page 6: ...rcom Line 3 Red B Intercom Line 4 Yellow Video Unlock Line 5 Green Relay N O Unlock Line 6 White Relay COM Intercom Line 1 Blue Audio Intercom Line 2 Black GND Intercom Line 3 Red B Intercom Line 4 Ye...

Page 7: ...Electric Striker Connection Fail Secure Power on to unlock Electric Striker Connection Fail Safe Power off to unlock Page 5 H298KP Front Rear View H298FKP Front Rear View LED Light LED Light Camera C...

Page 8: ...ack GND Black GND Black GND Standard Power Adapter Standard Power Adapter Standard Power Adapter 1 2 3 1 2 3 1 2 3 1 2 3 4 1 2 3 4 1 2 3 4 CN 3 1 12V 2 Negative GND CN 2 1 NO Exit Button 2 Button Comm...

Page 9: ...B Front Rear View H304F 4B Front Rear View LED Light LED Light Camera Camera Speaker Speaker Call Buttons Call Buttons Microphone Microphone Screw System Wiring Rain Cover Screws Plastic wall plug Rai...

Page 10: ...Note Only apartments requiring this feature require a netlink Monitor Expansion Each apartment requiring additional monitor s has the ability to do so with an expandability of up to FOUR monitors per...

Page 11: ...pter 12V Adapter 2C 2C Netlink Netlink CN 1 CN 1 CN 3 CN 3 CN 2 CN 2 12V Adapter 12V Adapter Door Striker or Auto Gate Door Striker or Auto Gate Keypad Door Stations Only Keypad Door Stations Only 2C...

Page 12: ...dapter 12V Adapter 2C 2C 2C 2C CN 1 CN 1 CN 1 CN 1 CN 1 CN 1 CN 2 CN 2 CN 2 CN 2 12V Adapter 12V Adapter 2C 2C Netlink Netlink CN 1 CN 1 CN 3 CN 3 CN 2 CN 2 12V Adapter 12V Adapter 12V Adapter 12V Ada...

Page 13: ...CN 2 CN 2 12V Adapter 2C Netlink CN 1 CN 3 CN 2 12V Adapter 12V Adapter Door Striker or Auto Gate Door Striker or Auto Gate Keypad Door Stations Only Keypad Door Stations Only 2C 2C 2C 2C Wiring Layou...

Page 14: ...Answering Visitor Calls Monitoring Transferring the Call Page 12...

Page 15: ...a momentary pulse only 6 Delete user PIN codes by user number 1 Enter the programming mode Default is 1234 2 Enter the 2 digit user number from 01 40 a long Di sound will be heard 3 Press to confirm a...

Page 16: ...ation The default setting is intercom enabled home mode which is not suitable for apartments Press and hold the unlock key on the monitor til a long beep is heard this confirms the unit is in apartmen...

Page 17: ...ect to confirm you have read the terms and conditions 8 Press the Submit button and a registration success message will appear 9 You will then see the login screen 10 Press the Login button to log int...

Page 18: ...g the preliminary hard reset see above GOTO the WiFi settings on your phone tablet and connect to the network named LIDAW you will be prompted there is no internet connection available on this network...

Page 19: ...he button Hotspot Connection On the following screen press Next 4 Choose the Doorbell 1 Type 1 option Do not change the GID number Do not change the GID number Username is admin Password is 1234 Name...

Page 20: ...ock password default is 1234 1 From the home screen within the APP press the icon 2 Locate the One Key Unlock option and press the highlighted icon to enable it The icon will turn green 3 Enter the un...

Page 21: ...que GID number the username admin and the default password of 1234 or the new password if already configured by WiFi 7 Press button in the upper right Save Page 19 Problems requiring Preliminary setup...

Reviews: