background image

EYE-LCD-5500-LHD

34


34

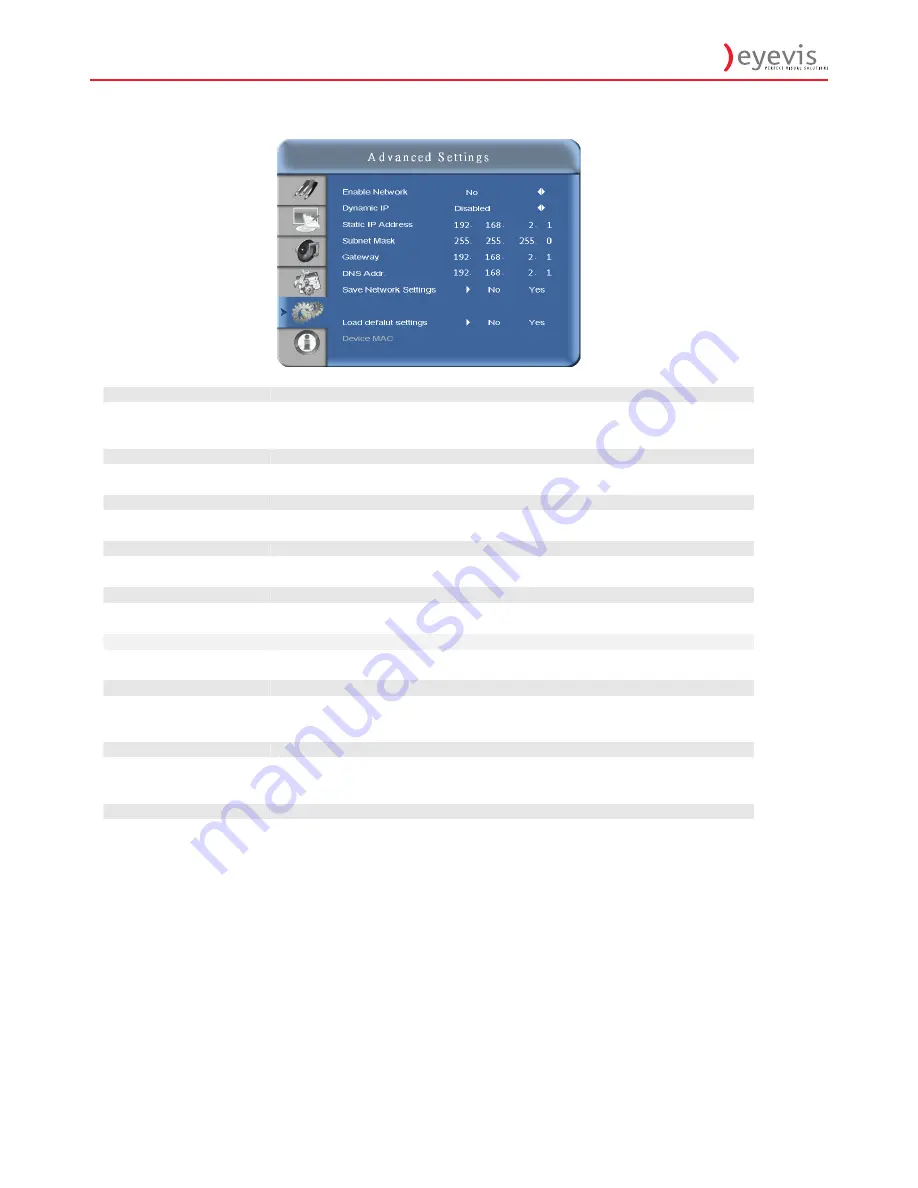
Advanced Settings Menu (continued) 


Enable Network 


Enable network feature   

Options:

 No, Yes 

Default

: No 

Dynamic IP 


Enable Dynamic IP mode   

Options:

 Disable, Enable 

Static IP Address 


Set static IP address 

Range: 

0

~

255.0~255. 0~255. 0~255 

Subnet Mask 


Set subnet mask 

Range:

 0

~

255.0~255. 0~255. 0~255 

Gateway 


Set gateway address   

Range:

 0

~

255.0~255. 0~255. 0~255 

DNS Address 


Set DNS address 

Range:

 0

~

255.0~255. 0~255. 0~255 

Save Network Settings 


Update the IP settings to net device . 

Options:

 No, Yes 

Default

: No 

Load Default Settings 


Load default network settings   

Options:

 No, Yes 

Default

: No 

Device MAC 


MAC Info 

Summary of Contents for EYE-LCD-5500-LHD

Page 1: ... EYE LCD 5500 LHD User s Manual Version 1 1 June 2011 EYE LCD 5500 LHD ...

Page 2: ...S 8 POWER INPUT 12 POWER INTERFACE 12 SIGNAL SOURCE INPUT 13 OPERATING THE MONITOR 14 THE TOP CONTROLLER OF THE MONITOR 14 ROTATING THE MONITOR 15 CHANGE THE RCU BATTERY 17 DISPLAY MODE 18 OSD ON SCREEN DISPLAY MENU FUNCTION 21 ON SCREEN DISPLAY OSD 25 DEFAULT SETTING 36 SUPPORTED TIMING 37 SPECIFICATION 38 TROUBLESHOOTING 39 COMPLIANCE 39 APPENDIX I MOVING AND CARRYING NOTICE 40 APPENDIX II STAND...

Page 3: ...EYE LCD 5500 LHD 3 3 Document History Title EYE LCD 5500 LHD User Manual Issue Date Oct 2010 Revision 01 Version Update Remark Ver 1 0 2010 Oct First version release ...

Page 4: ...to do so may result in fire or electrical shock Contact your dealer for inspection If water is spilled or objects are dropped inside the monitor remove the power plug from the outlet immediately Failure to do so may result in fire or electrical shock Contact your dealer for inspection If the monitor is dropped or the cabinet is damaged remove the power plug from the outlet immediately Failure to d...

Page 5: ...y cause a fire or electric shock Don t insert the power plug into an outlet other than 100 240V AC This may cause a fire or electric shock Don t use a damaged power plug or worn outlet Don t insert the improper power plug it may cause a fire and electric shock Don t place the monitor on an unstable shelf or surface The monitor may fall causing injury Please install on a horizontal stable level sur...

Page 6: ...lified service personnel to check the monitor If the liquid get s on the monitor s screen please clean it with a dry and soft cloth immediately Don t use any harsh chemical on the monitor If metal or liquid gets into the monitor it may cause a fire or an electrical shock Don t install or remove the power plug with wet hands This may cause an electric shock If the monitor will not be used for a lon...

Page 7: ... on the monitor periodically It is recommended to turn off the monitor for at least 6 hours after 18 hours of usage in a day to avoid image retention Exemptions This product isn t warranted for any damage caused by natural disaster such as earthquake thunder etc fire acts by third parties accidents owner s intentional misuse and fault or uses in other improper conditions This product isn t warrant...

Page 8: ...High color saturation DisplayPort input 2 HDMI v1 3 inputs with HDCP Audio function output Line out Internal speaker 10Wx2 Signal source auto detection OSD keypad lock function PIP PBP function Please see the chapter Display mode Overscan function Supports input main sub source detection Package Contents Unpacking Display is packed in a carton box and may be banded to 2 types of custom pallet depe...

Page 9: ...EYE LCD 5500 LHD 9 9 Step 2 Remove the top cushion and take the accessories Bag out Packing list ...

Page 10: ...EYE LCD 5500 LHD 10 Contents of the Accessory Bag VGA Cable D sub Power Cord black IR extender OSD Remote Control 2 piece batteries AAA inside ...

Page 11: ...EYE LCD 5500 LHD 11 Dimensions ...

Page 12: ...ide controls of the LCD monitor and the wall outlet Connect the power cord into main power of the monitor is power on O is power off Input 100 240V 5A 50 60Hz Power Interface Main power switch AC socket Please see the chapter Power input The top controller of the monitor The remote control RCU Main power Switch AC In socket The top of controller Single Input Interface I is power on O is power off ...

Page 13: ... input x1 4 DVI D input x1 D Sub 24 pin 5 VGA PC input x 1 D Sub 15 pin 6 PC audio in x1 Mini jack 7 IR Extender x1 Mini jack 8 Line Out x1 Mini jack Y Pb Pr Y Cb Cr input x 1 RCA G B R 9 Audio for Component input x 1 RCA W R 10 S video input x 1 Mini Din 4 pin Video input x 1 RCA 11 Audio for S Video Video input x 1 RCA W R 12 Power cord input AC input 13 AC switch ON OFF ...

Page 14: ...Top controller of the monitor OSD Key Pad function List Key Descriptions Power Power on Power off Source Source selection toggle Menu Right Volume Menu Left Volume Menu Up Menu Down Menu Exit Menu Exit selection Main Power switch AC In Input connecter ...

Page 15: ...ardless of the monitor being on or off Rotating the monitor When using the display in the portrait position the monitor should be rotated anti clockwise so that the right side is moved to the top This will allow for proper ventilation for the monitor Improper ventilation may shorten the lifetime of the monitor Then change the OSD rotation item from 0 to 270 on OSD menu Power ON Stand by Indicator ...

Page 16: ...e PIP position DisplayPort Select the DisplayPort source HD SDi 1 Not available at this model PIP Turns the PIP feature on and off S V Selects the S Video source HD SDi 2 Not available at this model SWAP Swaps the main source sub source picture P SOURCE Selects the secondary sub source MENU Opens the monitor s on screen menu system When the menu system is already open pressing this button will sel...

Page 17: ...r in the direction of the arrow and snap it back into place i Used batteries needed to follow the city rule to be discarded ii Avoid keeping used old batteries inside the remote control causing leakage of internal liquid resulting metal rust or fatal damage to the remote control hand unit iii Battery to be used according to the instruction About the remote control Don t drop shake or bump Don t pl...

Page 18: ...is no signal input for a period of time the monitor will automatically go to standby mode Adjusting the Volume 1 Using the remote press the VOLUME or VOLUME to increase or decrease the volume 2 Press the MUTE button to temporarily turn off all sound To restore the sound press the MUTE button again Selecting the input source 1 Using the remote press the desired source button VGA HDMI1 HDMI2 DVI Dis...

Page 19: ...ct the PIP sub source Using the remote press P SOURCE and use the arrow buttons to navigate to the desired sub source Press ENTER 4 To change the size and position of the sub source Using the remote press P POSITION to toggle through the options 5 To switch the main source and the sub source Using the remote press SWAP Main Top Left Top Right Bottom Right Bottom Left Small PIP Large PIP PIP Main M...

Page 20: ...ER to select the highlighted option 8 Side by Side Picture by Picture Press P POSITION button choose Side by side mode then the main source and the sub source will be on the screen display PIP Screen Table VGA HDMI 1 HDMI 2 DVI DisplayPort Video S Video Component VGA Yes Yes Yes Yes Yes Yes Yes HDMI 1 Yes Yes Yes Yes Yes HDMI 2 Yes Yes Yes Yes Yes DVI Yes Yes Yes Yes Yes DisplayPort Yes Yes Yes Ye...

Page 21: ...A HDMI1 2 DisplayPort DVI Comp S V Video PIP mode Select PIP mode Off Large PIP Medium PIP Small PIP Side by Side PIP Position Select PIP location Bottom Right Top Left Top Right Bottom Left Aspect Ratio Adjust the aspect ratio of the screen Full screen Pillar Box Letter Box PIP Main Zoom IN Zoom Out Enter Default Side by Side Scale Menu Return Auto Scan Select the Auto scan function Off On Displa...

Page 22: ...st from input source Light Sensor from ambient light Off DCR Light Sensor Enable Network Enable network feature Yes No Dynamic IP Enable Dynamic IP mode Disable Enable Static IP Address Set static IP address 255 255 255 255 0 0 0 0 Subnet Mask Set subnet mask 255 255 255 255 0 0 0 0 Gateway Set gateway address 255 255 255 255 0 0 0 0 DNS Address Set DNS address 255 255 255 255 0 0 0 0 Save Network...

Page 23: ...eo PIP mode Select PIP mode Off Large PIP Medium PIP Small PIP Side by Side PIP Position Select PIP location Bottom Right Top Left Top Right Bottom Left Aspect Ratio Adjust the aspect ratio of the screen Full screen Pillar Box Letter Box PIP Main Zoom IN Zoom Out Enter Default Side by Side Scale Menu Return Auto Scan Select the Auto scan function Off On Display Settings PIP Select source Select th...

Page 24: ... light Off DCR Light Sensor Enable Network Enable network feature Yes No Dynamic IP Enable Dynamic IP mode Disable Enable Static IP Address Set static IP address 255 255 255 255 0 0 0 0 Subnet Mask Set subnet mask 255 255 255 255 0 0 0 0 Gateway Set gateway address 255 255 255 255 0 0 0 0 DNS Address Set DNS address 255 255 255 255 0 0 0 0 Save Network Settings Update the IP settings to net device...

Page 25: ...EYE LCD 5500 LHD 25 25 On Screen Display OSD Menu Overview Image settings Display settings Main Display settings PiP Audio Settings ...

Page 26: ...EYE LCD 5500 LHD 26 26 Basic Setting Real Time Clock System Status Advanced Settings Network setup Ethernet function ...

Page 27: ...Press or select the desired level and then press ENTER Range 0 100 Default 50 Contrast Increases or decreases the contrast of picture Press or select the desired level and then press ENTER Range 0 100 Default 50 Sharpness Adjusts the definition of picture Press or select the desired level and then press ENTER Range 0 24 Default 10 Saturation Adjusts the brilliance and brightness only Video Mode Pr...

Page 28: ...rature to User Mode in order to adjust this setting Range 128 384 Default 256 Blue Gain Set Color Temperature to User Mode in order to adjust this setting Range 128 384 Default 256 Red Offset Set Color Temperature to User Mode in order to adjust this setting Range 50 50 Default 0 Green Offset Set Color Temperature to User Mode in order to adjust this setting Range 50 50 Default 0 Blue Offset Set C...

Page 29: ...rce Options HDMI1 HDMI2 VGA Component S Video and Video Default HDMI1 PIP PIP Mode Options Off Large PIP Middle PIP Small PIP and Side by Side Default Off PIP Position Options Bottom Right Top Left Top Right and Bottom Left Default Bottom Right Aspect Ratio Options Full screen Pillar Box Letter Box Default Full screen Side by Side Scale Submenu Options Zoom In Zoom Out Main PIP Default and Return ...

Page 30: ...in low tones bass Press or select the desired level and then press ENTER Range 0 20 Default 10 Treble Adjust the sound in high tones Treble Press or select the desired level and then press ENTER Range 0 20 Default 10 Balance Adjust the balance of the left and right speakers Press or select the desired level and then press ENTER Range 0 20 Default 10 HDMI Audio Input Select HDMI and PC audio input ...

Page 31: ...p Down Left Right OSD Zoom Options On Off Default Off OSD Rotation Select the OSD Rotation Press select the rotation Options 0 90 180 270 OSD rotation 270 is suitable for portrait mode Default 0 degree OSD Language Options English and Chinese Default English OSD Timeout Options 5 120 Default 30 Sleep Timer Set a period of time after which the monitor will switch to standby mode automatically Press...

Page 32: ...Time Clock Set date and switch alarm on and off Real Time Current time setting Year Month Date Hour Minutes Alarm Power ON Power on timer setup Options Disable Enable Default Disable Alarm Power OFF Power off timer setup Options Disable Enable Default Disable ...

Page 33: ...VGA ADC Settings Select ADC setting User ADC Calibration and restore factory default ADC setting Options Default User Default Default Flesh Tone Options Off Low Medium and High Only Video Mode Default Off Front LED Options On and Off Default On IRFM Creates slight frame motion to help avoid image retention Options On Default Off Baud Rate Options 115200 38400 19200 9600 Default 115200 Smart light ...

Page 34: ...atic IP address Range 0 255 0 255 0 255 0 255 Subnet Mask Set subnet mask Range 0 255 0 255 0 255 0 255 Gateway Set gateway address Range 0 255 0 255 0 255 0 255 DNS Address Set DNS address Range 0 255 0 255 0 255 0 255 Save Network Settings Update the IP settings to net device Options No Yes Default No Load Default Settings Load default network settings Options No Yes Default No Device MAC MAC In...

Page 35: ...9 0 KG EYE LCD 6500 107KG Storage Temperature Min 20 C Max 60 C Operating Temperature Min 5 C Max 35 C Environment Humidity 85 RH 35 C Plug and Play DDC 2B Compliance RS232 D Sub 9 pin RJ 45 in out OSD key 7 keys SOURCE MENU EXIT Function Wall mount 400 x400 400 x600 VESA standard Option Speaker Input 1Vp p Output 10W 4 x2 Technology Optical Method Finger gloved hand or any other pointer Interface...

Page 36: ...he calibration 5 After calibration is completed the display will notify user if the process is done successfully by different messages Default Setting Item Default Power switch Off Scheme User Brightness 50 Sharpness 12 Back light 80 Contrast 50 Color Temp 9300K Source Auto Detection Off OSD Language English Auto Off Smart light control Off IRFM Off Baud rate 115200 Ethernet Off ...

Page 37: ...1 83 O O O O 1152x864 67 5 75 108 O O 63 981 60 02 108 O O 79 976 75 025 135 O O SXGA 1280x1024 91 146 85 024 157 5 O O 64 744 59 95 101 O O SXGA 1400 x 1050 65 317 59 98 121 75 O O 55 469 59 901 88 75 O O O O 1440 x 900 55 935 59 88 106 5 O O O O 64 674 59 883 119 O O O O WSXGA 1680 x1050 65 29 59 954 146 25 O O O O UXGA 1600 x 1200 75 60 162 O O O O 1920 x 1080 66 587 59 93 138 5 O O O O VESA WU...

Page 38: ...GA XGA WXGA HD monitor Full Screen Display WUXGA Power Management VESA DPMS DVI DMPM Energy Star Performance OSD Language English and Chinese Power Source Power Input AC 100V 240V Operation Mode 226W Power Saving Mode 1W Input Frequency Range 50 60 Hz Power Consumption Rated Input Volt AC 100 240V Dimension W H D 1265 8 W x736 6 H x46 2 D Net Weight 29 KG Physical Gross Weight w packing 35 KG Stor...

Page 39: ...rectly Check the input signal is compatible with this display The image is not centered Check the input signal is compatible with this display The image is not locked correctly Check the input signal is compatible with this display The remote control doesn t work Make sure the batteries fresh and are installed correctly Ensure the remote is aimed at the IR sensor on the front of the display The pi...

Page 40: ...onitor requires at least two people If not it may drop and a serious injury may result Moving shipping the monitor please hold the white handles Carrying Notice This monitor is heavy please follow as below instruction when you ready to carry the monitor If not it may cause an injury NG OK ...

Page 41: ...oth This will help prevent the monitor from being scratched 2 Remove the screws M8 15 screw x4 from the stand bracket at the back of the monitor 3 Align the stand brackets with the mounting holes and attach the brackets to the monitor using the screws removed in Step 2 Caution Longer screws will damage the monitor Use maximum 15mm 0 59 long screws 8mm Metric Remove the 4 screws from back of the mo...

Page 42: ...3 Before installing please make sure the wall is strong enough to hold the necessary weight of the display and the mount Step1 Keep the display facing the ground and place it on a flat object Step2 Remove the 4 screws M8 15 from the back of the monitor Step3 Align the wall brackets with the mounting holes and attach the brackets to the monitor using the screws removed in Step 2 Caution Longer scre...

Page 43: ...EYE LCD 5500 LHD 43 43 Appendix III Wall Mount Safety Notes Wall mounting safety Notes ...

Page 44: ...EYE LCD 5500 LHD 44 44 ...

Page 45: ...ndows XP 64 bit Edition Windows XP 32 bit Edition Windows 2000 LAN Connection PC connects with display by LAN through Hub or Switch Network Setting LAN Default setting are as follows DHCP Disable IP ADDRESS 192 168 2 1 SUBNET MASK 255 255 255 0 DEFAULT GATEWAY 192 168 2 1 DNS Addr 192 168 2 1 The IP address and subnet mask of the Public Display can be set on the NETWORK SETTINGS screen of the web ...

Page 46: ... the installation process is completed How to use VCOM 1 Double click the VCOM icon then the VCOM program will show up on the desktop 2 VCOM program introduction 3 VCOM Function descriptions Device info shows the display IP information Exit for exiting the VCOM utility Search for searching device in same domain Search by IP for searching device by IP address Configure for configuring device Web fo...

Page 47: ... show all searched devices on the table In addition the IP domain of PC needs to be same as the domain of device 3 2 Searching device by IP Press the Search by IP icon the VCOM will search all devices in arranged IP address Then show all searched devices on the table If VCOM found the display successfully the Monitor information is displayed in the search window ...

Page 48: ...E LCD 5500 LHD 48 49 4 COM Mapping COM Mapping shows the display COM PORT information Add for creating a virtual COM port Remove for removing an existing virtual COM port Exit for exiting the VCOM utility ...

Page 49: ...EYE LCD 5500 LHD 49 50 4 1 Adding a virtual COM Press the Add icon the following window will pop up ...

Page 50: ...s the Rescan button The number of COM can be assigned by user Then OS will create a virtual serial port 4 2 Remove Select a COM port and press the Remove button the COM port will be removed 5 Communication Settings Provide a controller program to control both serial port or LAN connections check the COM port and baud rate is same then the display can be controlled through the LAN from the controll...

Page 51: ...EYE LCD 5500 LHD 51 52 6 7 Kjk 8 Lkj 9 ...

Reviews: