

Renaming the NetPA U 2002 SB Amplifier in Dante Controller
1.
From the control computer
Start
menu select:
All
Programs > Audinate > Dante
Controller > Dante
Controller
2.
The
Dante
Controller
-
Network
View
screen opens. All Dante devices on the network are discovered and listed.
3.
From the Device menu, select
Device
View
or press <
Ctrl+D
> on the keyboard.
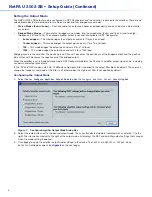
4.
The
Dante Controller
-
Device
View
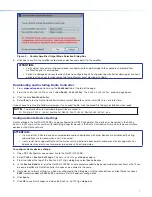
dialog opens. Select the device being configured from the
(Select
a
Dante
Device...)
drop-down list. The
Device View
dialog populates with the selected NetPA U 2002 SB information (see figure
9 below).
Figure 9.
Populated Device View Dialog Box
5.
Click the
Device
Config
tab to open the
Device
Config
page.
6.
In the
Rename
Device
panel,
enter the new name of the device in the text field.
NOTE:
No spaces are allowed in the name and names should be significant identifiers. For example,
NetPAUAmplifier-MainRack
7.
Click
Apply
. A confirmation prompt opens. Click
Yes
to confirm the new name.
8.
Repeat as necessary for all devices.
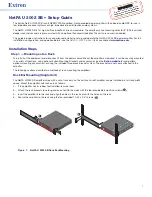
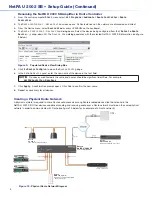
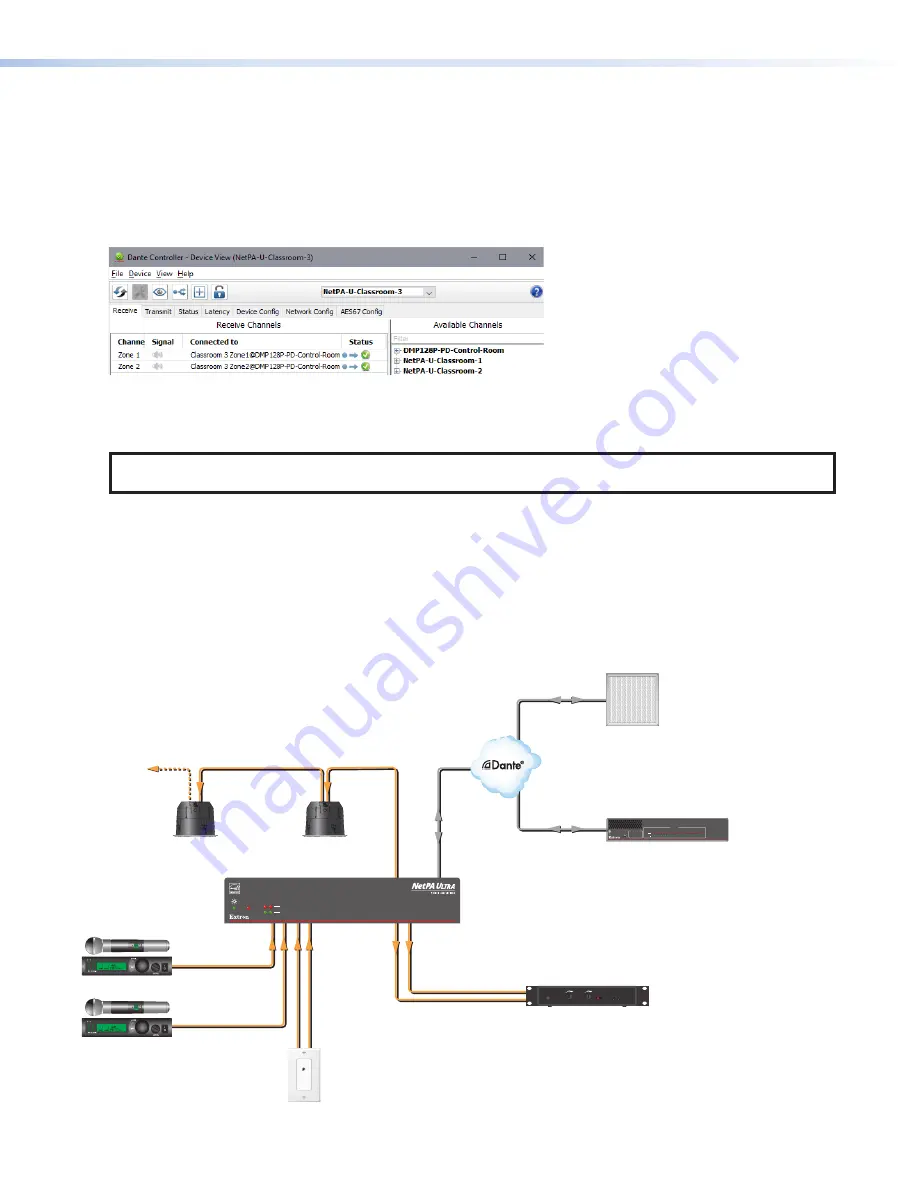
Creating a Physical Dante Network
A physical network is required to share Dante audio channels among Dante-enabled devices like those found in the
NetPA U 2002 SB. Other devices capable of sending and receiving audio over a Dante network must be on the same physical
network in order to communicate with Dante (see figure 10 below for an example of a Dante network).
AUDIO
Extron
mute
select
mute
select
NetPA U 2002 SB
LIMITER/PROTECT
SIGNAL
OVER
TEMP
2
1
INPUTS
ACTIVITY
CONFIG
EXP
LAN
XMP 240 C AT
EXPANSION MATRIX PROCESSOR
1 2 3 4 5 6 7 8 9 10 11 12 13 14 15 16 17 18 19 20 21 22 23 24
CLIP
SIGNAL
Extron
XMP 240 C AT
Expansion Matrix Processor
Extron
NetPA U 2002 SB
Power Amplifier
Extron
SF 26CT
Two-Way Ceiling Speakers
Extron
WPD 101 3.5 mm
Audio Pass-Through Wallplate
- Decorator-Style
Audio Line Out
Audio Inputs
Wireless Mic 1
Wireless Mic 2
Ethernet
Ethernet
Assistive Listening
System Transmitter
Local Audio
Ceiling
Array Mic
Ethernet
Figure 10.
Physical Dante Network Diagram
8
NetPA U 2002 SB • Setup Guide (Continued)


