


-0!!MPLIlERs)NSTALLATION
Installation, cont’d
2-14
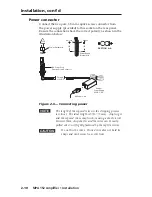
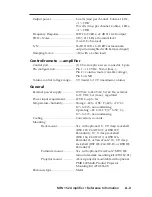
Audio output
4HISPOLEMMCAPTIVESCREWCONNECTOR
ISUSEDTOCONNECTTHEAMPLIlERTOTHE
SPEAKERS
!LLRIGHTCHANNELINPUTSIGNALSAREMIXED
ANDSUMMEDTOPRODUCEASINGLERIGHT
CHANNELOUTPUTLIKEWISEALLLEFTCHANNELINPUTSIGNALSAREMIXED
ANDSUMMEDTOPRODUCEASINGLELEFTCHANNELOUTPUT
)FTHEFRONTPANELSWITCHISSETTOSTEREOTHEOUTPUTWILLBE
STEREOIFTHEFRONTPANELSWITCHISSETTOMONOTHERIGHTANDLEFT
CHANNELSWILLBEMIXEDANDSUMMEDFORADUALMONOOUTPUT
7ITHANOHMLOADTHEAMPLIlERPRODUCESUPTOWATTS
CHANNEL7ITHAOHMLOADTHEAMPLIlERPRODUCESUPTO
WATTSPERCHANNEL
C
Do not short the + and - outputs to each other, as
this will damage the amplifier.
N
The length of the exposed wires in the stripping process
is critical. The ideal length is 3/16” (5 mm). Any longer
and the exposed wires may touch, causing a short circuit
between them. Any shorter and the wires can be easily
pulled out even if tightly fastened by the captive screws.
C
Do not tin the wires. Tinned wire does not hold its
shape and can become loose over time.
OUTPUT
4/8
OHMS
L
R
Summary of Contents for MPA 152
Page 1: ...User s Manual Mini Power Amplifier 68 1320 01 Rev A 02 09 MPA 152...
Page 8: ...ii 0 MPLIlER s 4ABLE OF ONTENTS Table of Contents cont d...
Page 12: ...0 MPLIlER s NTRODUCTION Introduction cont d 1 4...
Page 19: ...0 MPLIlER s NSTALLATION 2 7...
Page 30: ...0 MPLIlER s PERATION Operation cont d 3 4...
Page 31: ...MPA 152 Amplifier A Appendix A Reference Information Specifications Included Parts Accessories...
Page 36: ...0 MPLIlER s 2EFERENCE NFORMATION Reference Information cont d A 6...


