background image

Assigning passwords

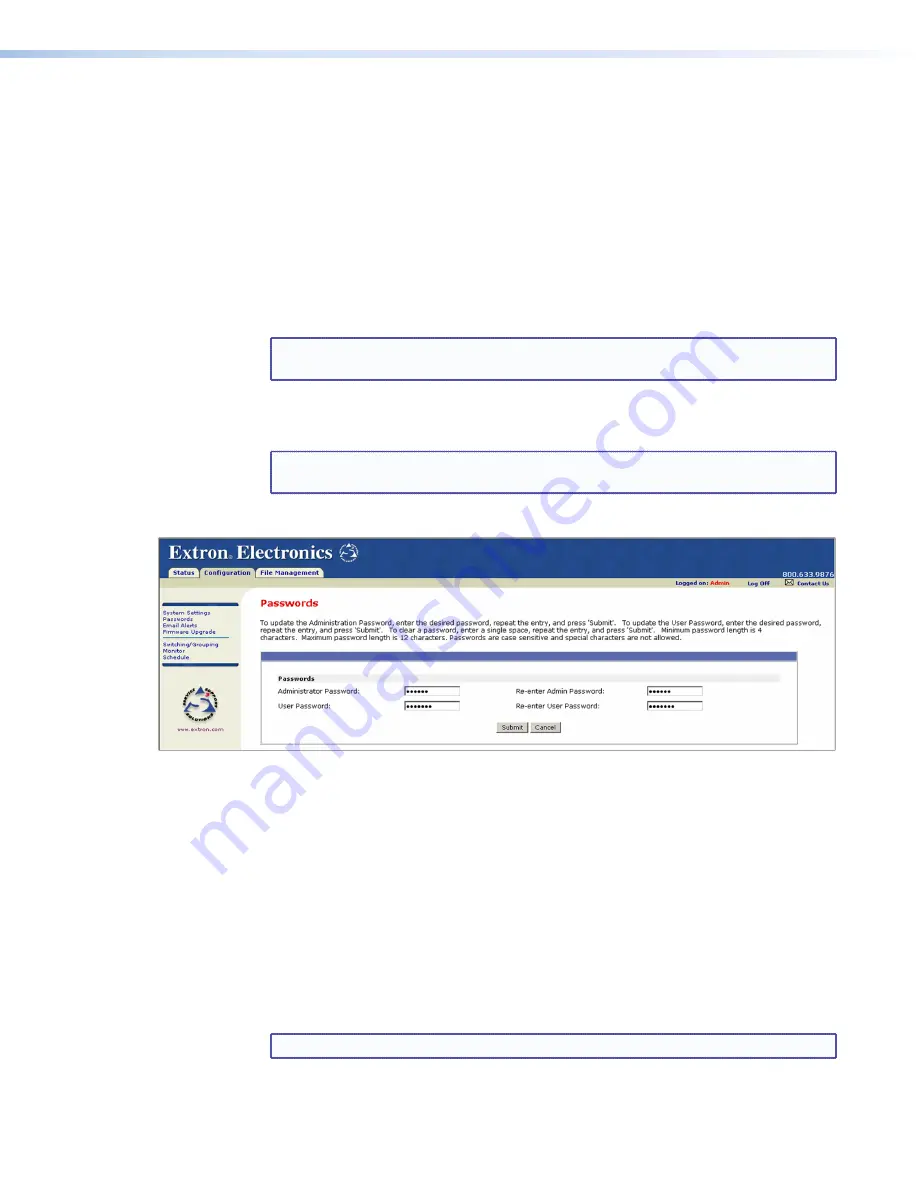
The Passwords screen allows you to assign passwords to the administrator and user access 
levels. The administrator password gives access to all IPL T PCS4 web pages, enabling the 
administrator to configure the PCS4. 
The user password provides access only to the System Status web page. If you are logged in 
as user, you see only the 

Status

 tab with the System Status screen. You cannot make any 

configuration changes. 

To assign passwords:

1. 

On the Configuration page, select 

Passwords

 from the side-bar menu.

2. 

Enter the new administrator password in the 

Administrator


Password

 field.

NOTE:

  Passwords must contain 4 to 12 alphanumeric characters. Symbols and 

spaces are not allowed, and the passwords are case sensitive. 

3. 

In the 

Re-enter


Admin


Password

 field, enter the same password again to confirm it.

4. 

If you want to assign a user password, enter it in the 

User


Password

 field.

NOTE:

  You cannot assign a User password unless an administrator password has 

either been assigned or is being assigned at the same time.

5. 

Reenter the same user password in the 

Re-enter


User


Password

 field.

Figure 15. 

Passwords Screen with Administrator and User Passwords Entered 

6. 

Click 

Submit

 to set the passwords.

Removing passwords

To remove a password:

1. 

On the Configuration page, select 

Passwords

 from the sidebar menu.

2. 

In the 

Administrator


Password

, the 

User


Password

, or both fields, delete the 

characters that are there, and press the <Spacebar> on your computer keyboard to 
enter a space.

3. 

Repeat step 

2

 in the 

Re-enter


Admin


Password

, the 

Re-enter


User


Password

, or 

both fields.

4. 

Click 

Submit

.

NOTE:

  Deleting the administrator password also deletes the user password.


IPL T PCS4 • HTML Configuration and Control

25

Summary of Contents for Ethernet Control Interface IPL T PCS4i

Page 1: ...User Guide IPL T PCS4 IPL T PCS4i IP Link IP Link Power Control Interfaces 68 738 07 Rev B 09 11...

Page 2: ...ksam machen da im Inneren des Geh uses dieses Produktes gef hrliche Spannungen die nicht isoliert sind und die einen elektrischen Schock verursachen k nnen herrschen Achtung Lesen der Anleitungen Bevo...

Page 3: ...a commercial environment This equipment generates uses and can radiate radio frequency energy and if not installed and used in accordance with the instruction manual may cause harmful interference to...

Page 4: ...commands and examples of computer or device responses mentioned in this guide the character 0 is used for the number zero and O represents the capital letter o Computer responses and directory paths t...

Page 5: ...nterface 56 Tabletop Use 56 Rack Mounting 56 Under desk Mounting 58 Glossary 59 Introduction 1 About this Guide 1 About the IPL T PCS4 1 Features 1 Application Diagrams 2 Installation and Rear Panels...

Page 6: ...IPL T PCS4 Contents vi...

Page 7: ...levels The PCS4 has its own web pages stored in flash memory within the device Features Remotely powering devices on and off Centralized management features such as Telnet allow remote powering on an...

Page 8: ...tomizable web pages and configuration settings Nonproprietary programming HTML and JavaScript is available as well as other programming methods Security Built in multilevel security provides user cont...

Page 9: ...2 Connection Diagram for IPL T PCS4i Extron IPL T PCS4 Power Control with Sensing Capabilities Computer DVD VCR Audio Amplifier DSS Cooling Fans IPL T PCS4 R F 1 S F 2 S F 3 S F 4 SET REFERENCE FULL...

Page 10: ...nt the PCS4 interface see Mounting the IPL T PCS4 Interface in the Reference Material section 3 Plug the PCS4 power cord into an AC outlet For the 120 VAC version use the supplied 14 AWG IEC power cor...

Page 11: ...female U S IPL T PCS4 or IEC IPL T PCS4i power output receptacles c Alarm relay Connect a relay controllable detection device to this single pole single throw relay connector The default condition for...

Page 12: ...lor T568B T568B White orange White orange Orange Orange White green White green Blue White blue Green Green White brown Brown Figure 6 RJ 45 Connector Wiring Configuring the LAN Port You need to confi...

Page 13: ...le siren or other detection device to the Alarm relay on the rear panel NOTE The alarm relay cannot be set up from the front panel You must use either SIS commands or the web pages to configure it see...

Page 14: ...is LED blinks the appropriate number of times to indicate the reset mode that has been entered b Reset button recessed Use the tip of a Phillips screwdriver or a pointed stylus to press this recessed...

Page 15: ...her using SIS commands via Telnet or using the PCS4 embedded web pages For details on setup and control via Ethernet see the SIS Programming and Control or the HTML Configuration and Control section S...

Page 16: ...the correct order with Full being set first Follow these steps to set the threshold for each device using the front panel These thresholds also can be configured using the web pages or SIS commands N...

Page 17: ...r example If the receptacle is set to And the power level The receptacle Full drops below the stored threshold F Full led shuts off and the S Standby LED lights Standby drops below the stored Standby...

Page 18: ...LEDs beside the button until you arrive at the setting you want for the receptacle No LEDs lit No groups The receptacle will not be part of any grouping S LED lit Group 1 F LED lit Group 2 Red power...

Page 19: ...lse blink every 3 seconds and the PCS4 is put in a different mode corresponding to the underscored notes in modes 3 through 5 The mode 5 LED blinks three times the third blink indicating that it is th...

Page 20: ...t occur within 1 second Result Reset mode 4 does the following Enables ARP program capability Sets the IP address back to factory IP settings Sets the subnet mask back to factory default Sets the gate...

Page 21: ...configured only via Internet protocol For your computer to communicate with the PCS4 it must be equipped with an network interface card and an HTML browser To allow your computer to work with Extron E...

Page 22: ...05 A6 00 0A 90 A space must separate arp from the hyphen Figure 9 ARP S Command Screen NOTE After the arp s command is issued the PCS4 changes to the new address and starts responding to ping request...

Page 23: ...n you can change the PCS4 default settings IP address subnet mask and optionally administrator name and password in order to use the unit on an intranet LAN or on the Internet WAN After you have set u...

Page 24: ...ws a From the Start menu select My Network Places b From the Network Tasks left side bar menu select View Network connections 2 Right click Local Area Connection then select Properties from the pop up...

Page 25: ...255 0 0 Default gateway Blank or 0 0 0 0 The temporary IP address differs from the PCS4 factory default by one digit c Click OK to save the changes and exit the network setup d Reboot the computer if...

Page 26: ...reloaded on the PCS4 are compatible with popular web browsers such as Internet Explorer version 5 5 or higher NOTE The following instructions assume that you have already configured the Windows based...

Page 27: ...er designed files but the default web pages provide many basic features for monitoring configuring and controlling the PCS4 via a web browser This section provides an overview of the embedded web page...

Page 28: ...e The System Status page displays information in the following categories System Description Includes product model a brief description part number and firmware version plus the current date and time...

Page 29: ...wing settings are available in the IP Settings section Unit Name The default is the product name followed by the last six digits of the MAC address You can give the unit a new name such as LightsOn Of...

Page 30: ...the time zone for the PCS4 location number of hours offset from Greenwich mean time Daylight Savings Daylight savings time DST is a one hour offset that is observed in some countries You can select a...

Page 31: ...in Password field enter the same password again to confirm it 4 If you want to assign a user password enter it in the User Password field NOTE You cannot assign a User password unless an administrator...

Page 32: ...mail server IP address and your domain name in the appropriate fields this information is available from your network administrator 4 Click Save to save the information 5 Click the Edit button at the...

Page 33: ...rmware files must have the extension S19 The firmware file name and path are displayed in the Current Firmware Version section on the Firmware Upgrade screen 4 Click Upload When the firmware upgrade i...

Page 34: ...u click Refresh Grouping receptacles You may want to group two or more receptacles together to ensure that they are switched on or off at the same time You can create up to three groups To group recep...

Page 35: ...ection or both enter your selections described in the following sections 3 When you are finished making selections in one section click the Submit button at the bottom of the section to implement your...

Page 36: ...ust be selected for these settings to take effect Initial State Select Open or Closed from the pull down menu for the initial state of the alarm relay The default is Open Action From the pull down men...

Page 37: ...receptacle that you want to schedule and click On or Off in the Power column beside it A Set Schedule For section opens displaying the selected receptacle number the power selection On or Off and men...

Page 38: ...o schedule Figure 21 Schedule Screen Showing Fields for Daily Receptacle Scheduling 2 In either the Power On or Off section select the hours minutes and AM or PM from the menus and select the check bo...

Page 39: ...22 Set Schedule For Field to Set Powering Off for a Single Receptacle 2 In the Set Schedule For section select the hour minutes and AM or PM from the drop down menus 3 Click Set to enter your settings...

Page 40: ...state Files are listed separately under headings of their extensions Adding a directory To add a directory or folder to the IPL T PCS4 file system 1 Enter a name for the directory in the Dir field fol...

Page 41: ...executed When a web page is requested the web server removes the SSI and replaces it with the answer to the SIS command within quotes echo var SIS Command Server Side Include Using the Host SIS comma...

Page 42: ...y The following lines demonstrate how to read status from the IPLink Product IPLink Product Name b echo var 1I b br IPLink Product Description b echo var 2I b br IPLink Product Part Number b echo var...

Page 43: ...ems certain characters are unsafe or not available and others are reserved by the HTML or URL specification URL encoding is used to insure compatibility and functionality with most Internet browsers A...

Page 44: ...rk 3F 63 At symbol 4O 64 Figure 30 Reserved Characters Unsafe characters URLs use some characters for special use in defining their syntax and these characters should be encoded For various reasons th...

Page 45: ...gement web page see File Management earlier in this section Accessing and Using Telnet Port 23 Telnet short for Telecommunications Network provides a way for you to connect to a computer or server in...

Page 46: ...you are finished entering commands to the interface press Ctrl at the command prompt to exit Telnet Troubleshooting Turn on the equipment in the following order 1 The PCS4 power control interface 2 T...

Page 47: ...Response If the connection was not made the following response appears Figure 35 Response to an Unsuccessful Ping Command If you get a response indicating that the ping was unsuccessful do the followi...

Page 48: ...follows 1 Select the Products tab on the Extron website home page 2 From the sidebar menu at the left of the screen select Software 3 On the software products page click Control Software 4 On the Con...

Page 49: ...s per field No special characters are required to begin or end a command sequence When the PCS4 determines that a command is valid it executes the command and sends a response to the host device All r...

Page 50: ...ponse codes and their descriptions are as follows E12 Invalid port number E13 Invalid value the number is out of range too large E14 Not valid for this configuration E17 System timed out E22 Busy E24...

Page 51: ...you are using Telnet or a web browser When using these commands through a web browser you can use the URL reference to shorten the examples URL refers to the full address of the control interface and...

Page 52: ...hen No blank or space characters are permitted as part of a name No distinction is made between upper and lower case NOTE The first character must be a letter The last character must not be a minus si...

Page 53: ...the model name and the last three pairs of the interface MAC address for example IPL T PCS4 00 02 3D X5 Connection security level 11 user 12 administrator X6 Pulse time in 20 ms per count If this para...

Page 54: ...to hold alarm active before canceling 0 never times out 1 7 1 to 7 minutes X70 On timed value 00 15 in 250 ms increments X71 Off timed value 00 15 in 250 ms increments X71 Day of the week 1 Sunday 2 M...

Page 55: ...X 0X Exe0 View Executive mode X X X Power Receptacle Monitoring and Alarm Functions Set alarm conditions E X X70 X70 X70 SA W X 2A X70 2A X70 2A X70 SA Ast X X70 X70 X70 X70 X70 View alarm conditions...

Page 56: ...number N N 60 544 07 or 60 544 09 Request model name 1I 1I IPL T PCS4 or IPL T PCS4i Request model description 2I 2I Lists four switched 110 VAC or 220 VAC receptacles with current threshold sensing...

Page 57: ...end out unsolicited information such as notice of a power level change This is called a verbose wordy relationship between the interface and a connected device When the IPL T PCS4 is connected to the...

Page 58: ...th directory CJ Dir path directory NOTE A directory does not truly exist until a file has been copied into the path Move back to root directory E CJ W 2F CJ Dir Move up one directory E CJ W 2E 2E CJ D...

Page 59: ...recedes filenames for files from subdirectories below the current directory Stream Files via Port 80 Load file to user flash memory24 28 Use a POST on port 80 followed by the delimited data to be writ...

Page 60: ...ay 0 0 0 0 DHCP off Web server Up to 200 simultaneous sessions 960 kB nonvolatile user memory Program control Extron Simple Instruction Set SIS Global Viewer requirements Microsoft Internet Explorer v...

Page 61: ...oncondensing Cooling Convection no vents Mounting Rack mount Yes with optional 1U rack shelf Furniture mount Yes under furniture mountable with optional mounting kit Enclosure type Metal Enclosure dim...

Page 62: ...our self adhesive rubber feet are included with the PCS4 For tabletop use attach one foot at each corner of the bottom side of the unit and place the PCS4 in the desired location Rack Mounting UL guid...

Page 63: ...1 as follows IPL T PC S4 R F 1 S F 2 S F 3 S F 4 SE T RE FE RE NC E FU LL 10 0 LIN K AC T ST AN DB Y S 2 4 40 x 3 16 screws Use 2 mounting holes on opposite corners Half rack false front panel uses 2...

Page 64: ...on the bottom of the unit remove them 2 Attach the mounting brackets to the unit with the provided machine screws 3 Insert 8 wood screws into the four pilot holes Tighten each screw into the mounting...

Page 65: ...conductor diameter C Condition A state for which the PCS4 is being monitored When a monitored condition is met the PCS4 may sound an alarm or send an e mail message depending on how the system has bee...

Page 66: ...f 10 Mbps or 100 Mbps Ethernet is mostly based on the IEEE 802 3 standard Executive mode An operating mode in which the IPL T PCS4 does not accept commands from the front panel Also called front panel...

Page 67: ...choes Ethernet packets to determine whether a network device is active and what the bidirectional delay is in communicating with it Port number A preassigned address within a server that provides a di...

Page 68: ...rol Protocol Internet Protocol The communication protocol language of the Internet Computers and devices with direct access to the Internet are provided with a copy of the TCP IP program to allow them...

Page 69: ...o receive an RA Return Authorization number This will begin the repair process USA 714 491 1500 Europe 31 33 453 4040 Asia 65 6383 4400 Japan 81 3 3511 7655 Units must be returned insured with shippin...

Reviews: