For information on safety guidelines, regulatory compliances, EMI/EMF compatibility, accessibility, and related topics, see the
Extron Safety and Regulatory Compliance Guide
on the Extron website.
© 2020 Extron — All rights
reserved.
All trademarks mentioned are the property of their respective owners.
Worldwide Headquarters:
Extron USA West, 1025 E. Ball Road, Anaheim, CA 92805, 800.633.9876
Input and output signal LEDs
•
Inputs
— Light when a source is connected to the corresponding input connector and TMDS clock activity is detected.
•
Output
— Lights when a video output is actively sent on the DTP/HDBT output.
HDCP LEDs
•
Inputs
— Light for each input if the connected sources are HDCP-encrypted and have been authenticated by the
switcher.
NOTE:
If the source device connected to the selected input is HDCP encrypted (requires HDCP authentication), the
corresponding signal LED may not light unless HDCP has been authenticated.
•
Output
— Lights when the HDCP has been authenticated between the output of the switcher and the sink device
connected.
NOTE:
HDCP is re-authenticated on the output whenever a new input is selected.
Input selection buttons
— Press one of these buttons to select an input to switch to the output. The green LED at the right
of each button lights when the corresponding input is selected. If auto-input switching is in effect, these buttons are disabled,
but the LEDs continue to light to indicate the selected input. The input buttons are also used to initiate a system reset and to
enable and disable front panel lockout (see the DTP2 T 204 User Guide for more information).
Reset button
— This button initiates three modes of reset for the switcher. For the different reset levels, press and hold the
button while the switcher is running or while you power up the switcher. (For more information about reset modes, see the
DTP2 T 204 User Guide at www.extron.com.)
LockIt Lacing Brackets
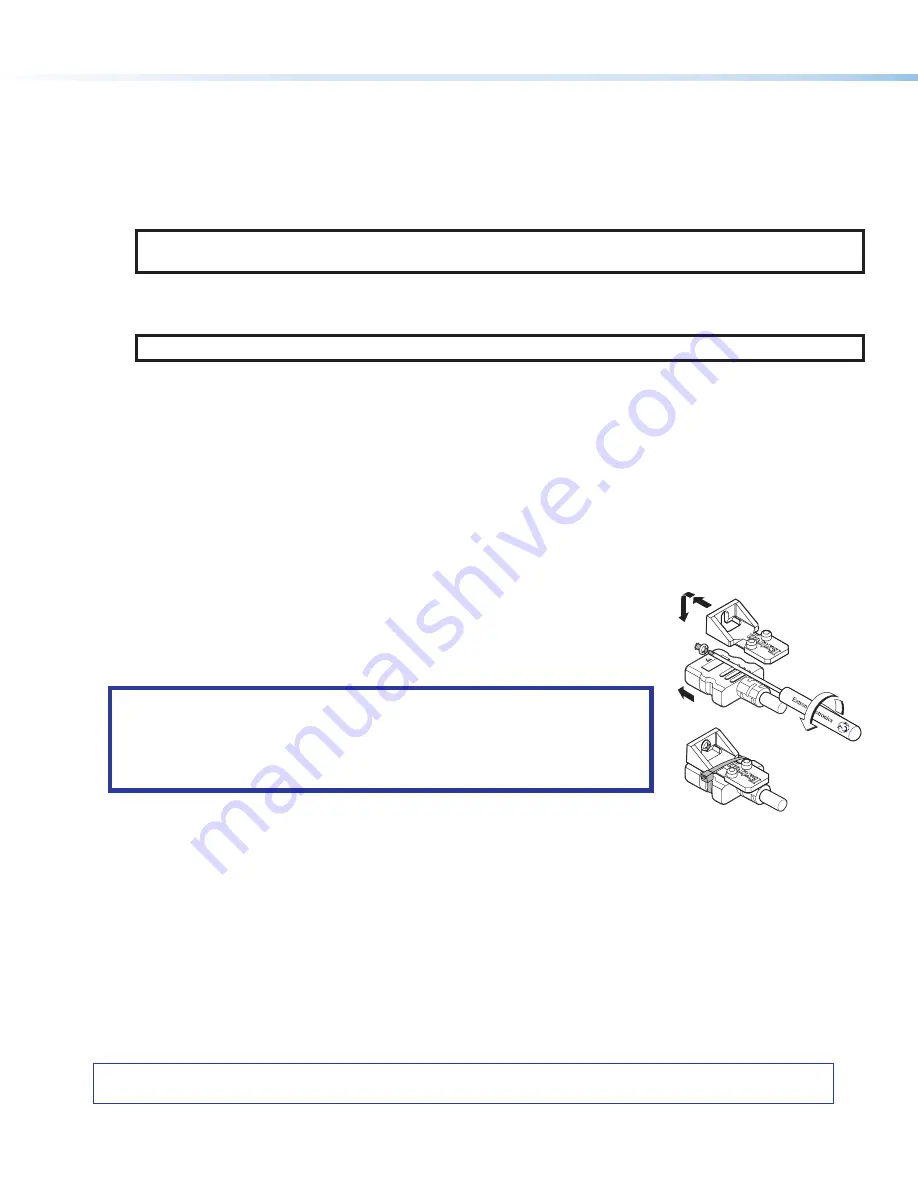
Use the included LockIt lacing brackets to securely fasten the HDMI cables to each device as follows
.
1
Plug the HDMI cable into the rear panel connection.
2
Loosen the HDMI connection mounting screw from the panel enough to allow the
LockIt lacing bracket to be placed over it. The screw does not have to be removed.
3
Place the LockIt lacing bracket on the screw and against the HDMI connector, then tighten
the screw to secure the bracket.
ATTENTION:
•
Do not overtighten the HDMI connection mounting screw. The shield it fastens
to is very thin and can easily be stripped.
•
Ne serrez pas trop la vis de montage du connecteur HDMI. Le blindage auquel
elle est attachée est très fin et peut facilement être dénudé.
4
Loosely place the included tie wrap around the HDMI connector and the LockIt lacing
bracket as shown.
5
While holding the connector securely against the lacing bracket, use pliers or similar
tools to tighten the tie wrap, then remove any excess length.
3
1
2
3
4
5
4
68-3277-50 Rev. A
08 20


