background image

3                                             MC108  V1.1   2/09 


Operation 


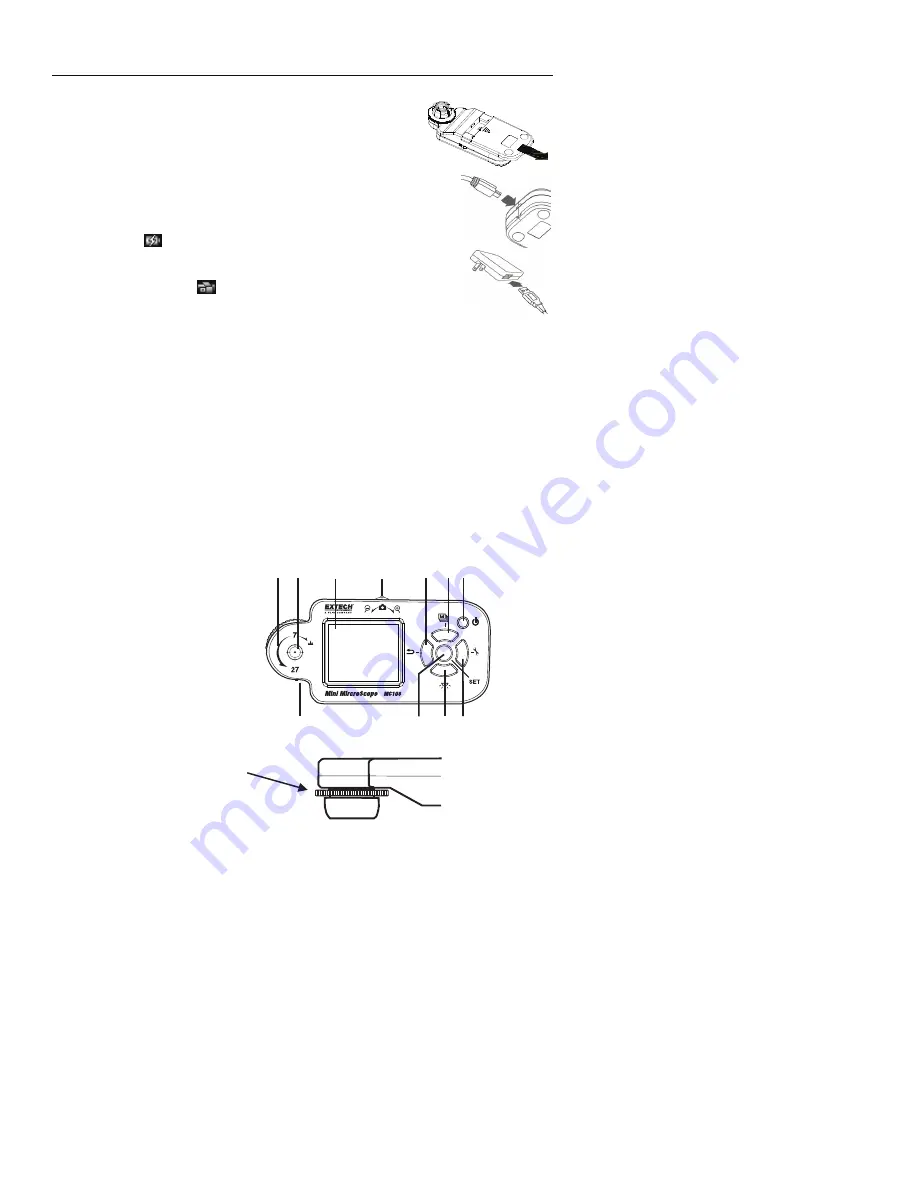
Power Supply


  The unit includes three Ni-MH rechargeable batteries.  

  The unit can run from the batteries or from USB power when 

the USB cable is connected to a PC or to the power adaptor.  

  The Ni-MH batteries will recharge automatically when the 

microscope is connected, with the USB cable, to a PC or to the 
USB power adapter. 

  When the recharger is in the power-off mode, the white LEDs will 

flash twice every three seconds. If the recharger is in power-on 
mode, the 

 icon will be shown on screen.  

  After completely charging in the power-off mode, the white LEDs will 

flash once every three seconds. After completely charging in the 
power-on mode, the 

 icon will be shown on screen.  

  Recharge Ni-MH batteries every few months, even if the system is 

not used to maintain battery strength, this is suggested to extend battery longevity.  

  For lengthy storage periods, remove batteries to prevent damage due to battery 

leakage/ discharge. 

  The unit may also use alkaline batteries. Do not mix battery types in use and do not 

recharge alkaline batteries.  

Powering the Unit  

  Press the power button for 2 seconds and then enter the normal observation Mode. 

The magnified images should now be shown on the screen.  

  By placing the observed object below the aiming mark located on the back of the case, 

the screen will display the observed image desired.   

  You may adjust the transparent protector in front of the lens protector in order to 

provide focus. 

  Press the save button, or zoom wheel, to capture images for purposes of recording.  

Controls  

1. Optical 

zoom/focus 

2. Aiming 

mark 

3. Display 
4. Zoom/ 

Snapshot 

5. Return/Preview 
6. Special 

effects/Up 

7. Power 
8. Tools 
9. Brightness 
10. Set/Save/Compare 
11. Indicator 

 
Optical Zoom/Focus dial 


1 2

3

4

5 6 7

8

9

10

11


Summary of Contents for MC108

Page 1: ...User s Guide Mini Microscope Model MC108 ...

Page 2: ...e in areas with high humidity Use the microscope only within its operating temperature range 23 F to 122 F 5 C to 50 C Sudden varied temperatures changes may cloud the lens Do not let the lens face directly into sunlight or intense light for an extended period of time Strong light can damage the light sensitive electronic circuits Avoid touching the lens Caution The white LEDs have strong luminosi...

Page 3: ...to maintain battery strength this is suggested to extend battery longevity For lengthy storage periods remove batteries to prevent damage due to battery leakage discharge The unit may also use alkaline batteries Do not mix battery types in use and do not recharge alkaline batteries Powering the Unit Press the power button for 2 seconds and then enter the normal observation Mode The magnified image...

Page 4: ...zoom wheel to save the image into RAM The unit can enlarge image to 108x 27x4 108x Aiming Mark Circular mark on the back of case shows position of lens which helps locate lens over the target object Special Effects Press this button to select different image effects E g normal gray inverse ruler and comparison Power Hold this button for 2 seconds to turn the unit on off Tools Press this button to ...

Page 5: ...l settings Image Effects Press the Image Effects button to to change the appearance of the image The image mode selected is indicated by the corresponding letter next to the battery symbol in the display N G I E or D Normal N Normal display Gray G To remove color and create a gray scale image for easier image discrimination Inverse I To reverse color and or grayscale to help highlight some given f...

Page 6: ...o leave this mode Status Battery Low Battery power is low Image Effect N Normal Mode G Gray Mode I Inverse Mode E Emboss Mode D Dual Window View Mode Freeze When in Dual Window View mode or Dual Window Compare mode Pressing Confirm button will enter Freeze mode Press Confirm button again to leave Freeze mode Magnifying Current magnification rate is shown when the indicator is located at text 7 and...

Page 7: ...mation please refer to the website www silabs com CP2102 is a product of SILICON LABS Inc You may use the add remove programs on the control panel to remove the application program and USB driver Application Program Instructions When starting the application program see figure 1 click the Language to select your preference then click the icon A Digital Microscope dialog will appear on the screen c...

Page 8: ...wn as figure 3 Please remember ruler and magnification number are for reference only They are shown when the optical zoom focus indicator is located at text 7 and 27 Magnification is variable by clicking the or icon Transmission may be slow after clicking the icon you may have to wait a moment to obtain the desired image Click the icon in figure 3 to save the display image to PC Click the icon to ...

Page 9: ...FLIR COMPANY warrants this instrument to be free of defects in parts and workmanship for one year from date of shipment a six month limited warranty applies to sensors and cables If it should become necessary to return the instrument for service during or beyond the warranty period contact the Customer Service Department at 781 890 7440 ext 210 for authorization or visit our website www extech com...

Reviews: