background image

APEX 4 User’s Guide

Rev 1.0

25

5. Specifications

5.1 Printer Specifications (subject to change without notice)

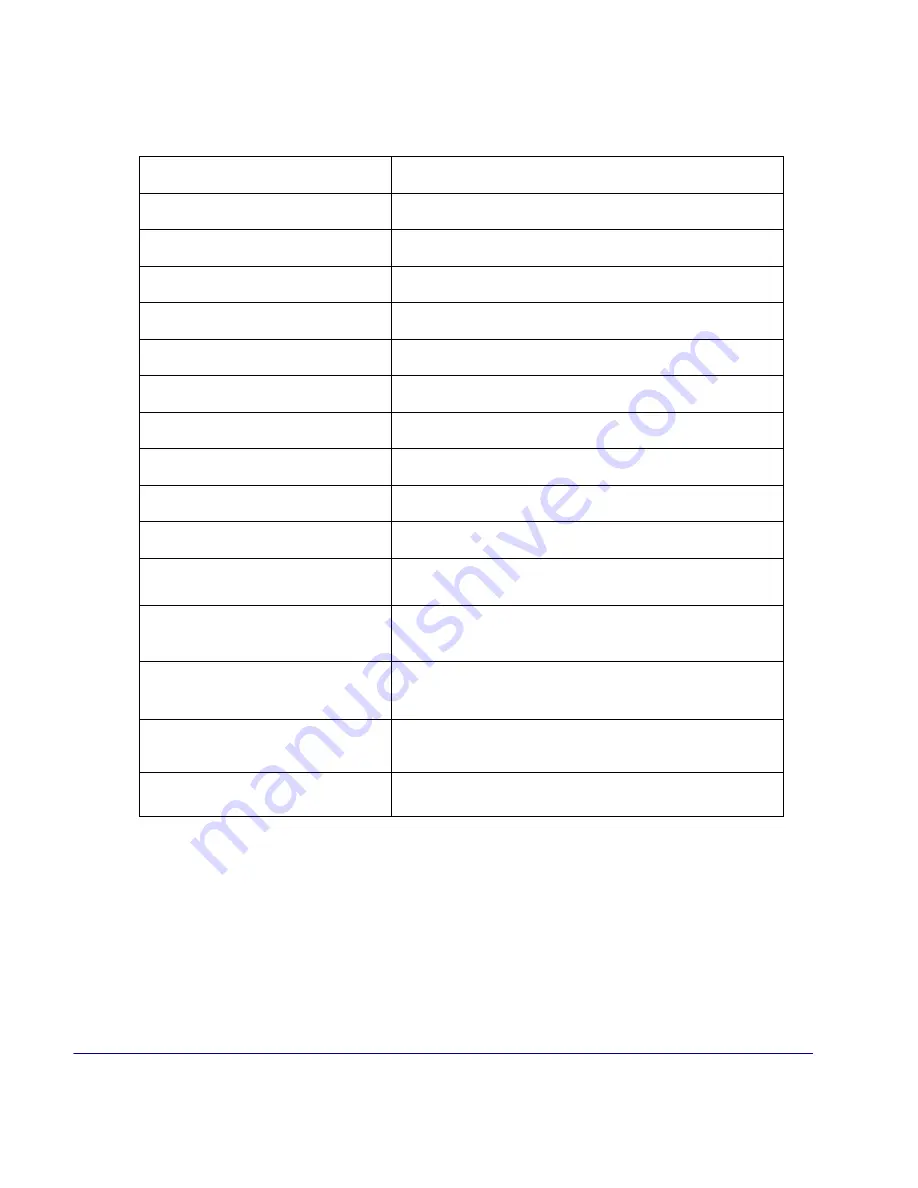
Dimensions

7.4”L x 6.5”W x 2. 5”H (191L x166W x 63H mm)

Weight

22 ounces (648g)

Shipping weight

3.3 lbs. (1.5kg)

Power

Lithium-Ion battery (7.4V;2250 mAh)

Operating Temp. Limits

14 to 122°F (-10 to 50°C)

Storage Temp. Limits

-4 to 140°F (-20C to 60°C)

Operating Humidity Limits

20% to 85% non-condensing

Storage Humidity Limits

5% to 95% non-condensing

Print Width

4.1” (104mm) , 203 dpi (8 dots per mm)

Printing Method

Thermal Direct

Print Speed

Up to 3.0 inches/sec. @ 7.2v to ph.

Fonts:

(Bitmap)

3 Resident Font Tables, 6 Downloadable Font Tables,

Bold Font and Proportional Font

Supported Bar Codes

Codabar, Code 39, UCC/EAN – 128, UPC/EAN/JAN,

Interleaved 2 of 5, Code 128, PDF 417

Memory

Flash: 4MB

SRAM: 2MB

Charging Time

Approximately 180 minutes

Communications

USB, Bluetooth, 802.11b

Summary of Contents for APEX 4

Page 1: ...APEX 4 User s Guide Rev 1 0 1 Revision 1 0 8 3 2009 A AP PE EX X 4 4 U Us se er r G Gu ui id de e...

Page 2: ...ons 17 3 4 USB Communication USB 17 3 5 Bluetooth Communications 18 3 6 802 11 Communications Option 18 3 7 Serial RS232 Option 18 3 7 Magnetic Stripe Reader Option 19 4 Printer Maintenance 20 4 1 Pri...

Page 3: ...EN 300 328 2 2 EMC Directive 89 336 EEC EN 301 489 1 and 17 and Low Voltage Directive 73 23 EEC EN 61131 2 3 802 11 Wi Fi Module Conforms to the following regulation and or standards FCC Part 15 Subp...

Page 4: ...y them This product is designed for servicing at an Authorized Service Center Other than routine maintenance described in this manual the user should not attempt to repair service or disassemble this...

Page 5: ...ting and many others where point of service receipts are required The package contains Printer Battery Cartridge Universal Adapter USA UK European and Australian plugs for charging the battery inside...

Page 6: ...city To cycle a battery fully charge it and then allow full discharge through normal use in the printer 1 2 1 Installing the battery Note Refer to Figure 2 below to install the battery pack in the pri...

Page 7: ...attery charger adaptor into the appropriate AC line voltage socket Battery LED will illuminate amber indicating that the battery is being charged The battery will be fast charged and after about 180 m...

Page 8: ...re the socket outlet is close to the printer and easily accessible during the battery recharging process Either switch the socket off if supplied with a socket switch or pull out the charger from the...

Page 9: ...is ON and the printer is in 802 11b g mode Steady Transmitting Receiving LED 2 Battery AMBER Steady Battery being charged The LED will turn off when the battery is fully charged LED 3 Magnetic Card Re...

Page 10: ...r power will result in printer buffer data loss LED 3 Magnetic Card Reader Printer Error GREEN Momentary flashing RED Flashing Printer has discovered and is parked on the Q Mark Advance Q Mark to tear...

Page 11: ...hes on the sides of the connector of the Shoulder Strap Slide the knob located on the back of the printer into the connector slot Release the two latches on the connector The printer is now secure To...

Page 12: ...on on the top cover as indicated in Figure 6 The door will open slightly open the rest of the way as shown FIGURE 6 OPENING PAPER DOOR Note Paper Door Release button must be depressed when opening and...

Page 13: ...und on the core in such a way that the end of the paper will unwind freely from the core If fastened by tape or glue the core will be pulled into the mechanism causing jamming and possible gear damage...

Page 14: ...F switches Press the ON OFF or FEED switch to stop or cancel the self test print The first few lines of self test show the printer firmware version the current printer settings for example Bluetooth o...

Page 15: ...10 shows the DIP switch location The functions assigned to these switches are shown in Table 3 3 2 2 Setting Dip Switches FIGURE 11 DIP SWITCH 2 SHOWN IN ON POSITION Note Be careful when changing dip...

Page 16: ...5 RS232 and IrDA only 115200 OFF OFF OFF 57600 ON OFF OFF 38400 OFF ON OFF 19200 ON ON OFF 14400 OFF OFF ON 9600 ON OFF ON Use for fixed IrDA 2400 OFF ON ON 1200 ON ON ON Parity Bit SW 6 SW 7 Parity E...

Page 17: ...W 6 SW 7 SW 8 Any position Any position Any position Any position Any position OFF ON Any position Compatible Software The host and printer communicate through a method called the Virtual Com Port in...

Page 18: ...ration Dip Switch 1 must be in the OFF position Dip Switch 2 must be in the ON position Note Adjust baud rate settings to match those of the 802 11 module in your computing device The printer can be p...

Page 19: ...e optional magnetic stripe reader Quickly swipe the card through the reader either left to right or right to left The magnetic stripe must be facing toward the paper supply door while it is passed thr...

Page 20: ...y cloth across it Make sure the platen roller is clean all the way around Use the cleaning pen or moisten another cotton swab with isopropyl alcohol Rub the swab across the black mark sensor to remove...

Page 21: ...ur IT department Check for the correct Extech part number for the battery and only user that part for your new battery See Section 4 7 for printer supplies Risk of explosion if battery is replaced by...

Page 22: ...ridge Charging time in the printer is approximately 3 0 hours Take the battery out of printer if storing the printer for long periods of time The battery storage temperature is 40 F to 104 F 4 C to 40...

Page 23: ...n printing Clean the print head following the cleaning instruction listed in the Section 4 1 Red Error LED on Check that paper roll is not out and paper door is closed Error reading MCR After extended...

Page 24: ...e Adhesive 70 Roll 757092 CASE Continuous Thermal w Repositionable Adhesive 70 Roll Case of 10 Rolls 757150 Thermal Print Head Cleaning Pen 757160 Magnetic Card Reader Cleaning Cards 5 per order 75735...

Page 25: ...0 F 20C to 60 C Operating Humidity Limits 20 to 85 non condensing Storage Humidity Limits 5 to 95 non condensing Print Width 4 1 104mm 203 dpi 8 dots per mm Printing Method Thermal Direct Print Speed...

Page 26: ...ceipt paper tag stock Supply Width 4 375 inches 111 mm Supply Length 1 Roll of receipt paper is 100 ft 30km Supply Sensing Black mark on face of supply Paper Roll Diameter Outside 2 0 inches 51 mm Ins...

Page 27: ...of the FCC Rules Operation is subject to the following two conditions 1 This device may not cause harmful interference 2 This device must accept any interference received including interference that m...

Page 28: ...g Guide http www extech com printer techSupport troubleShootGuide html 6 2 Technical Support Request If you need technical assistance regarding software hardware or operation of Extech printers please...

Page 29: ...Portable Printer Division http www extech com Printer Copyright 2009 Extech Instruments Corporation All rights reserved including the right of reproduction in whole or in part in any form...

Reviews: