Excell FB530 User Manual Download Page 25

EXCELL PRECISION CO., LTD.


0201810X                                     


                ZSME300000292 


24 

Appendix 3 Printer Installation 

A. Roll paper installation and problems solution 

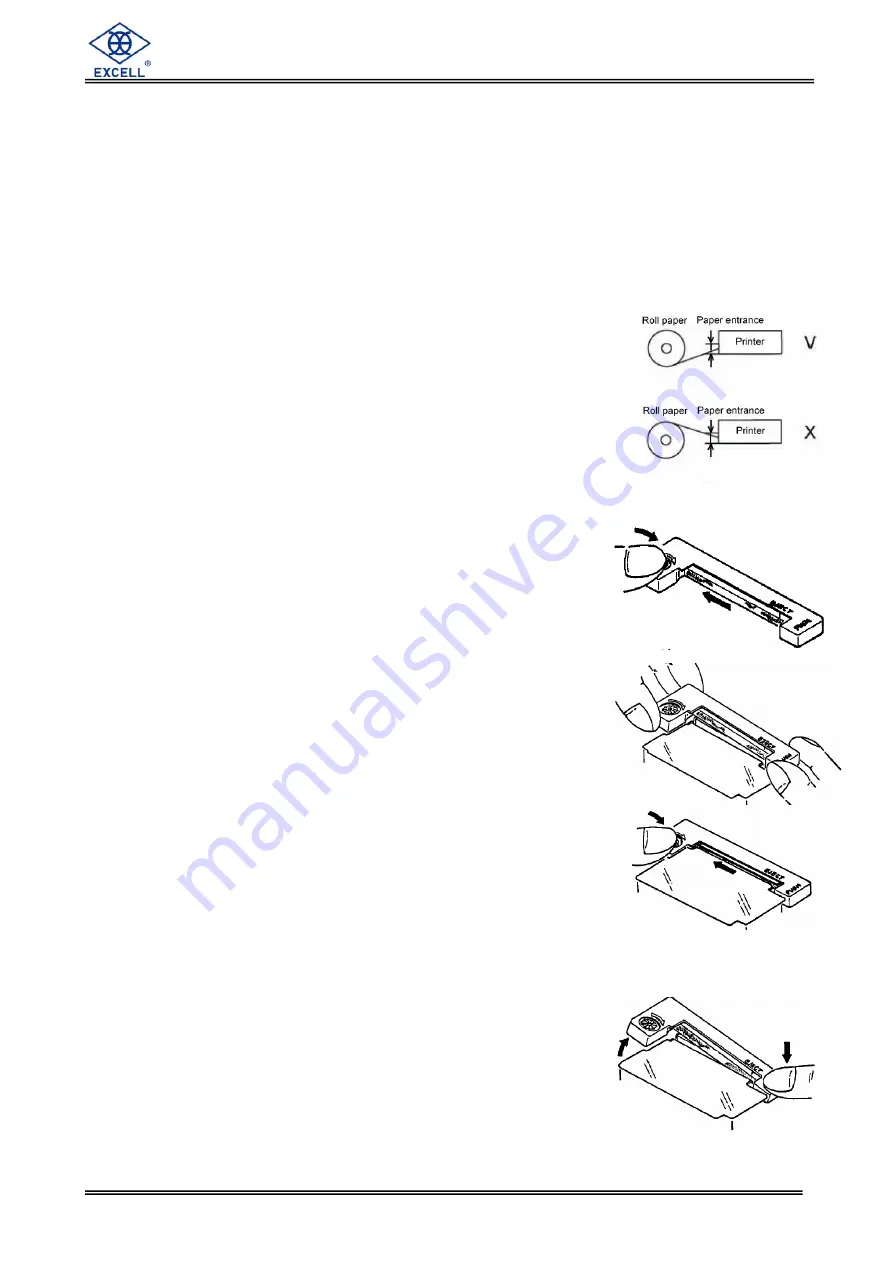
1. Installation roll paper: 

  Use designated roll paper with a width 44.5 ± 0.5 mm and internal diameter 50 mm.   

  Fix the roll paper into the paper entrance of the Printer.   

  Cut the edge of the paper leveling and then install the paper (refer to 

V

 of picture A).   

And then use 

Feed

 key to complete installation (make sure the paper is parallel with 

the printing location. Avoid operating as 

X


of picture A ) 

  The paper should not be folded or broken. 


2. Uninstall roll paper: 

  Cut up the paper at the entrance of Printer, and then pull   

out the paper from the exit of Printer. 


3. Paper jam solutions procedures: 

  Uninstall the paper first. 

  Use a nipper or others to clear remain wastepaper. 


B. Ribbon installation 

  Use designated ribbon. (ERC-05) 


  Uninstall the roll paper before install the ribbon. (Picture B) 


  Turn and tighten the ribbon before installation.       


  Sway the ribbon to proper location according to Picture C.   

If the ribbon loosens during installation, retighten   

it according to Picture D. 


  To uninstall the ribbon, press gently the location in Picture E, 

and then take it out with proper adjustment. 


  The ribbon of the model received may deviate its location during   

its transportation, and this may lead to the breakdown of the Printer. 

To solve this problem, reinstall the ribbon according to the   

above procedures. 


Picture E 

Picture D 

Picture C 

Picture B 

Picture A 

Summary of Contents for FB530

Page 1: ...is the property of EXCELL PRECISION CO LTD and is supplied without liability for errors or omissions No part may be reproduced or used except as authorized by contract or other written permission The...

Page 2: ...FUNCTION SETTING 11 3 1 F4 CHECK WEIGHING CONFIGURATIONS 12 3 2 F5 RS232 AND MINI PRINTER OUTPUT SETTING OPTION 13 3 3 F6 EXIT FUNCTION 19 3 4 F7 INTERNAL VALUE DISPLAY MODE 19 3 5 F8 WEIGHT HOLD MOD...

Page 3: ...utions for Use 1 Please operate or charge the scale in an open area Do not squeeze the power cord to avoid wire on fire 2 Please keep scale in a cool and dry place Do not store under high temperatures...

Page 4: ...3 Do not short the battery terminals to check whether there is current Please check whether the connection point is firm to guarantee good connection 4 The battery should be replaced by specialized pe...

Page 5: ...functions including animal scale HOLD 6 Depending on actual space a RS232 card and or a relay card can be installed 8 FB530 can choose EPSON M 150II 16L mini printer output as an option but relay card...

Page 6: ...Then scale must be fully recharged before operating again Please recharge at once when the symbol shows in order to keep the weight accuracy Memory power supply for FB530 When AC battery is cut off a...

Page 7: ...form is less than 10d the display backlight will switch off after 10 seconds Display backlight is on all the time Display backlight is off 2 2 Weighing Mode 2 2 1 Units Selection 1 After indicator is...

Page 8: ...ntainer After finishing the procedures the net indication Net and pretare indication is on Place goods into the container then the indicator shows the net weight of goods Clear pretare value Press the...

Page 9: ...key 1 times the display shows Preset Single point preset low limit only After preset low limit procedures is completed and the display shows then press key again the display shows This means that the...

Page 10: ...s a when shift among weight mode counting mode and warning accumulation mode b when shift the units c turn off the scale LCD indication 10d Low Limit High Limit To exit preset mode please press key 2...

Page 11: ...eight values When changing between weighing and counting mode or selecting weighing unit the indicator will automatically clear all the totalized weight values The indicators will automatically clear...

Page 12: ...Totalizing Refer to the operation of totalizing in weighing function Chapter 3 General Function Setting Switch on the scale While the scale is counting down to zero press and hold key until the displ...

Page 13: ...s key kg key Increase the flash value by one from 0 to 9 key Confirm key kg A B A 0 After stable the beeper beeps and the indications are on 1 After stable the beeper beeps whether stable or not the i...

Page 14: ...and press to save Press key Press key Press key Below need to connect to Mini Printer before continue only available in FB530 Press key Press key Press key Press key Press key Press key Mini Printer P...

Page 15: ...2 BYTES OL Overload Under load TR TARE Mode ST Display is Stable NT NET Mode US Display is Unstable GS GROSS Mode DATA 7 or 8 BYTE 2B HEX PLUS r n P 0 No transmission r n P 1 Stable transmission r n P...

Page 16: ...0 876 kg shows as below after stable no tare or pre tare mode S T G S 0 8 7 6 k g CR LF HEAD1 HEAD2 DATA UNIT CR LF 2 The net weight 1 568 lb shows as below without weight stability under tare or pre...

Page 17: ...key to transmit simple free format r n P 6 Same format as r n P 3 Print the complete format for the first time Then only print NET weight Please refer to F14 for details Press key to transmit complet...

Page 18: ...hed on platter Weight has become stable Weight zero point Check weighing OK status within a predetermined weight range Beeper beeps twice and printing data stable weight compliant with conditions on t...

Page 19: ...r value to adjust the word space An example is shown below r n p 6 Press key to transmit simple free format Transmit when weight change 10d Transmit when weight change 10d Print TOTAL and clears total...

Page 20: ...ER to ADJ position After setup please switch the SWA1 on MINI JUMPER back to LOCK position In hold mode press key to print the hold value as shown on display It s not related to the settings of F5 tra...

Page 21: ...cally hold the display value not changeable due to external variables After zero return or weight is less than 10d the scale exits the hold mode automatically hold 4 Animal Scale function When animal...

Page 22: ...function The net weight 1 568 lb shows as below without weight stability under tare or pre tare mode U S N T 0 0 1 5 6 8 l b CR LF HEAD1 HEAD2 DATA UNIT 3 7 F12 Print Key Function Setting Press key o...

Page 23: ...nds to setup 1 second 0 0 0 0 0 0 Use key to enter 12 digit Part number 0 0 0 0 0 0 1 second 0 0 0 0 0 0 Use key to enter 10 digit Serial number 0 0 0 0 After power off S N will reset as 1 P N will be...

Page 24: ...TXD Pin 3 RXD Pin 7 GND Other pins are disabled J2 J4 SHORT J1 J3 OPEN Pin 2 RXD Pin 3 TXD Pin 7 GND Other pins are disabled Please refer to F5 function settings for transmission mode baud rate settin...

Page 25: ...and then pull out the paper from the exit of Printer 3 Paper jam solutions procedures Uninstall the paper first Use a nipper or others to clear remain wastepaper B Ribbon installation Use designated...

Page 26: ...0000292 25 Appendix 4 Load Hook Installation Please install the load hook only for FB 630 according to correct order as follows Appendix 5 7 Segment Display Characters 0 1 2 3 4 5 6 7 8 9 A B C D E F...

Page 27: ......

Page 28: ......

Reviews: