background image


                                                                              ~ 9 ~            


Overall user manual 

© 2011 VAN OS MEDICAL UK LTD. 

Tel. +44(0)1757 701177, Fax +44(0)1757 706011, E-mail: 

[email protected]

www.vanosmedical.com


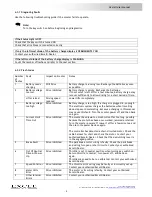
6.3.1 Diagnosing Faults 

 
Use the following troubleshooting guide if the scooter fails to operate. 


Note: 

Turn the key switch on before beginning any diagnostics. 


If the Status Light is OFF 

Check that the key switch is turned ON 
Check that all cables are connected correctly 
 

If only the leftmost diode of the battery charge display is PERMANENTLY ON 

Contact your authorised Excel® Dealer 
 

If the leftmost diode of the battery charge display is FLASHING 

Count the number of flashes and refer to the next section. 


6.3.2 Flash Codes 

 
Number 
of 
flashes 

Fault 

Impact on Scooter 

Notes 

Battery needs 
charging 

Will Drive 

Battery charge is running low. Recharge the batteries as soon 
as possible. 


Battery voltage 
too low 

Drive inhibited 

Battery charge is empty. Recharge the batteries. 
If the scooter is left off for a few minutes, battery charge may 
recover sufficiently to allow driving for a short period of time.  

Lifter raised 

Driving speed 
reduced 

Lower lifter completely. 

Battery voltage 
too high 

Drive inhibited 

Battery charge is too high. If a charger is plugged in, unplug it. 
The electronic system charges the batteries when travelling 
down slopes or decelerating. Excessive charging in this manner 
may cause this fault. Turn the scooter power off and then back 
on again. 

Current Limit 
Time Out 

Drive inhibited 

The scooter has drawn too much current for too long, possibly 
because the motor has been over-worked, jammed or stalled. 
Turn the scooter power off, leave it off for a few minutes, and 
then turn the power back on again. 


The controller has detected a short-circuited motor. Check the 
cable harness for short and check the motor: Contact your 
authorised Excel® Dealer. Check that the declutching lever is 
in the engaged position. 

Brake Fault 

Drive inhibited 

The park brake coil or wiring is faulty. Check the park brake 
and wiring for open or short circuits. Contact your authorised 
Excel® Dealer. 

Out Of Neutral 
Drive At Power 
Up 

Drive inhibited 

Throttle is not in neutral position when turning key switch on. 
Return throttle to neutral, turn power off, and back on 
again. 
Throttle may need to be re-calibrated. Contact your authorised 
Excel® Dealer. 
Speed Pot Error 

Drive inhibited 

The throttle or its wiring may be faulty or incorrectly set up. 
Contact your authorised Excel® Dealer. 
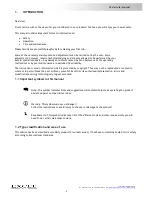
Motor Volts 
Error 

Drive inhibited 

The motor or its wiring is faulty. Contact your authorised 
Excel® Dealer. 
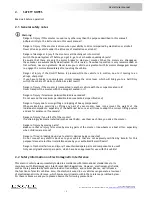
Other Internal 
Errors 

Drive inhibited 

Contact your authorised Excel® Dealer. 


Summary of Contents for Entice 'Universe'

Page 1: ...Read instructions before use User Manual Excel Entice Universe...

Page 2: ...VING 5 4 1 BEFORE DRIVING FOR THE FIRST TIME 5 4 2 TAKING OBSTACLES 5 4 3 DRIVING UP AND DOWN GRADIENTS 6 4 4 PARKING AND STANDSTILL 6 5 PUSHING THE SCOOTER BY HAND 6 5 1 DISENGAGING MOTORS 7 6 THE CO...

Page 3: ...poor maintenance are excluded from liability The instructions contain information which is protected by copyright They may not be reproduced or copied in whole or in part without the prior written con...

Page 4: ...is exceeded Do not exceed the maximum permissible load see technical specifications Danger of injury due to wrong lifting or dropping of heavy components When maintaining servicing or lifting any par...

Page 5: ...position if installed Only ever drive downhill at a maximum of 2 3 of the top speed Avoid abrupt braking or accelerating on gradients If at all possible avoid driving on slippery surfaces such as snow...

Page 6: ...efore you take your first trip you should familiarise yourself well with the operation of the vehicle and with all operating elements Take your time to test all functions and driving modes Note If ins...

Page 7: ...of tipping over Only ever drive downhill at a maximum of 2 3 of the top speed Always return the backrest of your seat to an upright position before ascending slopes We recommend that you lean the back...

Page 8: ...sure the power supply is switched off key switch Push lever 1 forwards Engaging the motor Pull lever backwards 6 THE CONTROL PANEL 6 1 Control Panel layout 1 Seat Lifter activation if installed 2 Batt...

Page 9: ...lever towards you to drive forwards Gently pull the left driving lever towards you to drive backwards Note The controller is programmed with standard values ex works Your Excel Dealer can program it t...

Page 10: ...unplug it The electronic system charges the batteries when travelling down slopes or decelerating Excessive charging in this manner may cause this fault Turn the scooter power off and then back on ag...

Page 11: ...he screws on both sides of the seat that hold the backrest 1 using the spanner and Allen key Adjust the backrest to the desired angle Reposition the screws and tighten 7 2 Adjusting the seat The lever...

Page 12: ...an overload protection system If the motors are put under considerable strain for a longer period of time for example when driving up a steep hill and especially when the ambient temperature is high...

Page 13: ...t sunlight If the battery charger overheats charging current will be reduced and the charging process delayed To avoid damaging the batteries never allow them to be fully discharged Do not drive on he...

Page 14: ...pply and switch on Disconnecting the scooter from the mains power supply First disconnect the cable from the mains power supply Then disconnect the cable from the scooter Note How can I tell when the...

Page 15: ...e Jobs When delivered Weekly Monthly Seat and backrest padding Check for perfect condition X Tyres Have tyred checked for specified air pressure 2 5 bar X X Front wheels Front wheels must spin smoothl...

Page 16: ...anti tippers 120 cm 122 cm Seat height measured from the chassis manually adjustable 43 45 47 49 cm 43 45 47 49 cm Backrest height w o headrest 44 cm 44 cm Backrest height with headrest 63 cm 63 cm Ba...

Page 17: ...9 Country The Netherlands Function Director Technical constructed file Prepared by Name J M J Brouwer BBA Function Research and Development Issue date 01 12 2010 TCF date 01 12 2010 Recertification d...

Page 18: ...www vanosmedical com Van Os Medical UK Ltd Excel House Escrick Business Centre Escrick York YO19 6FD Tel 44 0 1904 720170 Fax 44 0 1904 720398 sales vanosmedical com...

Reviews: