background image

Auto Opener and Piston Troubleshooting: 

How does the auto opener and piston work? 

The black piston cylinder is filled with a mix of oils that naturally expand around 73 degrees.  As the oil 
expands, it will begin to push out the rod of the piston and open your window.  The springs and the 
weight of the window will pull it shut when the temperature drops.   Please note that if the piston is not 
in the opener assembly, it will not retract on its own (it is the pressure of the springs which cause the 
retraction). 

Here’s a few things to check for on the pistons: 

Is the piston moving at all?  

To test, remove the piston and place in ice water for 15 minutes, push the 

rod in and measure the length.  Place in hot water for 15 minutes (above 90 degrees).  Measure the 
distance – did the rod push out?  If so, your piston is working. 

Does the piston rod move in and out smoothly?

  The manufacturer recommends oiling them regularly 

(2 to 3 times/year) with a light oil such as olive oil or WD40.  Sometimes oiling them will help get them 
moving if they are stuck. 

Were the pistons ever under pressure?

  If the opener and piston are attached while there was a weight 

or lock/sash lock holding the window shut, the piston can burst open and release the paraffin oil inside.  
This can also happen if they are stored in a tight container that doesn’t have enough room for them to 
expand.  If a piston has burst, this is usually evident by visible oil, a gash in the side of the piston – or the 
rubber stopper in the end might have popped out. 

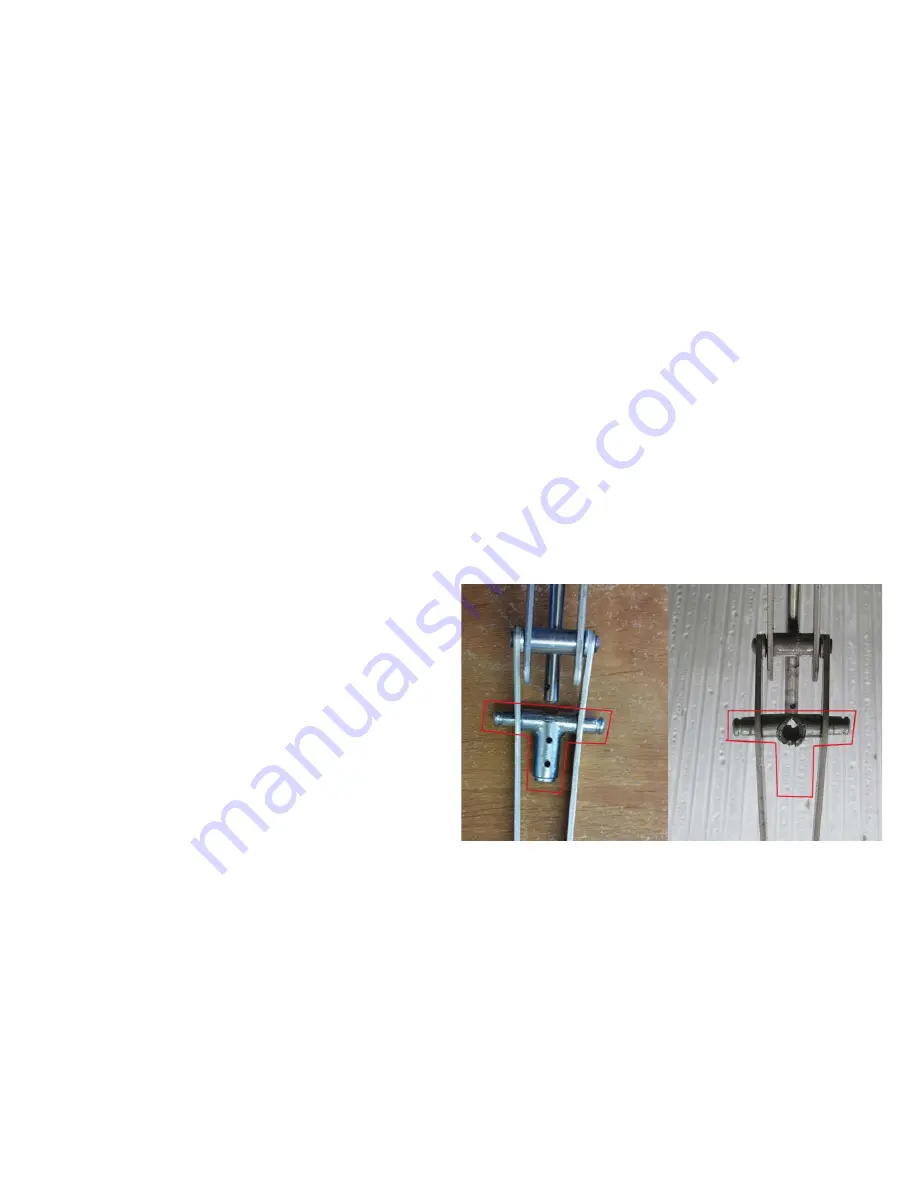
Does everything look intact on your opener?


x

There is a cast metal T piece that
occasionally breaks – see pictures to the
right.

x

Sometimes the arms of the opener are
“torn” or twisted.  This can happen when
a huge wind gusts pulls the window
further than the opener can handle (can
be prevented with wind cables) OR
someone thought the opener was a
handle to open the window and has
pulled on the piston to try to open the
window.

If you are installing in a Riga greenhouse

, please check the angle at which the actual opener is installed.  

See the next page regarding the opener installation in a Riga greenhouse.  If installed incorrectly, 
pressure builds in the piston and can make it difficult to open the vent.  This can also make pressure 
build up in the piston until the window suddenly “pops” open – or if you slightly push the window it 
opens suddenly. 

If you are unsure of any of the above, a photo can help us diagnose the issue.  Please send us photos of 
your opener installed with the piston threaded into the holder.   Also include a photos of the imprint 
near the end of piston, which will have the manufacturer’s name and a date stamped into the black 
sleeve.  We need this to file a warranty claim with the manufacturer and replace your piston. 

29

Summary of Contents for HOKLARTHERM Riga XL 5

Page 1: ...e ZŝŐĂ y ĂĐƚŽƌLJ DĂŶƵĂů Assembly Instructions 9HUVLRQ ZZZ H DFR FRP FXVWRPHUVHUYLFH H DFR FRP VVHPEO QLPDWLRQ 9LGHR LV DYDLODEOH RQ RXU RX7XEH SDJH ILQG WKH OLQN DW ZZZ H DFR FRP RU VFDQ WKH 45 FRGH DERYH ZŝŐĂ y ϱ ϲ ϳ ϴ ϵ ...

Page 2: ...FR XVWRPHU 6HUYLFH DW RU HPDLO XV DW FXVWRPHUVHUYLFH H DFR FRP 3KRWRV ZLOO KHOS XV VHH LI WKHUH DUH SDFNDJLQJ GHILFLHQFLHV DQG FKDQJH WKHP LQ WKH IXWXUH 7KLV ZLOO DOVR KHOS LGHQWLI SDUWV 6WRUDJH 3OHDVH NHHS DOO WKH ER HV LQ D GU SODFH DQG SURWHFWHG DJDLQVW VXQOLJKW VHH QRWH UHJDUGLQJ SRO FDUERQDWH I VWRUHG RXWGRRUV SURWHFW VHFXUHO ZLWK WDUSV 3ODFLQJ RXU JUHHQKRXVH 3ODFH RXU JUHHQKRXVH LQ D ORFDWLR...

Page 3: ...Placing on a stem wall using the Door Extension Kit 16 Gable Assembly front and back are identical 17 18 Side Wall Assembly 19 Attaching Rear Gable 20 Roof Windows Roof Window Parts See page 9 Roof Window Assembly 21 Roof Window Auto Opener 22 23 Wind Restraints for High Wind optional 24 Door Assembly Same for front back doors Door Bottom Half 25 Door Top Half 26 Door Handle installation 27 Sealin...

Page 4: ...SDFNLQJ WKH JRRGV EHFDXVH WKHQ RX FDQQRW VHH WKH VLGH ZLWK WKH 89 SURWHFWLRQ 7KH ILOP ZLOO DOVR SURWHFW WKH SRO FDUERQDWH IURP VFUDWFKHV GXULQJ DVVHPEO 8QOLNH PRVW JUHHQKRXVHV WKH PRXQWLQJ RI WKH DOXPLQLXP SUR OHV LV GRQH WRJHWKHU ZLWK WKH JOD LQJ 7KLV UHVXOWV LQ DQ DEVROXWHO VHFXUH JOD LQJ DQG WKH EHVW SRVVLEOH VWDELOLW RI WKH JUHHQKRXVH 6SHFLDO 1RWH 0XFK RI WKH JUHHQKRXVH LV DVVHPEOHG ZLWK VHULH...

Page 5: ... 6WUXFWXUH IRU 5LJD VVHPEO tŚĞŶ ĂƐƐĞŵďůŝŶŐ Ă ŐƌĞĞŶŚŽƵƐĞ ŽĨ ƚŚŝƐ ůĞŶŐƚŚ ǁĞ ƌĞĐŽŵŵĞŶĚ ƵƐŝŶŐ ƐƵƉƉŽƌƚƐ ƚŽ ŚŽůĚ ƵƉ ƚŚĞ ƌŝĚŐĞ ƉƌŽĨŝůĞ ǁŚŝůĞ LJŽƵ ǁŽƌŬ zŽƵ ĐĂŶ ƵƐĞ Ă Ϯdžϰ ƉŝĞĐĞ ŽĨ ǁŽŽĚ ƚŚĂƚ ŝƐ ϵ ϴ ƚĂůů ĞƌĞ ĂƌĞ ƐŽŵĞ ĞdžĂŵƉůĞƐ ďĞůŽǁ 4 ...

Page 6: ... Curved center profiles Page x Glazing Page x Foundation frame special accessories Page Depending on the VL H greenhouse you KDYH RXU ER FRXQW ZLOO YDU RX PD KDYH DGGLWLRQDO ER HV IRU RSWLRQDO DFFHVVRULHV DV ZHOO VXFK DV VKHOYLQJ YHQWLODWLRQ KHDWLQJ DQG RWKHU LWHPV RX PD KDYH DGGLWLRQDO VPDOOHU ER HV RI URRI ZLQGRZV GHSHQGLQJ RQ PRGHO VL H 0D YDU E VL H RI PRGHO 0D YDU E VL H RI PRGHO 3DFNDJLQJ RXQ...

Page 7: ...1PMZDBSCPOBUF MB JOH 1BOFMT NN USJQMF XBMM 5LJD 5LJD 5LJD 5LJD 5LJD PLOOLPHWHUV 6 6 ...

Page 8: ...le right with 50 angle at top 2 1929 6 Vertical door profile left with 30 angle at top 2 2641 7 Vertical door profile right with 30 angle attop 2 2641 8 Crossbar 10 952 RQWHQWV RI PDLQ ER EDVLF FRQVWUXFWLRQ components 3URILOHV IRU ERWK JDEOHV 4XDQWLW HQJWK PP 3URILOH HVLJQ 3RV 7 SH HVFULSWLRQ ORRU 3URILOH 6LGH XUYHG HQWHU 3URILOHV DWHUDO 6XSSRUWV LQG UDFHV URVV DU 8QGHU LQGRZ 5RRI HDP 5H QIRUFHPHQW ...

Page 9: ... 12 for cross bars in front and back walls 4 for floor profile corner connectors 16 142 Phillips head screws 4 2x50PP 113 Phillips head screws 4 8 x 16PP 114 Roofbeam endcap coverplate 2 115 Connector plate for cross bars under windows 4 8 8 depends on PRGHO 116 Floor profile corner con nector covers 4 117 Self drilling screws 3 5 x 13 t connector 102 104 32 Length Type 952 mm 571 mm Riga XL 12 pc 4 ...

Page 10: ... 1 864 47 Rectangular tube with cross holes 1 933 Profile design Pos Description 4XDQWLW Length mm 41 Door profile left 1 949 42 Door profile right with hinge borings 1 949 48 Door profile top 1 864 43 Door profile bottom with large hole for door handle 1 864 3URILOHV IRU HDFK URRI ZLQGRZ KDYH URRI ZLQGRZV KDV KDV 3URILOHV IRU HDFK GLYLGHG UHYROYLQJ GRRU DW WKH ERWWRP JUHHQKRXVH KDYH 3URILOHV IRU HDFK ...

Page 11: ...Phillips head screws 4 2 x 60PP door 143 OD LQJ EORFN 30 x 16 x 4 153 T seal 2 2 966 973 2 4 4 1 2 1 4 135 Hinge 139 Phillips head screws 4 8 x 25PP hinges 140 Phillips head screws 4 8 x 16PP hinges 136 Sash Lock 141 Phillips head screws 3 5 x 22PP Sash Lock 158 Door holder PHWDO 2 parts 159 Phillips head screws 3 5 x 16PP door holder 127 Plastic corner connectors 1x left 1x right FFHVVRULHV EDJ I...

Page 12: ...HZV RQQHFWLQJ RQJ 3URILOHV RXU ORQJ DOXPLQXP H WUXVLRQV PD FRPH LQ VHFWLRQV WKDW QHHG WR EH FRQQHFWHG EHIRUH DVVHPEO 3OHDVH VHH H DPSOHV EHORZ 7KH UXE 6FUHZV DUH DOUHDG LQ WKH FKDQQHOV RX ZLOO QHHG WR ORRVHQ WKHP DQG VOLGH WKHP LQ SODFH 1 ...

Page 13: ...ssembly of the bracing WUD Bracing IRU Riga XL 21 EXQGOHG ZLWK WKH FHQWHU FXUYHV bracing strut 5HPHPEHU GXULQJ DVVHPEO 3ODFH WKH SDLU RI FXUYHV ZLWK WKH QRWFKHV IRU WKH EUDFHV LQ WKH FHQWHU RI JUHHQKRXVH 7KHQ DVVHPEOH DV GLUHFWHG UDFLQJ VWUXWV DQG WKH FRUUHVSRQGLQJ FXUYHV VKRXOG EH QHDU WKH PLGGOH 7KH FRPHV ZLWK RQH VWUXW WKH ZLWK DQG WKH ZLWK SHU EUDFLQJ VWUXW 12 ...

Page 14: ...e curved center profiles Assembly of the bracing strut curved center profile curved center profile hexagon head EROW M6 x 55 with nut M6 hexagon head EROW M6 x 55PP with nut M6 bracing strut 30 x 4 bracing strut 30 x 4 WUD Bracing IRU Riga XL 21 13 ...

Page 15: ...URILOHV 4FMG UBQQJOH TDSFX 4XDQWLW 0HDVXUHPHQW PP 3URILOHV DQG KDUGZDUH IRU IRXQGDWLRQ IUDPH LUVW KRRN WKH IRXQGDWLRQ IUDPH LQWR WKH VRLO SURILOH WKHQ URWDWH LW LQWR SRVLWLRQ 1RWH 0DNH VXUH WKH IRXQGDWLRQ IUDPH SLHFHV DUH FHQWHUHG LQ WKH VRLO SURILOH 7KH IRXQGDWLRQ IUDPH ZLOO EH VKRUWHU LQ OHQJWK WKDQ WKH VRLO SURILOHV 2QFH LQ SRVLWLRQ XVH VHOI WDSSLQJ VFUHZV WR VHFXUH WKH IRXQGDWLRQ IUDPH WR WKH ...

Page 16: ...DPH SOHDVH LQVHUW D EROW LQWR WKH IRXQGDWLRQ IUDPH FKDQQHO WR DWWDFK EUDFNHW ZLWK EROW QFKRULQJ WKH JUHHQKRXVH WR RXU RZQ IRXQGDWLRQ 0RXQWLQJ EUDFNHWV WR DWWDFK EDVH IORRU SURILOH W U R H LVWLQJ IRXQGDWLRQ DWHUDO VWD EDU SRV H DJRQ KHDG EROW 0 PP QXW 0 SRV 0RXQWLQJ EUDFNHW 7R DQFKRU WR FRQFUHWH ZH UHFRPPHQG 7DS RQ VFUHZV OHQJWK ZLWK WKH DQFKRU GLDPHWHU GULOO ELW VKRXOG EH LQFOXGHG 7DS RQ VFUHZV DU...

Page 17: ... WHQVLRQ NLW DQG RXU ZDOO PXVW EH KLJK 7KH JUHHQKRXVHV KDYH D IURQW DQG EDFN GRRU ZKLFK LV FHQWHUHG RQ WKH JDEOH ZDOO 7KH URXJK RSHQLQJ IRU WKH GRRU QHHGV WR EH EHWWHU WR PDNH LW KHQ EXLOGLQJ RXU VWHP ZDOO XVH WKH H WHULRU GLPHQVLRQV RI WKH JUHHQKRXVH IRU WKH H WHULRU GLPHQVLRQV RI RXU ZDOO WKLV ZLOO HQVXUH RXU GRRUV ZLOO RSHQ IXOO DQG FRQQHFW ZLWK WKH GRRU FDWFK 7KH IORRU SURILOH ZKLFK ZLOO VLW R...

Page 18: ...S 6WHS 6WHS LQVLGH WWDFK WKH 7 FRQQHFWRU SRV ZLWK LQVHUWHG EROW P DQG QXW 0 WWHQWLRQ QVHUW QRWHG TXDQWLW RI EROWV 0 SRV LQ SUR OH JURRYH EHIRUH DVVHPEO YHUWLFDO SUR OH PLGGOH SRV YHUWLFDO SUR OH PLGGOH SRV FURVVEDU SRV FURVVEDU SRV W FRQQHFWRU SRV FURVVEDU SRV VFUHZHG ZLWK 3KLOOLSV KHDG VFUHZ SRV RQQHFW URVVEDU XVLQJ 7 FRQQHFWRU SRV DQG LQVHUWHG EROW 0 DQG QXW 0 SRV 6WHS 6WHS WWHQWLRQ QVHUW QRWHG ...

Page 19: ...QVHUWHG EROWV 0 DQG QXW 0 SRV RQ WKH FURVVEDU DQG YHUWLFDO SURILOH 6WHS 6WHS 6WHS 7KH W FRQQHFWRUV DUH FRQQHFWHG ZLWK VHOI GULOOLQJ VFUHZV SRV RQ WKH HGJH VWD EDU 9LHZ IURP LQVLGH 9LHZ IURP LQVLGH 9LHZ IURP LQVLGH 1RWH 8VH WDSH WR KROG EROW LQ GHVLUHG ORFDWLRQ 5HFRPPHQGHG 3ODFHPHQW HLJKW QVHUW EROWV LQWR FKDQQHO RQ HGJH FXUYH WR DWWDFK RXU ODWHUDO VXSSRUWV 3ODFHPHQW KHLJKW PD YDU DQG ZLOO GHWHUPLQ...

Page 20: ...FHQWHU SUR OHV SRV HQODUJHG 6WHS 6OLGH LQ VXEVHTXHQW JOD LQJ DQG FXUYHG FHQWHU SUR OHV RQVLGHU 5RRI ZLQGRZ SRVLWLRQ GXULQJ WKLV WLPH 6WHS WWHQWLRQ RU URRI ZLQGRZ LQVWDOODWLRQ LQVHUW RQH EROW 0 SRV LQ HDFK FXUYH DGMDFHQW WR ZLQGRZ EHIRUH DVVHPEO Q FURVV EDU XQGHU ZLQGRZ SRV LQVHUW 0 WWDFK ZLQGRZ FURVVEDU FRQQHFWRU SODWH SRV RQ LQVLGH ZLWK EROW 0 DQG QXWV WWHQWLRQ QVHUW EROWV 0 SRV LQ SUR OH JURRYH ...

Page 21: ...KH VHDOV EHFDXVH LW FRQWUDFWV LQ FROG ZHDWKHU Hexagon bolts can be inserted later into most of profiles through a special hole in the channel If there is no hole you can drill one yourself T sealings pos 126 138 153 for all doors and windows altogether ca 26 m WWHQWLRQ 7KH W VHDO JRHV RQO RQ VLGHV RI WKH URRI ZLQGRZ QRW WKH WRS EDU SURIL OH WWHQWLRQ 7KH W VHDO PXVW EH LQVHUWHG I L UVW LQ WKH WRS SU...

Page 22: ...RRI ZLQGRZ QFRUUHFW RUUHFW 7KH URRI ZLQGRZ LV LQVWDOOHG E VOLGLQJ LW RQ IURP WKH HQG RI WKH URRI EHDP DV VKRZQ WR WKH OHIW OLNH D EDOO DQG VRFNHW WWDFK WKH 6DVK RFN SRV ZLWK 3KLO OLSV KHDG VFUHZ SRV 21 I RX DUH VWUXJJOLQJ ZLWK LQVWDOODWLRQ RI WKH URRI ZLQGRZ 7KH WRS ULGJH RI WKH ZLQGRZ VOLGHV WKURXJK WKH YHU QDUURZ FKDQQHO RQ WRS RI WKH URRI EHDP 6SUD ERWK WKH FKDQQHO DQG WKH WRS RI WKH ZLQGRZ EDU...

Page 23: ...HH ERWWRP RI QH W SDJH IRU FRUUHFW SODFHPHQW WR DYRLG EXUVWLQJ RXU SLVWRQ 2SHQ WKH URRI ZLQGRZ XQWLO WKH WKUHDGV RI WKH SLVWRQ HQJDJH WKH WKUHDGV RI WKH RSHQHU IUDPH 7KUHDG WKH SLVWRQ KDOI ZD LQWR WKH WKUHDGV LQ WKH RSHQHU IUDPH I RX DUH VWUXJJOLQJ WR WKUHDG WKH SLVWRQ LQ SODFH LW LQ WKH IULGJH IRU PLQXWHV WKHQ WU DJDLQ HW WKH RSHQHU DFFOLPDWH WR WKH JUHHQKRXVH IRU KRXUV EHIRUH RX PDNH DGMXVWPHQWV...

Page 24: ...eck that the window can open freely right from the start If not you must change the position of the aluminum profiles tŚĞŶ ƉůĂĐŝŶŐ ƚŚĞ ΗƋƵŝĐŬͲƌĞůĞĂƐĞΗ ĂƌŵƐ ŝŶƚŽ ƚŚĞ Ɛŝůů ďƌĂĐŬĞƚ ďĞ ƐƵƌĞ ƚŚĂƚ ďŽƚŚ ƉŽŝŶƚƐ ĂƌĞ ŽŶ ƚŚĞ ƐĂŵĞ ƐŝĚĞ ŽĨ ƚŚĞ ďƌĂĐŬĞƚ Ĩ ƚŚĞLJ ĂƌĞ ŶŽƚ ƚŚĞ ŽƉĞŶĞƌ ǁŝůů ŶŽƚ ŵŽǀĞ ĨƌĞĞůLJ ǁŚĞŶ ƚŚĞ ƉƌĞƐƐƵƌĞ ďƵŝůĚƐ ĂŶĚ LJŽƵƌ ƉŝƐƚŽŶ ǁŝůů ďƵƌƐƚ dŚŝƐ ŝƐ ŶŽƚ ĐŽǀĞƌĞĚ ƵŶĚĞƌ ǁĂƌƌĂŶƚLJ ĞĞ ƉŝĐƚƵƌĞƐ ďĞůŽǁ E KZZ d E...

Page 25: ...Ě ŶƵƚ Position the restraint as illustrated and adjust as needed to avoid interference from the crossbar as the window is raised and lowered You can make your own restraints from 1 16 stainless wire rope stranded 7x19 for maximum flexibility Overall length should be about 16 When installed near the crossbar they will limit the window opening to less than the safe extents of the hinge and window op...

Page 26: ...G VXUIDFH ZRUNV ZHOO UHFWDQJXODU WXEH DQG GRRU SUR OH DWWDFKHG ZLWK SRV WWDFK WKH 6DVK RFN SRV ZLWK 3KLOOLSV KHDG VFUHZ SRV 1RWH 7KH UXEEHU VHDO LV LQ RQH EXQGOH IRU DOO GRRUV DQG ZLQGRZV XW DFFRUGLQJO SOHDVH 0RXQWLQJ GLYLGHG UHYROYLQJ GRRU DW WKH ERWWRP 9LHZ IURP RXWVLGH JOD LQJ EORFN SRV PSRUWDQW 6LOLFRQH VKRXOG EH XVHG WR VHDO WKH FRUQHU FRQQHFWRUV FDSV SRV ZKHUH WKH PHHW WKH DOXPLQXP SURILOHV ...

Page 27: ... ZLQGRZV XW DFFRUGLQJO SOHDVH 0RXQWLQJ UHYROYLQJ GLYLGHG GRRU WRS 9LHZ IURP RXWVLGH 3ODFH WKH SUR OHV RQ D IODW VXUIDFH DFFRUGLQJ WR WKH GLDJUDP EHORZ D FDUGERDUG VXUIDFH ZRUNV ZHOO WWDFK WKH 6DVK RFN SRV ZLWK 3KLOOLSV KHDG VFUHZ SRV PSRUWDQW 6LOLFRQH VKRXOG EH XVHG WR VHDO WKH FRUQHU FRQQHFWRUV FDSV SRV ZKHUH WKH PHHW WKH DOXPLQXP SURILOHV DV ZHOO DV DOO DURXQG WKH ZLQGRZ JOD LQJ ZKHUH LW PHHWV W...

Page 28: ...ructions for lockable handle 1 2 3 4 5 6 7 8 9 5LJD 0HWDO RRU ROGHU IWHU WKH GRRU LV DVVHPEOHG DQG LQVWDOOHG RX PD SODFH WKH GRRU KROGHU DV VHHQ WR WKH OHIW RX PD XVH VHOI WDSSLQJ VFUHZV RU SUHGULOO D VPDOO KROH 27 ...

Page 29: ... LQWR WKH VKHHW 7KLV LV D SXUHO RSWLFDO GLVDGYDQWDJH ZKLFK FDQQRW EH DYRLGHG 7KH VKHHWV ZLOO QRW VXIIHU DQ GDPDJH IURP WKLV WWHQWLRQ 2QO QHXWUDO FXUH VLOLFRQH VKRXOG EH XVHG GXH WR SRVVLEOH VWUHVV FUDFNV LQ WKH SRO FDUERQDWH JOD LQJ DFR KDV RVV 6LOLFRQH RU GYDQFHG 6LOLFRQH LV UHDGLO DYDLODEOH DW PRVW ORFDO KRPH LPSURYHPHQW VWRUHV OHDQVLQJ DQG PDLQWHQDQFH OHDQ WKH JUHHQKRXVH ZLWK ZDWHU DQG D VRIW F...

Page 30: ...re stored in a tight container that doesn t have enough room for them to expand If a piston has burst this is usually evident by visible oil a gash in the side of the piston or the rubber stopper in the end might have popped out Does everything look intact on your opener x There is a cast metal T piece that occasionally breaks see pictures to the right x Sometimes the arms of the opener are torn o...

Page 31: ...of your warranty 3 Leaking cylinder Is covered during the warranty period 4 Cracked cylinder Žƌ ƌƵďďĞƌ ƉůƵŐ ĐŽŵŝŶŐ ŽƵƚ ƚŚĞ ĞŶĚ An overloaded cylinder as a result of ŝŶĐŽƌƌĞĐƚ ŝŶƐƚĂůůƚŝŽŶ ƵƐĂŐĞ ŽĨ ĂƵƚŽ ŽƉĞŶĞƌ is normally not covered by the warranty Individual treatment each time See example to the right dŚĞ cylinder can be overloaded due to incorrect installation See our installation videos on www ...

Page 32: ...PHG WR ILW LI GHVLUHG 3 strut LQFKHV V36 angle end tail narrow 4 5 cross brace V161 connector with grub screw KH DJRQDO EROW 0 PP ZLWK QXW 0 S12 S1 KH DJRQDO EROW 0 PP ZLWK QXW 0 S5 S1 7 KHDG EROW 0 PP ZLWK QXW 0 S15 S1 2 2 2 OOHQ NH V21 1 1 1 3RO FDUERQDWH VKHHWV VKHOI VXUIDFH Q D VHSDUDWH ER Shelf kit only available for Riga XL 5 6 9 31 ...

Page 33: ...ULPPHG WR ILW LI GHVLUHG 3 strut LQFKHV V36 angle end tail narrow 4 5 cross brace V161 connector with grub screw KH DJRQDO EROW 0 PP ZLWK QXW 0 S12 S1 KH DJRQDO EROW 0 PP ZLWK QXW 0 S5 S1 7 KHDG EROW 0 PP ZLWK QXW 0 S15 S1 2 2 2 OOHQ NH V21 1 1 1 3RO FDUERQDWH VKHHWV VKHOI VXUIDFH Q D VHSDUDWH ER Shelf kit only available for Riga XL 5 6 9 32 ...

Page 34: ... ZLWK FRQQHFWRUV ZLWK JUXE VFUHZV 9 DV VKRZQ WR WKH OHIW 7LJKWHQ WKH VHW VFUHZV JUXE VFUHZV ZLWK LQFOXGHG OOHQ ZUHQFK JUHHQKRXVH FXUYH Pos 3 Pos 1 Pos 5 VVHPEO 2YHUYLHZ WWDFK DQ DQJOH HQG WDLO 9 WR HDFK HQG RI WKH VWUXWV SRV 3XVK LQ DV IDU DV LW ZLOO SRVVLEO JR LW LV RND LI LW GRHV QRW IXOO LQVHUW QVHUW RQH 0 EROW 6 SHU JUHHQKRXVH FXUYH LQFOXGLQJ HGJH FXUYHV LQWR WKH ORZHU ERWWRP FKDQQHO RI WKH DW...

Page 35: ...UDO VXSSRUW ZLWK LQVHUWHG EROW DQG QXW DQG OHW WKHP KDQJ WWDFK FURVVEUDFH WR IURQW ORQJLWXGLQDO SURILOH IURP VKHOI NLW ZLWK LQVHUWHG EROW GG WKH VWUXW DVVHPEO EHQHDWK DQG WLJKWHQ ZLWK QXW 5HSHDW RQ DOO FXUYHV Step 5 Step 4 WWDFK VWUXW WR JUHHQKRXVH FXUYH ZLWK EROW 6 DQG QXW 6 7LS QVHUW EROW 6 DW WKH LQVHUWLRQ SRLQW QHDU WKH ERWWRP RI WKH FXUYH 3OHDVH QRWH WKDW WKH EODFN DQJOH PD QRW PDWFK WKH DQJO...

Page 36: ...on top of the cross bar to support the weight as seen below For the Riga XL the best placement is above the rear wall door with the weight on the door frame as seen to the left You may cut the hole in the polycarbonate before or after assembly of the greenhouse Draw the outline of hole to be cut only the area protruding from the polycarbonate Drill a hole in each corner of the panel to insert a fi...

Page 37: ... cut along your marked lines note if you use this method your measurement will be different than the ones to the right 6WHS Bolt the heavy thick L bracket which comes with the vent to the galvanized steel T bracket supplied by us screw self tapping screws the T bracket to the bottom of the vent and cross bar slightly off center You may want to drill small pilot holes Attach the motor to the L brac...

Page 38: ...ƐĞŵďůLJ 37 ZŝŐĂ WůĂƐƚŝĐ ŽŽŬ ƐƐĞŵďůLJ ϭ Ϯ ϯ WŝŶĐŚ ƚŚĞ ƚŽƉ ŽĨ ƚŚĞ ƉůĂƐƚŝĐ ŚŽŽŬ ĂŶĚ ƐůŝĚĞ ŝƚ ŝŶƚŽ ƚŚĞ ƌŝĚŐĞ ďĞĂŵ Žƌ ƚŚĞ ĐƵƌǀĞ ďĞĂŵƐ WůĂƐƚŝĐ ŚŽŽŬƐ ĂƌĞ ĚĞƐŝŐŶĞĚ ĨŽƌ ƐƵƉƉŽƌƚŝŶŐ ƉůĂŶƚƐ ŐƌŽǁŝŶŐ ǁŝƌĞ Ͳ Žƌ ŽƚŚĞƌ ůŝŐŚƚǁĞŝŐŚƚ ŝƚĞŵƐ ...

Page 39: ...1RWHV 3 ...

Page 40: ...DQ DQUHBD NQ RRDLAKX TDRSHNMR HUD TR B KK NKK EQDD µ µ BTRSNLDQRDQUHBD DW BN BNL W BN Q CHMF VVV BNL WůĞĂƐĞ ǁĂƚĐŚ ŽƵƌ ĂŶŝŵĂƚĞĚ ĂƐƐĞŵďůLJ ǀŝĚĞŽ ŽŶ ŽƵƌ džĂĐŽ dƌĂĚŝŶŐ Ž zŽƵdƵďĞ ŚĂŶŶĞů ŝŶĚ ƚŚĞ ůŝŶŬ Ăƚ ǁǁǁ ĞdžĂĐŽ ĐŽŵ ...

Reviews: