background image

Operating instructions EcoStar 530 F-M 


Datei:1_EcoStar530F-M_9662597_Betriebsanleitung_EN_2009-05.doc 

Update: 2012-12-18, S. 34 , 40 

9662597


41/42 

W e reserv e the right to change ex ecution and construction!  

MEIKO Maschinenbau GmbH & Co. KG,  Englerstr. 3,  D-77652 Offenburg,  Tel.: +49/781/203-0,  Fax: +49/781/203-1121 


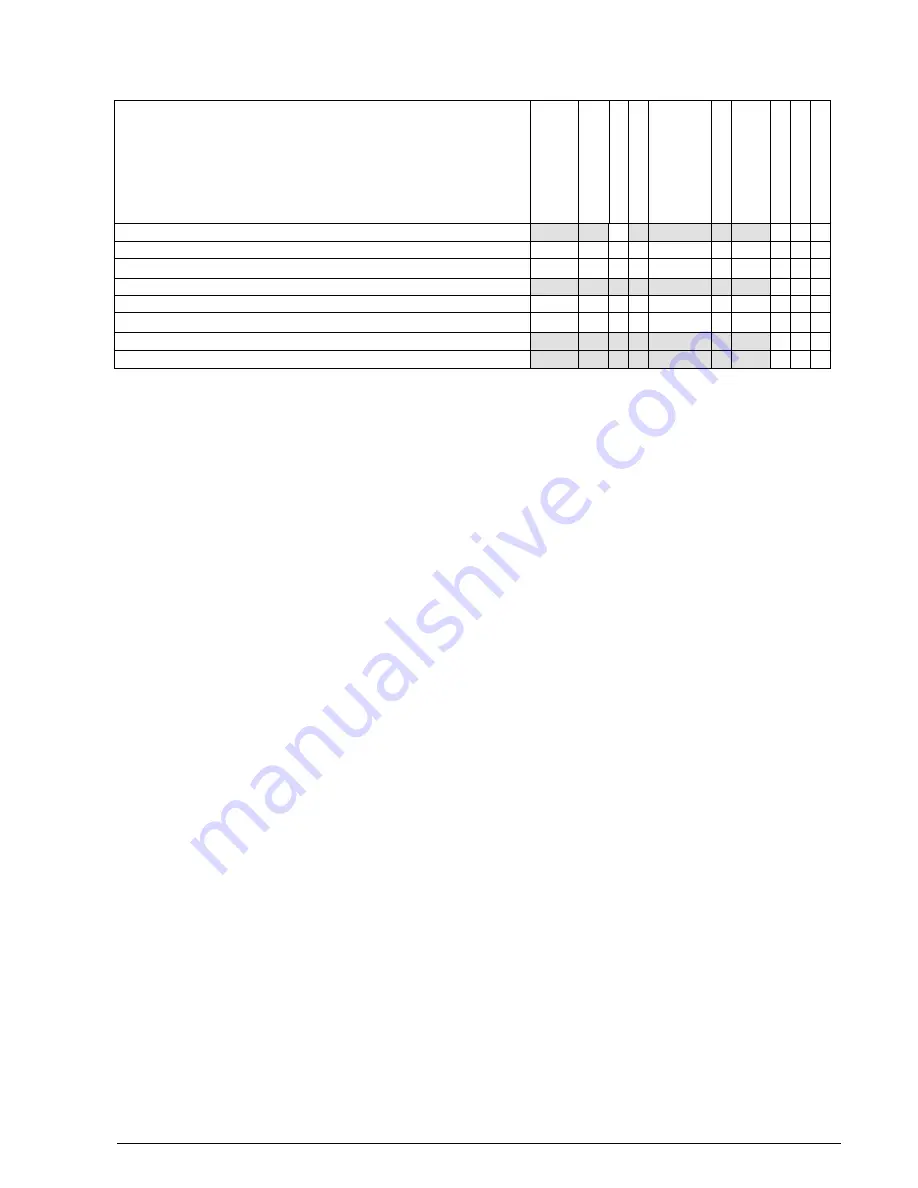
Maintenance procedures 


FV

 2

8

FV

2

8

GI

O


E

c

o

S

ta

4

3

0

 F 


E

c

o

S

ta

5

3

0

 F

-M


FV

 4

0

.2

 /

 FV

 6

0

.2

 /


FV

 7

0

.2

 D


GK 

6

0


OR

 5

0

 H


E

co

S

ta

r 5

4

5

D

-M

 /


DV

 8

0

.2

 /

 DV

 1

2

0

.2

 /


DV

 1

2

5

.2

 /

 DV

 2

0

0

.2

 /


DV

 2

0

0

.2

 P

W


D

V

 2

7

0

 B


FV

 1

3

0

.2

 –

 FV

 2

5

0

.2


D

V

 2

7

0

.2


C

o

mpo

n

e

n

OK


C

o

mpo

n

e

n

fa

u

lt

y


C

o

mpo

n

e

n

re

p

lac

e

d


Check dosage, adjust if necessary 


10. Operation check of the complete machine 


Check machine for correct interaction of all functions 


11. Test run 


Check results of test wash and rinse  


Brief instruction for new personnel  


20  Environmentally acceptable measures, Disposal of the 

installation 

Each discarded appliance is to be made immediately unserviceable - to avoid later acci-
dents. 


Switch the machine off completely via the on-site power disconnection device. 

 
When you eventually dispose of the installation (dismantlement/scrapping), the parts and 
their corresponding materials should preferably be re-used.


Here is a list of the materials that most frequently occur when dismantling: 

  Chrome-nickel-steel 

  Aluminium 

  Copper 

  Brass 

  Electrical and electronic parts 

  PP and other synthetic materials 

21  Documentation 

Installation drawing / technical sheet 

Technical data sheet 

Wiring diagram / Programming instructions 

Summary of Contents for EcoStar 530 F-M

Page 1: ......

Page 2: ...s for the waste water connection 13 6 7 Emergency off 13 6 8 Chemicals for the operation of the appliance 13 6 9 Instructions for the disposal of the packaging material 14 7 Settings for initial commi...

Page 3: ...er of this documentation 24 17 Settings modifications on site adaptation 25 17 1 Using the keyboard for programming 25 17 2 Code entry 25 17 3 Service level 26 17 4 Parameter list 31 17 5 Assignment l...

Page 4: ...n fully and to use it properly It will also enable you to avoid repairs and the related loss of operational time In the event of any damage caused by non observance of these operating instructions any...

Page 5: ......

Page 6: ...lation s operation Warning of dangerous electrical current Warning of possible hand injuries No splashing water prohibits the use of a high pressure hose Danger of explosion indicates a potential expl...

Page 7: ...to the essential requirements of the following EC Directives harmonized standards national standards Par la pr sente nous certifions sous notre seule responsabilit la conformit du produit avec les ex...

Page 8: ...trained in all questions relating to safety at work and environmental protection and in particular that they are familiar with the operating in structions as well as with the safety information provid...

Page 9: ...ry out the necessary activities and who therefore are aware of the possible dangers and how to avoid them who have been trained in first aid and in the on site rescue arrangements who have read and w...

Page 10: ...he Door must be closed Open the door very carefully during the programme cycle as otherwise wash water could splash out The tank heating element may still be hot after the tank has been emptied There...

Page 11: ...observed ATTENTION The shipping operations may only be carried out by qualified persons who ob serve the safety instructions Observe transport instructions on the packing The appliance must be moved w...

Page 12: ...nts for the electrical connection Work on the electrical part of the machine may only be undertaken by specialist per sonnel The customer must guarantee the following points relating to the connection...

Page 13: ...ur trap into the waste water connection if this is not already built in further information about this is in the Installation drawing Technical Sheet The drain hose must be connected to the waste wate...

Page 14: ...be observed without fail Any necessary initial tests to parts supplied by sub suppliers must be carried out More detailed information if required can be found in the relevant Instructions for Use ATTE...

Page 15: ...eating phase the light above the pre selection key will flash When the light remains constantly lit the machine is ready for operation The time until the operation readiness is reached depends on the...

Page 16: ...lery can be too close together Do not overload the baskets Do not stack the dishes in the wash basket directly on top of each other As the wash water could not strike the items directly and unnecessar...

Page 17: ...ically 10 Care and maintenance 10 1 Care general The appliance has been designed to minimise the need for cleaning care and mainte nance However for a reliable safe and permanent function of the appli...

Page 18: ...dish washer and a poor wash Food residues sticking to the tank tank heating element and sieves must be removed with a brush Disassemble the wash arms and rinse them with flowing water Wash nozzles mu...

Page 19: ...scaled you should ask a service engineer from the agency responsible to de scale the boiler 11 Machine with built in water softening device EW10 Not in case of machines with air gap 11 1 General If th...

Page 20: ...tion button for at least 3 seconds ATTENTION We recommend that you fill the machine immediately after the regeneration process in order to dissolve and remove from the wash tank any salt particles tha...

Page 21: ...value The tank water is heated up to 71 C during washing After a brief stop time the dripping pause and the final rinsing starts as long as the washing time set in the programme has been reached or e...

Page 22: ...g a time relay Times shorter than three minutes should not be set because oth erwise residual moisture would stay in the housing and possibly damage the fan motor 12 2 Noise level Work place noise lev...

Page 23: ...Stripes and smears on the dishes Rinse water mineral content too high see operating instructions If this is observed only at particular times check water softener for regeneration This must not carrie...

Page 24: ...y defined Any personnel undergoing training are only allowed to work on the dishwashing machine installation under the supervision of an experienced person persons Trained operating personnel Trained...

Page 25: ...ing instructions accompanying every machine in the series this is described in condensed form For control programming the power supply must be available but the machine must be completely switched off...

Page 26: ...evel The list of service parameters can be found on this level parameter numbers 1xx Here you can view these or modify them or you can also call up the ventilation of the rinse and wash hoses On the s...

Page 27: ...ng the accept key the value will flash Increase the value using the I key or reduce it using the II key and confirm with the Accept key You can leave this level by pressing the 0 key See 17 4 for list...

Page 28: ...rtridge has been changed You can leave this level by pressing the 0 key again 17 3 5 First time filling of boiler this display by pressing the accept key After emptying the boiler repair of descaling...

Page 29: ...uire is displayed Confirm the parameter to be modified by pressing the accept key the value will flash Increase the value using the I key or reduce it using the II key and confirm with the Accept key...

Page 30: ...ut will be shown with status Press the I key to move forwards and the II key to move backwards until you reach the output you require Modifying Confirm the output to be modified by pressing the accept...

Page 31: ...water quality 106 Hardness degree Parameters 0 50 dH KH 30 The quantity of soft water available between two regenerations de pends onthe hardness of the wa ter for partial demineralisation TE too 107...

Page 32: ...ers 202 Must be tank temperature Parameters 10 82 C 60 Standard for all the rinse programs on one appliance Output depend ent on definition 203 Pre rinse time Parameters 0 8 sec 0 See pre rinse proces...

Page 33: ...ied out within 5 minutes otherwise factory settings will not be loaded Without power supply reset the information 123 will be displayed 241 Air gap FA in corporated Parameters 0 1 0 0 FA not available...

Page 34: ...ctance VE optional AIn 1 83 C Boiler temperature AIn 2 60 C Tank temperature out 1 1 0 1 Wash pump out 1 2 0 1 Booster Pump out 1 3 0 1 Drain pump out 2 1 0 1 Rinse aid dosage pump out 2 2 0 1 Deterge...

Page 35: ...times will be adapted to the rinse time so that the correct concentration remains if the rinse time is modified 18 Operating errors Despite being expertly designed the machine may develop minor fault...

Page 36: ...code once again 123 Factory setting parameter list Switch power supply ON OFF within 5 minutes and set parameters back to factory set tings This will be rejected and parame ters will be retained Info...

Page 37: ...h defective 202 Boiler level during filling not reached early enough only FA machines See 201 203 No change to boiler level switch detected on emptying only for FA machines Boost pump defective Plug c...

Page 38: ...es not fall on time Only with built in drain pump Fresh water supply insufficient water faucet closed Drain pump soiled defective Rotor loose Drain pump plug connector loose Start capacitor defective...

Page 39: ...of the person conducting the maintenance or repair work Failure to observe these precautions can result in severe physical injury or damage to property ATTENTION Before carrying out any maintenance an...

Page 40: ...y pattern Check wash arm hubs 3 Fresh water rinse Check flow pressure water pressure Check rinsing system is complete and produces correct spray pattern Check that system is watertight 4 Housing and m...

Page 41: ...ine Check machine for correct interaction of all functions 11 Test run Check results of test wash and rinse Brief instruction for new personnel 20 Environmentally acceptable measures Disposal of the i...

Page 42: ......

Page 43: ...M...

Page 44: ...xit the ventilation programme by using the exit key General For control programming the power supply must be available but the machine must be completely switched off no LED must be illuminated Code e...

Page 45: ...ccording to manufacturer s in formation then it must be corrected depending on the water hard ness and the rinse result 106 Hardness degree Parameter 0 50 dH 30 The quantity of soft water available be...

Page 46: ...ention All changes to service parameters will be reversed Pow er supply reset must be carried out within 5 minutes otherwise factory settings will not be loaded Without power supply reset the informat...

Page 47: ...irazione Tubo de aspiraci n Uk ad ss cy Aanzuigleiding Laugenpumpe Drain pump Pompe de vidange Pompa di scarico Bomba de vaciado Pompa spustowa Afvoerpomp Ablaufverrohrung mit Siphon bauseits Drain pi...

Page 48: ...ma z dala od r de ciep a LET OP Aanzuigleiding van warmtebronnen verwijderd houden 8 005 393 8 005 372 7 mm Deckel Reiniger bzw Klarsp lerbeh lter Lid for detergent resp rinse aid container Couvercle...

Page 49: ......

Page 50: ...sente nous certifions sous notre seule responsabilit la conformit du produit avec les exigences fondamentales des directives CE normes harmonis es et normes nationales suivantes Con la presente dichi...
Reviews: