EVN Rextron EVA-ME20WW User Manual Download Page 7


5


Assembly 

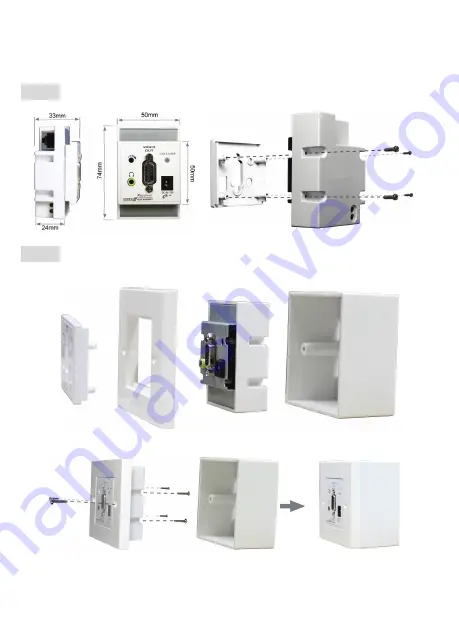
Step 1. Remove the 4 screws on the Extender Unit


Step 2. Install the Extender Unit inside the Wall-mount Box, as 

figure shown below.


Extender Cover         Wall-mount Cover                   Extender Unit                        Wall-mount Box 


NOTE

: The depth of the Wall-mount Box should not be less than 34mm 


Summary of Contents for Rextron EVA-ME20WW

Page 1: ...Tel 49 7161 60686 0 www evn components de 73037 G ppingen Fax 49 7161 60686 29 info evn components de RoHS PP5 RHAA12Z 000 Features and functions may be added or changed after the manual was written P...

Page 2: ...se read this manual thoroughly and follow the Installation procedures to prevent any damage to the unit or any connecting device RoHS The final specifications are the actual product based Features and...

Page 3: ...es the best video presenting and the RGB Skew feature on the Receiver Unit allows manually and intuitively adjusting video quality according to the length of CAT5 cable Its compact design offers the c...

Page 4: ...your application z EQ Sharpness adjustment for optimal signal clarity z Support both DC jack or Terminal block power supply interface z Compatible with most of the popular screen resolution to XGA SXG...

Page 5: ...source depends on model T5 LED Indicator Green Power ON Red EDID Copy Status See Operation Transmitter T6 T6 DC jack Terminal block DC 9 12V power supply R1 RJ 45 Connector Connect to Transmitter Unit...

Page 6: ...er end of the cable to the VGA Audio port of the Unit 3 Basically the Transmitter is power free operation and it draws little power from Receiver Unit except EDID Copy processing Video Audio Type requ...

Page 7: ...rews on the Extender Unit Step 2 Install the Extender Unit inside the Wall mount Box as figure shown below Extender Cover Wall mount Cover Extender Unit Wall mount Box NOTE The depth of the Wall mount...

Page 8: ...Unit Transmitter is automatically provided instead To efficiently achieve EDID communication when the computer is booting up users are required to implement the EDID Copy on the Local Unit Transmitter...

Page 9: ...ep 1 Connect the monitor EDID compliant to the VGA Port on the Unit and power on the monitor Step 2 Press the button EDID Copy and release the button RIGHT AFTER the LED flashing green 3 4 sec Step 3...

Page 10: ...t HDB15 F x 1 Audio jack x 1 RJ 45 x 1 RJ 45 x 1 HDB15 F x 1 Output RJ 45 x 1 HDB15 F x 1 Audio jack x 1 LED Power EDID Copy Dual Color x 1 Power x 1 Video Resolution Max 1920 x 1080 Full HD 1920 x 12...

Page 11: ...pe Function Transmitter Receiver Dongle Video EV 10DL EV 01DR Video EV A20WL EV A20WR US Type Wallplate Video Audio EVA A20WL EVA A20WR VGA SKEW TUNER Type Function RGB Calibration Distance Max 200M 3...

Page 12: ...10 2U Rackmount Module Tray Kit RMU U2RACK Power Hub 12V x 8 PHQ 50T...

Page 13: ...n expressed or implied with respect to the contents or use of this documentation and especially disclaims its quality performance merchantability or fitness for any particular purpose The direct vendo...

Reviews: