background image


EZN Plus Series   


System Requirements 

Before installing, please check that your computer meets the following system requirements. 


Operating System: Microsoft Windows XP / Vista (32-bit) / 7 (32-bit) 


Microsoft Internet Explorer 7 or above 

 
Packing List 


EZN Plus Series Camera x 1 


4-Pin Terminal Block x 1 


Quick Mounting Ring x 1 


Software CD x 1 


RJ-45 Connector x 1 


Quick Installation Guide x 1 


Mounting Kit x 1 


-


Long Screw x 4 (for attaching the Quick Mounting Ring to the mounting surface) 

-


Short Screw x 4 (for connecting the camera base to the quick Mount Ring) 

-


Screw Anchor x 4 (in conjunction with Long Screw) 

-


Hexagon Key x 1 (for adjusting the camera position) 

-


Hexagon Wrench x 1 (for removing the sunshield) 

-


Torx Wrench x 1 (for removing the lock tab) 

-


Mounting Template x 1 


Note:

 Contact the shipper if any items appear to have been damaged in the shipping process. If any 

items are missing, notify your EverFocus Electronics Corp. Sales Representative or Customer Service 
Branch. Please also keep the shipping carton for possible future use. 


2.


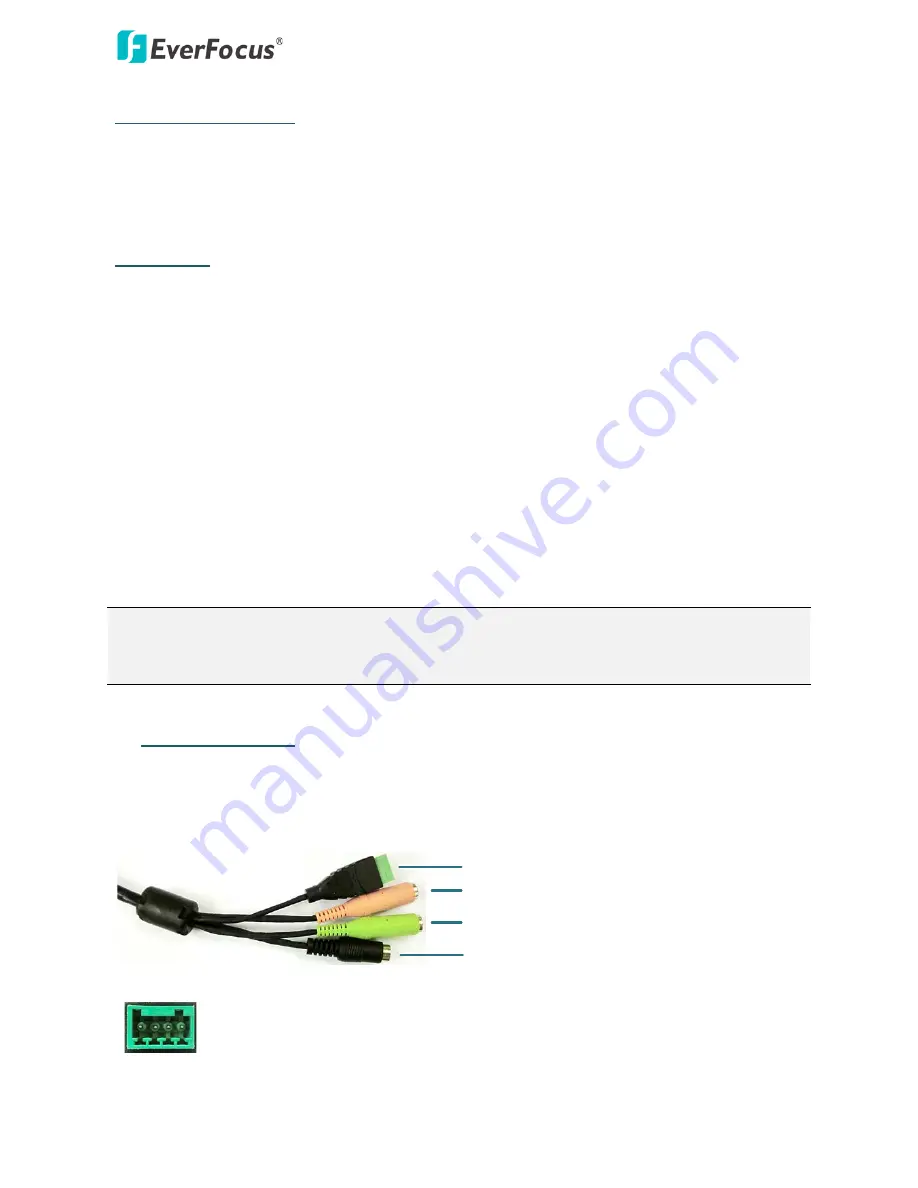
4-Pin Data Cable 

The 4-Pin Data Cable provides connections for power, audio input / output and alarm input / output. 
The wires are illustrated and defined below. Note that microphones with external power supplies 
are required. 

Alarm Input / Output

Audio Input (Pink)

Audio Output (Green)

12V DC Input


Pin Assignment for Alarm Input / Output 

4   3   2   1


Pin 1: Alarm GND


Pin 2: Alarm In 

Pin3: Alarm Out-


Pin4: Alarm Out+


Summary of Contents for EZN3160 Plus

Page 1: ...EZN Plus Series Outdoor IR Bullet IP Camera Quick Installation Guide Copyright EverFocus Electronics Corp Release Date October 2012...

Page 2: ...ocus Zoom Control Press this control to the left or right to adjust camera focus To zoom in out the camera view press this control up or down 3 Reset Button Resets all configurations to the factory de...

Page 3: ...x 1 for adjusting the camera position Hexagon Wrench x 1 for removing the sunshield Torx Wrench x 1 for removing the lock tab Mounting Template x 1 Note Contact the shipper if any items appear to have...

Page 4: ...uick Mounting Ring If you wish to run the wires into the wall drill another hole in the middle of the circular area within the Quick Mounting Ring 2 Push the four supplied anchors into the four holes...

Page 5: ...mera Or connect a handheld test monitor to the TV out connector on the camera module for setting image zoom and focus Please refer to 3 3 Adjusting Camera Focus Zoom later in this Quick Installation G...

Page 6: ...the camera body Screw Sunshield Camera Body 2 Unscrew the Fix Screw using the provided torx wrench and then remove the Lock Tab Lock Tab Fix Screw 3 Rotate and then remove the camera cover 4 Insert a...

Page 7: ...est monitor to the TV out connector for setting image zoom and focus 4 To adjust camera focus push the Focus Zoom Control to the left or right To zoom in out the camera push the Focus Zoom Control up...

Page 8: ...he LAN The default network values of the cameras will be displayed By default the network protocol of the camera is DHCP 3 To configure the network settings select a camera and then click Login Multi...

Page 9: ...ls 6 To access the camera highlight the camera and click Connect to Selected IP The Internet Explorer window pops up 7 Type the user ID and password to log in The Live View window of the camera appear...

Page 10: ...he IP camera on a LAN WAN Internet The camera must be assigned an IP address that is compatible with its LAN By setting up port forwarding on the router you can remotely access the cameras from outsid...

Page 11: ...tion may require that you use DDNS for a reliable connection Please refer to 7 3 2 DDNS in the User s Manual One to One Connection Directly from PC to IP Camera You can connect directly without using...

Page 12: ...ng the Camera to log in the camera 2 Select the camera and then click Upgrade Firmware A browsing window appears 3 Select the firmware file evb and then click Open The IP Utility will automatically up...

Page 13: ...w everfocus co jp info everfocus co jp EverFocus Europe UK Unit 12 Spitfire Business Park Hawker Road Croydon Surrey CR0 4WD UK TEL 44 20 8649 9757 44 845 430 9999 FAX 44 20 8649 9907 www everfocusuk...

Reviews: