background image


EMN Series Mini Mobile IP Dome


37


Upgrade Firmware

This function can only be set up in the 

Advanced

 tab. Click the 

Browse

 button to 

find a previously prepared firmware upgrade file. Click the 

Upload

 button to install the new firmware. 


Note: 

1.


Do not disconnect power to the unit during the upgrade sequence. The unit will reboot 
automatically after the upgrade has completed (1-5 minutes). 

2.


During the upgrade process, all event recording actions will be stopped. Event recording 
actions will resume after the camera is rebooted.   

3.


If the “

File Error, Please re-login!!

” warning message appears when upgrading the firmware, 

please try the following instructions: 

a.


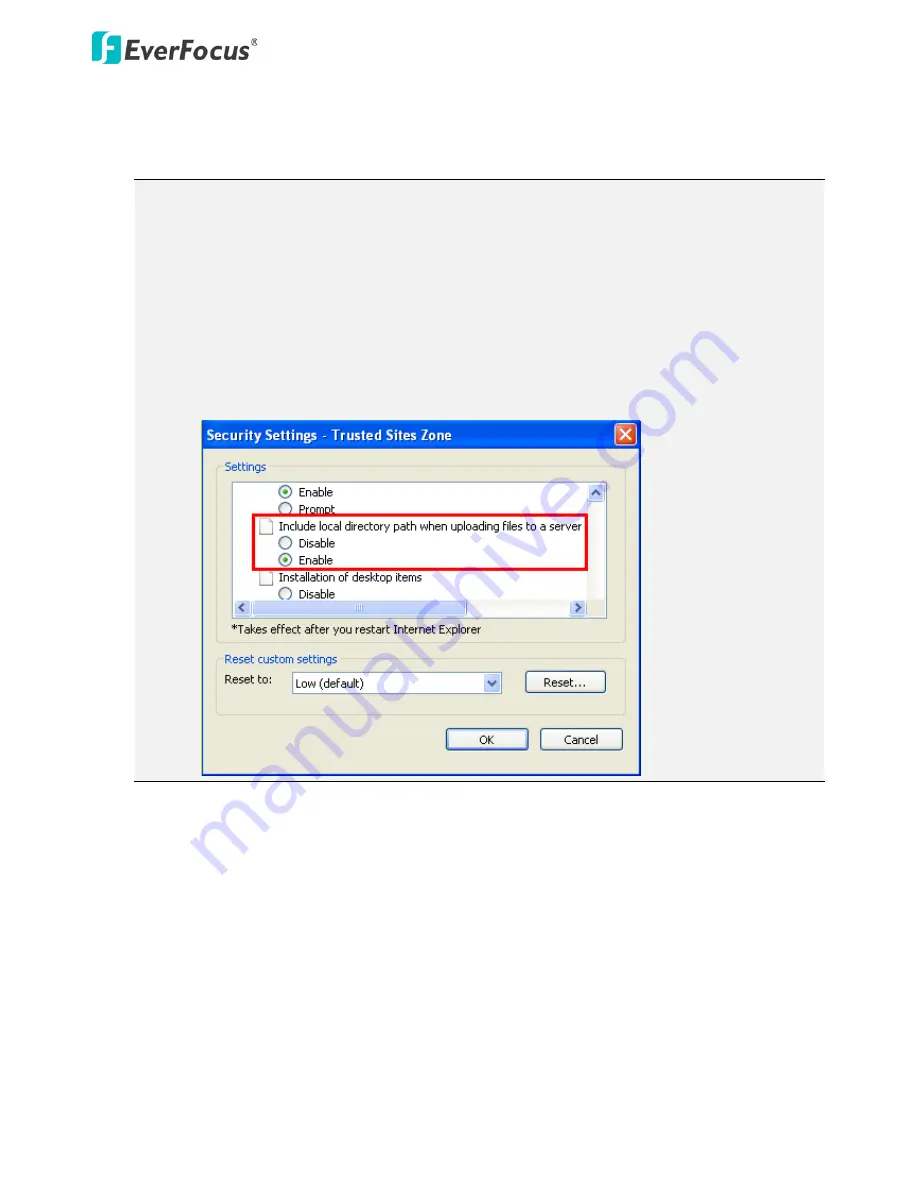
Go to Internet Explorer > Tools > Internet Option > Security > Custom. 

b.


Find and enable the 

Include local directory path when uploading files to a server.


Summary of Contents for EHN1120

Page 1: ...EMN Series Mini Mobile IP Dome Camera Full HD WDR IP67 IK10 EN50155 User s Manual Copyright EverFocus Electronics Corp Release Date July 2013...

Page 2: ...ts of this manual may be reproduced or transmitted in any form or by any means without written permission of the EverFocus Electronics Corporation EverFocus 12F No 79 Sec 1 Shin Tai Wu Road Hsi Chih T...

Page 3: ...ccur in a particular installation If this equipment does cause harmful interference to radio or television reception which can be determined by turning the equipment off and on the user is encouraged...

Page 4: ...s fire 6 Cleaning For cameras with interchangeable lenses do not touch the surface of the sensor directly with the hands Use lens tissue or a cotton tipped applicator and ethanol to clean the sensor a...

Page 5: ...View Window 15 6 Playback 18 6 1 Remote Playback Using Playback Page 18 6 2 Setting Up the Playback Function 20 6 2 1 Inserting Removing the SD Card 20 6 2 2 Testing the Playback Function 21 6 3 Play...

Page 6: ...4 Image 48 7 3 Event Settings 49 7 3 1 Event Wizard 49 7 3 2 Event 50 7 3 3 Notification 54 7 4 Link to Smart Phone App 57 8 Upgrading Firmware Using IP Utility 58 9 Specifications 60 10 Troubleshoot...

Page 7: ...thernet IEEE802 3af features are also provided You can power the camera over the network or by connecting the camera to a 10 36 VDC power supply Since the EMN series mini IP dome conforms to ONVIF PSI...

Page 8: ...gurations to the factory default settings 4 Video Test Out Connector Connects to a handheld monitor for adjusting camera angles using the supplied Video Test Out Cable 2 1 Cables The EMN series mini I...

Page 9: ...ing Template x 1 Set Screw x 4 with 4 Nuts Software CD x 1 for thin surface installation Quick Installation Guide x 1 Video Test Out Cable x 1 Desiccant Bag x 1 Cable Gland with one Waterproof Ring x...

Page 10: ...y Night 3 axis mechanism pan tilt rotate Built in microphone BNC video output for simplified on site installation and verification Selectable cables M12 connector cable rugged RJ 45 connector cable Wi...

Page 11: ...g template onto a desired location on the wall ceiling Drill the three cross marks and insert the supplied three Anchors into the holes Note that the camera lens should point to the arrow direction No...

Page 12: ...he cables through the hole on the wall ceiling 5 Connect the network power or audio cables to the camera For rugged type Optionally use the supplied Cable Gland to connect the camera to the network fo...

Page 13: ...with white stripe Brown 6 Optionally insert a micro SD SDHC card to the card slot See No 2 in 2 Physical Description 7 Access the camera live view See 5 1 Checking the Dynamic IP Address Or using the...

Page 14: ...ustment Loosen the screw and rotate the camera by 90 90 8 Remove the used desiccant bag from the camera and then stick the supplied Desiccant Bag on the inner side of the cover Note It is highly recom...

Page 15: ...1 Install and then start the IPU program The following dialog box appears 2 IPU will automatically search the cameras connected in the LAN The default network values of the cameras will be displayed B...

Page 16: ...your IP administrator for network configuration details 6 To access the camera highlight the camera and click Connect to Selected IP The Internet Explorer window pops up 7 Type the user ID and passwor...

Page 17: ...follow the steps below 1 On the computer click Start Control Panel System and Security Action Center click Change User Account Control Settings the User Account Control Settings window appears Adjust...

Page 18: ...X controls field select Prompt In the Include local directory path when uploading files to a server field select Enable Click OK 4 In the Internet Options window click the Advanced tab and then disabl...

Page 19: ...nd allows multiple users on and off site to see the IP camera on a LAN WAN Internet The camera must be assigned an IP address that is compatible with its LAN By setting up port forwarding on the route...

Page 20: ...ic IP address this connection may require that you use DDNS for a reliable connection Please refer to 7 1 1 Network DDNS in the User s Manual One to One Connection Directly from PC to IP Camera You ca...

Page 21: ...e Snapshot button to take a snapshot By default the snapshot will be saved at C EverFocus To change the location see Record to Local in 7 1 3 Storage 4 Record Click the Record button to start stop rec...

Page 22: ...Select the Video Stream Stream 1 Stream 2 Stream 3 or Stream 4 that will be displayed in the video box on the bottom Stream 2 Stream 3 and Stream 4 are only selectable if you have enabled the stream T...

Page 23: ...for instance set the camera to record the audio video feed to the SD card on board the camera You can then click on the Playback button to open the Playback page and search for and play all such recor...

Page 24: ...ncluded in the software CD Playback is designed as a quick way to check recent recordings that were triggered by Events that were configured to Record to SD Card in the Event Management see 7 3 2 Even...

Page 25: ...the file to highlight it its details will be displayed in the File Information area You can now click Play to play that specific file Pause Click to pause playing back Stop Click to stop playing back...

Page 26: ...a 2 To remove the SD card Click the Remove button System Settings Storage Secure Digital Card when the camera is powered on the SD card information SD card is not mounted will display and the Remove b...

Page 27: ...to SD Card 5 To save your settings click the Create button and the Event will be listed in the Event List 6 Look at the Post trigger Buffer at the bottom to make sure the buffer time is set to 10 seco...

Page 28: ...rding like your test event simply click the Search button under the Show All Files on SD Card header 12 If the micro SD card is active and formatted correctly the recording folder s name the recording...

Page 29: ...scriptions 1 Snapshot Click to take and save a snapshot 2 Load File Click to load the recordings for playing back 3 Convert ARV to AVI Convert the recording from ARV format to AVI format 4 Playback Ti...

Page 30: ...ubmenu There are two tabs Basic and Advanced on the left side bar You can set up the basic camera settings in the Basic tab To further set up comprehensive camera settings click the Advanced tab which...

Page 31: ...EMN Series Mini Mobile IP Dome 25 7 1 System Settings 7 1 1 Network...

Page 32: ...ver the same IP addresses used for the other network cameras and PCs with unique IP addresses Static IP The user can manually set the Static IP address This type of address is stable and cannot change...

Page 33: ...he IP camera will automatically update the information to the DDNS to ensure it is always available for remote access Before enabling the following DDNS function user should have applied for a host na...

Page 34: ...P 554 HTTPS 443 HTTPS Settings This function can only be set up in the Advanced tab Hypertext Transfer Protocol Secure HTTPS is a combination of the Hypertext Transfer Protocol and the SSL TLS protoco...

Page 35: ...stall other certificates remove the existing one by clicking the Remove button to erase the certificate 5 On the Web page change the address from http to https in the address bar and press Enter on th...

Page 36: ...e certificate or request 5 Copy the contents of the Certificate request in PEM format and paste it to the certificate request field on the Web page of the 3rd party certification authority such as Sym...

Page 37: ...erver if applicable The camera s time will be automatically adjusted by synchronizing with the NTP server Click Apply to save the setting Time Zone Setting Set the time zone of the camera s location C...

Page 38: ...will create a new file to save that data to Enable Overwrite Check the box for overwriting recording snapshot file when the disk storage capacity is full The user can set the storage capacity limitati...

Page 39: ...f you want the card to stop recording new footage when its memory is full SD Card Information If a SD card has been inserted to the card slot of the camera the SD card information will be displayed in...

Page 40: ...l to cancel the changes and return to the previous settings Video Overlay Time Stamp Settings Check the Enable Video OSD box to enable displaying time day information on the live view window Select th...

Page 41: ...tream and SD card settings on this page Machine Name C If required enter a new name for the machine This name will be visible in the Machine Name field of the IP Utility software which is included in...

Page 42: ...rn all of the camera s settings including the IP address to the factory default values The camera will then have to be reconfigured Entire Configuration Save To make a backup file of the machine s cur...

Page 43: ...uence The unit will reboot automatically after the upgrade has completed 1 5 minutes 2 During the upgrade process all event recording actions will be stopped Event recording actions will resume after...

Page 44: ...up 1 day 2 36 represents the camera has been powered on for one day 2 hours and 36 minutes System Log Displayed the sequence number date time and event messages of the log event The log will display t...

Page 45: ...ld below the account list 2 Revise the account name password and description Select an authority level for the user account Supervisor Administrator The only difference between a supervisor and admini...

Page 46: ...the user access to the live view page 3 Select Active or Disable to active or disable the user account 4 Check the Enable SD Card box to allow the user to access the SD card playback function 5 Click...

Page 47: ...cessing the camera The Allow option is only relevant if you ve set up at least one Deny item configured with Network or Range network rule from the Rule drop down list Rule Select a network rule and t...

Page 48: ...EMN Series Mini Mobile IP Dome 42 7 2 Camera Settings You can configure camera related settings such as video audio region of interest and privacy mask 7 2 1 Streaming and Audio...

Page 49: ...If required select whether you want the stream to stream a Constant Bit Rate or a Variable Bit Rate and set the values of whichever option you choose Click Apply to apply the changes or Cancel to can...

Page 50: ...you select B W from the color drop down list 4 Check the Enable box to enable the configured privacy mask 5 Click the Draw button and move the cursor on the left side live image 6 Move the cursor to...

Page 51: ...te images even in daytime Schedule Select to let the camera to switch to Day mode or Night mode based on the day and night schedule settings see 7 2 3 Schedule D N Level The value represents the AGC l...

Page 52: ...e Mode field AGC The function is only activated if you select Auto or ALC in the Mode field Set the Auto Gain Control limit here The lower the AGC level the lower the video signal and the noise Flicke...

Page 53: ...down list on the Camera setup page Select Night and then move the cursor on the desired time square click and drag the cursor over the time squares to configure them to the Night mode blue color Sele...

Page 54: ...de the bar to adjust the saturation White Balance Settings Select a mode that delivers the best image quality for the camera s light environment Auto Select to let the camera automatically adjust the...

Page 55: ...etection event to automatically notify the users when an event occurs You can also set up a schedule to automatically record the videos when an event occurs 7 3 1 Event Wizard The Event Wizard allows...

Page 56: ...ries Mini Mobile IP Dome 50 7 3 2 Event This function can only be set up in the Advanced tab Except the Event Wizard you can also configure the event settings along with the Recording Schedule on this...

Page 57: ...uffer Check the box if you want the Event reaction as selected in the Notification Over field below to be the activation of the video recording function and if you want the recording to include the vi...

Page 58: ...gement field Post trigger Buffer Select the duration for the buffer This will determine the amount of footage length of time after the event trigger moment that will be included in an event triggered...

Page 59: ...video recording periods snapshots etc To set up the Motion area 1 Check the Enable box to enable the selected area 2 Select a sensitivity value of the motion detection sensor function 3 Click the Dra...

Page 60: ...EMN Series Mini Mobile IP Dome 54 7 3 3 Notification This function can only be set up in the Advanced tab...

Page 61: ...ch an image when events occur SSL Connection Check the box to enable the SSL function Enable this function means you can access the camera through the SSL protocol that provides communication security...

Page 62: ...tings Network Alarm Settings This function works with EverFocus CMS software The camera can send a network alarm signal when the event occurs to the CMS servers To establish the connection between the...

Page 63: ...can access camera live view or take a snapshot via your smart phone This page is designed for users to download the mobile app to your mobile phone by scanning the QR code MobileFocus for iPhone Mobi...

Page 64: ...layed By default the network protocol of the camera is DHCP 3 Select a camera and click Login Multi Login to log in the camera 4 Type the user ID and password Click OK Note 1 The default user ID is us...

Page 65: ...A browsing window appears 6 Select the firmware file evb and then click Open The IP Utility will automatically upgrade the firmware The camera will reboot once the update is complete Click Find Devic...

Page 66: ...Rotation Mirroring of images Text and Image Overlay Auto Gain Control Auto White Balance Event Trigger Manual Trigger Motion Detection Tamper Detection Notification E mail notification FTP uploading r...

Page 67: ...card slot Video Test Out Connector One built in DIP connector LAN PoE Cable Connects to a 10 100 Base T Ethernet or PoE Power Cable 10 36 VDC input Audio Cable Line in cable Camera Angle Adjustment P...

Page 68: ...sages pop up When these error messages pop up follow the steps below to fix the problem 1 To enter the Registry Editor of your computer Click Start and type regedit in the Search Program and Files fie...

Page 69: ...Find the KeepAlive Timeout Dword by following the path HKEY_CURRENT_USER Sofware Microsoft Windows CurrentVersion Internet Settings 4 Double click KeepAlive Timeout and this window appears 5 Change th...

Page 70: ...ww everfocus co jp info everfocus co jp EverFocus Europe UK Unit 12 Spitfire Business Park Hawker Road Croydon Surrey CR0 4WD UK TEL 44 20 8649 9757 44 845 430 9999 FAX 44 20 8649 9907 www everfocusuk...

Reviews: