8
9
For Plastic Parts:
Wipe surface clean with cloth slightly moistened with mild soap and water.
DO NOT
use abrasive cleaners or solvents. Allow to air dry.
For Wood Parts:
Wipe surface clean with cloth slightly moistened with mild soap and water.
DO NOT
use abrasive cleaners or solvents. Immediately wipe dry with clean cloth.
For Seat Pad:
Machine Wash Separately, Cold Water – Delicate Cycle.
NO CHLORINE BLEACH.
Tumble Dry: 10 – 15 Minutes on Low Heat – Remove Immediately.
If musical toys fail to operate, check the batteries.
Note:
ONLY
the batteries are
replaceable. Dispose of old batteries safely.
DO NOT
use this product if any parts are missing, damaged or broken.
Care and Maintenance
BATTERY INFORMATION:
Battery life varies with use.
BATTERY SAFETY INFORMATION:
Batteries are small objects. Batteries must be
replaced by adults. Follow the polarity (+/-) diagram in the battery compartment.
•
DO NOT
mix old and new batteries.
•
DO NOT
mix alkaline, standard (carbon-zinc), or rechargeable (nickel-
cadmium) batteries.
• Only batteries of the same or equivalent type, as recommended, are to be
used.
•
DO NOT
dispose of batteries in fire, as batteries may explode or leak.
• The supply terminals are not to be short-circuited.
•
DO NOT
use rechargeable batteries.
•
DO NOT
recharge non-rechargeable batteri
es.
• Promptly remove exhausted batteries from the toy.
• Remove batteries before storing unit for a prolonged period of time.
•
DO NOT
allow unit to get wet.
• Dispose of used batteries properly.
Battery Replacement:
To replace batteries, loosen screw and remove battery door.
Discard old batteries properly and replace with alkaline batteries. Replace door and
tighten screw.
Troubleshooting:
Toy does not turn on or does not respond.
• Make sure batteries are installed correctly.
• Make sure battery cover is correctly secured.
• Install new batteries.
Toy makes improper responses.
• Check or install new batteries.
• Power Off then Power On, to reset.
WARNING
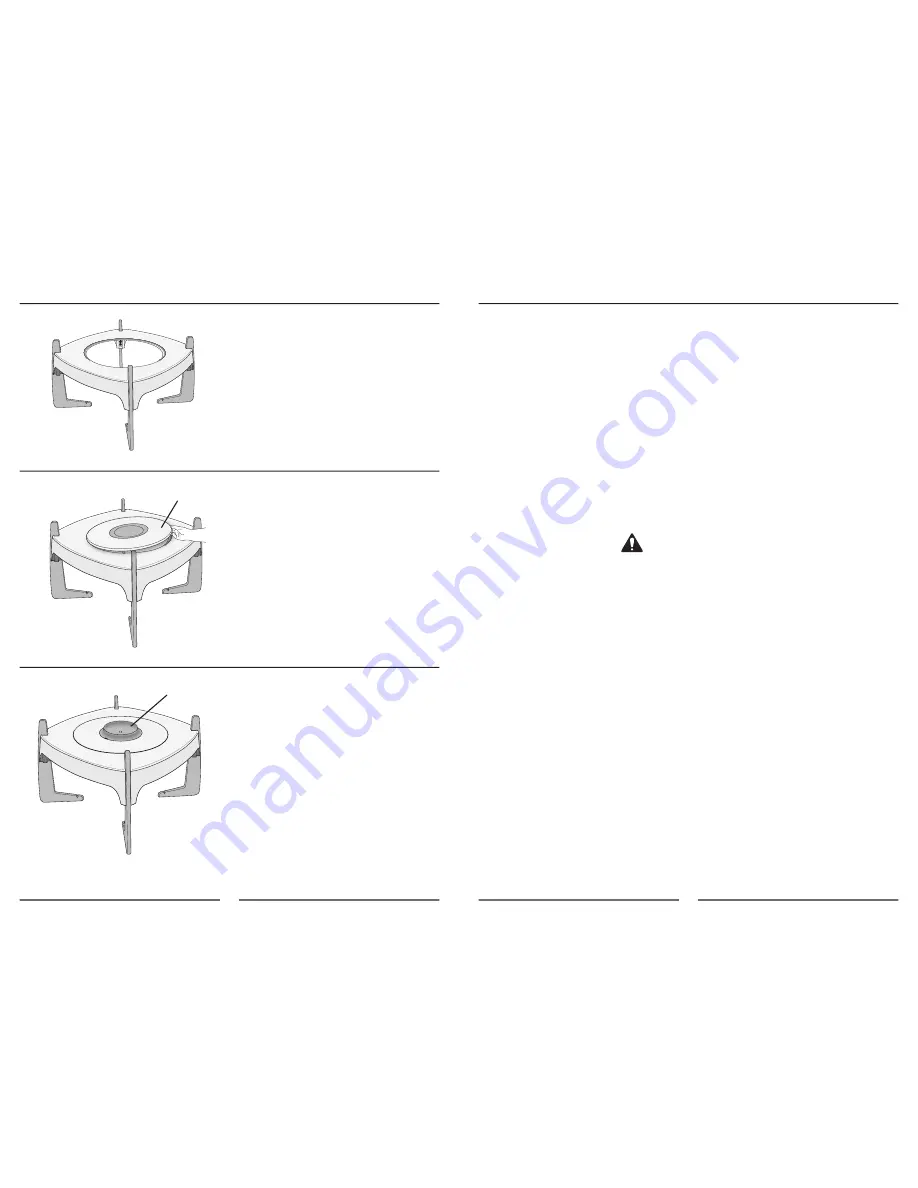
Assembling the Art Table
5.
Place Base
H
in opening on
ExerSaucer Tray, as shown.
6.
Base Cap
I
can be placed in Tray
with rim facing up, as shown, to create
storage area for supplies.
H
H
4.
Turn the ExerSaucer right-side-up.


