background image

28

8. Validation

Once installation is complete and configured, validate the functions of EVBox Smart Charging.

You must check that all CTs are operational and measuring the correct power values for the loads.  

Incorrect line voltage and current mapping can cause incorrect power values measurment and 

inaccurate monitoring data, and incorrect functioning of the charging station.

To check the correct operation of EVBox Smart Charging, the system provides real-time values for 

all measured loads. 

There are two options to visualize real-time values:

•  The Smappee Energy Monitor app reports in real-time the active power values for each input.
•  The Smappee Dashboard reports in real-time the active and reactive power, line and phase 

voltage, power factor, and current of each input. Log-in with the username and password on  

https://dashboard.smappee.net, then select 

Live electricity values

.

1

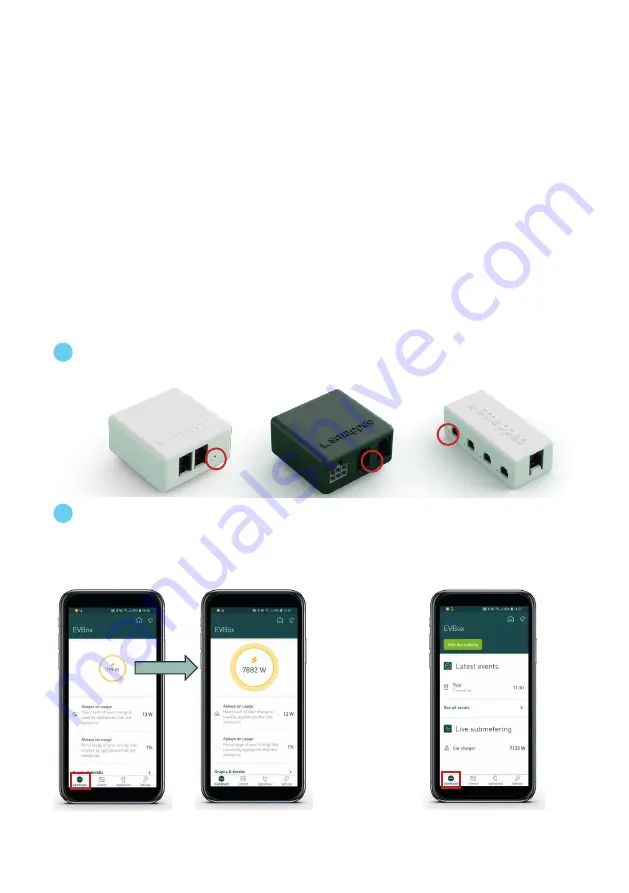
 Check the status LEDs on the Smart Charging devices (see Addendum 1). 

2

 Check the live submetering values, including for the charging station.

a.  Start charging the EV car or switch on an appliance with known power consumption 

and check that the value in the yellow circle increases by the rated consumption.

b.  Check the live submetering values at the bottom of the Dashboard screen

Summary of Contents for Smart Charging

Page 1: ...1 EVBox Smart Charging Smart Charging Installation manual ...

Page 2: ...2 I m home Let s get started ...

Page 3: ... Validation 28 9 Finish 29 10 Troubleshooting 30 11 Bus cable specification 34 Addendum 1 Colour code explanation 35 Addendum 2 Wi Fi connection properties and firewall rules 36 Addendum 3 Components overview 37 EVBox Smart Charging CT Hub 38 EVBox Smart Charging Power Box 39 EVBox Smart Charging Genius 40 EVBox Smart Charging Wi Fi Connect 41 EVBox Smart Charging Current Transformer CT 42 12 Warr...

Page 4: ...e for the protection of the Power Box Connect the power cable according to the connection diagram see next pages The circuit breaker acts as the disconnect device and must meet IEC 60947 2 Do not open the equipment or touch any of its electronic circuitry Do not attempt to open repair or service any parts Only use the bus and power cables delivered with the product Category 5 or 6 SFTP network cab...

Page 5: ...hat the housing is not damaged during installation When there is visible damage to the device s housing it is recommended to replace the device to prevent any hazardous situation to occur 1 6 Maintenance Clean the outside only with a dry clean cloth Do not use abrasive agents or solvents 1 7 Support Only certified electricians or equivalent may install EVBox Smart Charging If you have any question...

Page 6: ...stem as it provides power to all components It measures the line voltage of the different connected phases and transfers the data via RS 485 3 Genius Wi Fi Connect Genius The gateway between the monitoring system and the Smart Charging Cloud ensuring secure data storage from different components It also interacts with third party components The communication to cloud is done via Ethernet or Wi Fi ...

Page 7: ...on IMPORTANT The components in the kit Power Box CT hub s and Wi Fi Connect or Genius unit are pre configured and are specific to one kit These components cannot be used with a different kit Typical device combinations are Smart charging CT Hub Power Box Wi Fi Connect Smart charging CT Hub Power Box Genius 2 4 Compatibility of Smart Charging with EVBox charging stations Product Smart charging comp...

Page 8: ...omponents in the kit Power Box CT hub s and Wi Fi Connect or Genius unit are pre configured and are specific to one kit These components cannot be used with a different kit Note Installation of the Smart Charging requires the Smappee Energy Monitor mobile app The mobile app is required both for configuration of EVBox Smart Charging and the monitoring of energy usage We recommend that both the inst...

Page 9: ...0 connector Wi Fi Connect RS485 connector for BusinessLine Current Transformer 2x Quick Install Guide 3 3 Inside the box Smart Charging 1 DIN mounting plate Bus cable 40 cm Power Box Wall mounting plate Bus cable 150 cm CT Hub Power cable Bus termination plug RJ10 connector RS485 connector for BusinessLine Quick Install Guide Genius Current Transformer 3x RJ10 splitter ...

Page 10: ...nnect RS485 connector for BusinessLine Quick Install Guide Solid Core 3 Phase CT 2x 2x 3 5 Inside the box Smart Charging 3 DIN mounting plate Bus cable 40 cm Power Box Wall mounting plate Bus cable 150 cm Power cable Bus termination plug RJ10 connector RS485 connector for BusinessLine Quick Install Guide Genius 3x RJ10 splitter Solid Core 3 Phase CT 2x CT Hub Current Transformer 3x ...

Page 11: ...liances to be monitored Location inside the building distances between them etc Total load main service yes no Specific appliances e g HVAC Heat pump EV Solar etc Are they on separate circuit breakers or are they powered from a wall socket Circuits main sockets lighting area etc 4 3 Details System Verify the mains voltage single phase 1P three phase 3P N 3 400 or 3P 3 230 Requirements Wi Fi 2 4 GH...

Page 12: ...thernet 4 4 Tools not included Multimeter Screwdrivers Wire stripper Flashlight Needle nose pliers Wire cutter RJ10 crimping tool Optional drill drill bits and screws 4 5 Supplies not included Cable ties Circuit breaker 6 A single phase or three phase for Power Box only Ethernet cable if wired communication is used External Wi Fi antenna if there is a weak Wi Fi signal Category 5 or 6 SFTP network...

Page 13: ...tallation but before setting up the Wi Fi connection 1 Install the Power Box on the same electrical group as the charging station 2 Connect the power cable according to the connection diagram see next pages 3 Install the Wi Fi Connect or Genius unit 4 Mount the current transformers CT on the power cables The arrow shown on the CT K L has to point in the direction of the current flow 5 Connect the ...

Page 14: ...hree CTs instead of the solid core CT available as a three phase CT kit Label the current transformers on the clamp and connector side to enhance visualisation The arrow indicated on the CT or Solid Core 3 Phase CT K L must point in the direction of the current flow Mount the supplied bus termination plug in the free port of the last CT Hub You can use a custom RJ10 cable instead of the standard B...

Page 15: ...REMARK The above wiring and colour scheme is indicative National regulations must be respected Wiring for Europe must be at least 1mm2 600 V and protected by a 6 A circuit breaker Note The Power Box L2 L3 connections are connected to neutral in a single phase installation ...

Page 16: ...REMARK The above wiring and colour scheme is indicative National regulations must be respected Wiring for Europe must be at least 1mm2 600 V and protected by a 6 A circuit breaker Note The Power Box L2 L3 connections are connected to neutral in a single phase installation ...

Page 17: ...heme is indicative National regulations must be respected Wiring for Europe must be at least 1mm2 600 V and protected by a 6 A circuit breaker 5 5 Connection diagram Smart Charging 3 phase Neutral 3 400V Brown L1 Black L2 Grey L3 Blue Neutral ...

Page 18: ...heme is indicative National regulations must be respected Wiring for Europe must be at least 1mm2 600 V and protected by a 6 A circuit breaker 5 6 Connection diagram Smart Charging 3 phase Neutral 3 400V Brown L1 Black L2 Grey L3 Blue Neutral ...

Page 19: ... Charging The Connection uses an RS485 connection between the Wi Fi Connect or Genius unit and the charging station 1 Install the Category 5 or 6 SFTP network cable along the route from the Wi Fi Connect or Genius unit to the charging station Leave enough cable at each end to make the connections 2 Install the RJ10 connector supplied on the the Wi Fi Connect or Genius unit end of the network cable...

Page 20: ...ind the connection 2 Route the network cable into the charging station along the same route as the power cable When the cable enters the base of the station drill a hole and use a cable gland 3 Connect the network cable to the modem board PCB using the gray 2 pole Phoenix plug supplied Green RS485 pin A Green White RS485 pin B ...

Page 21: ...d the RS485 connection on the modem board PCB The figures below will help you find the connection 3 Route the network cable into the charging station along the same route as the power cable 4 Connect the network cable to the modem board PCB using the gray 2 pole Phoenix plug supplied Green RS485 pin A Green White RS485 pin B ...

Page 22: ...es below will help you find the connection 2 Route the network cable into the charging station along the same route and using the same cable gland as the power cable Cut an additional hole in the cable gland for the network cable 3 Connect the network cable to the RS485 connector blocks on the DIN rail Green Connector block 3 Green White Connector block 4 ...

Page 23: ...en White RS485 pin B BusinessLine G3 1 In the charging station find the RS485 connection on the modem board PCB The figures below will help you find the connection 2 Route the network cable into the charging station along the same route as the power cable When the cable enters the base of the station drill a hole and use a cable gland ...

Page 24: ...r must be on the charging station and secured 1 Supply power to the installation 2 Use a digital multimeter to determine which phase powers the different loads in the electrical system Please note that the colour code inside the fuse box and or the phase numbering may be incorrect Note 0 volt is measured when both loads are on the same phase ...

Page 25: ...fore proceeding For more details about the Wi Fi properties refer to Addendum 2 Resetting the Wi Fi For connecting the Wi Fi Connect or Genius to another Wi Fi network or for changing the authentication password select in the Smappee Energy Monitor app Settings Your Smappee Monitors Smart Charging Infinity components Smappee Wi Fi Connect or Genius Change your Wi Fi settings and follow the steps i...

Page 26: ... to the customer s preference for example My EV station Maximum current New details Note This is a system generated username and password Change them once you ve logged into the Smappee App Save your new details on this card in the below space STICKER HERE EVBox Smart Charging EVBox Smart Charging safely balances the energy usage between your electric car charging station and other appliances on s...

Page 27: ...nection Follow the instructions shown in the app You will set up the following features Internet conectivity set the Wi Fi network to which EVBox Smart Charging must connect to Overload protection Enter the maximum current that the main circuit breaker can supply ...

Page 28: ...real time values The Smappee Energy Monitor app reports in real time the active power values for each input The Smappee Dashboard reports in real time the active and reactive power line and phase voltage power factor and current of each input Log in with the username and password on https dashboard smappee net then select Live electricity values 1 Check the status LEDs on the Smart Charging device...

Page 29: ... change username and password a Go to Settings In Profile change the user name and Email address In Password change the password b Write new username and password on the Member Card 3 Give the Member Card to the customer 4 Check that the LED of the Wi Fi Connect Genius is green breathing and that the live values are correct and visible in the app ...

Page 30: ...ed in Port A of the Power Box and all CT Hubs are connected using RJ10 cables Insert the bus termination plug in the open port of the last CT Hub Check that all CT Hubs have a green flashing LED EVBox Smart Charging is switched on before all CTs were connected Switch Smart Charging off wait 30 seconds then switch it on again No real time measurements of the connected CTs CT is not connected proper...

Page 31: ...ge your Wi Fi settings and follow the steps For an Ethernet connection If restarting does not solve the issue check if the Ethernet cable provides a working internet connection Plug in the Ethernet cable firmly in the Wi Fi Connect or Genius The Genius LED is blue The Genius is starting Wait for 5 minutes The Genius is unable to start Restart the Wi Fi Connect or Genius by unplugging the RJ10 cabl...

Page 32: ... connection error then restart the Wi Fi Connect or Genius by unplugging the RJ10 cable and plugging it back in CT Hub is not recognised during installation The Bus cable A RJ10 cables between CT Hubs is not connected correctly Check that all required RJ10 cables are connected and the bus termination plug is plugged in the free port of the last CT Hub Each CT LED flashes once every three seconds o...

Page 33: ...L2 L3 corresponds with the Load Configuration of the Grid phase setting See the tips in Chapter Validation The Smappee Smart Energy Monitor app values are 0 zero CTs are not connected or incorrectly connected Check all CT connections The Smappee Smart Energy Monitor app values are negative CTs connections are swapped Make sure all CTs have correct wire connections Solar panels are installed but no...

Page 34: ...ed Pins 1 4 Pins 2 3 must be twisted pairs Characteristic impedance of 100 ohms AWM style 2835 60 30V 24 AWG The maximum length of each bus is 100 m 109 yards The total length of the CT Hub bus must be no more than 100 m 109 yards The length of the Genius Power Box bus is also no more than 100 m 109 yards Note The bus termination plug must be plugged into the output socket of the last CT Hub RS485...

Page 35: ...onnection issue Red flashing The Wi Fi Connect or Genius had a working internet connection but has lost its connection to the Smappee cloud Yellow steady The Wi Fi hotspot access point has been activated to allow the Wi Fi Connect or Genius to reconfigure the Wi Fi settings Yellow flashing Smappee is trying to open a Wi Fi hotspot access point Wait a few seconds and the LED will become a steady ye...

Page 36: ...ntain the following characters é ç è ä à î ô ï Allowed special characters for the Wi Fi password MAC filtering must not be active on the router Your firewall must allow outbound secure HTTP connections The maximum number of characters for the WPA2 PSK is 20 The DHCP service of your router assigns the IP address of your Smart Charging Firewall rules If you use a firewall you must apply the followin...

Page 37: ...rging Wi Fi Connect SMARTC WCONNECT Smart Charging Power Box SMARTC PBOX Smart Charging CT Hub SMARTC CTHUB Smart Charging CT 50A SMARTC CT50A Smart Charging CT 50A short SMARTC CT S 50A Smart Charging CT 100A SMARTC CT100A Smart Charging CT 200A SMARTC CT200A Smart Charging CT 400A SMARTC CT400A Smart Charging CT 1000A Rogowski Coil SMARTC CT1000A RC Smart Charging Solid Core CT SMARTC CTSC Smart...

Page 38: ...00 A 1000 A More than 1000 A Contact EVBox Included accessories Smappee Bus cable 40 cm 15 75 inches Measure currents ranging from 0 A to 1000 A Daisy chain up to 9 Solid Core 3 Phase CTs or combine with CT Hubs to measure up to 28 inputs and up to a distance of 100 meters 109 yards Connect CTs and Rogowski coils to the CT Hubs ARTICLE NUMBER SMARTC CTHUB TECHNICAL SPECIFICATIONS The CT Hub is the...

Page 39: ... C to 90 C 4 F to 194 F Relative humidity 0 95 non condensing Operating altitude 0 2 000 m 0 to 6 562 feet EMC IEC 61326 1 FCC 47 part 15 Safety IEC61010 1 2010 COR1 2011 Impact rating IEC 62262 IK 06 Impact Energy 1J IP rating IEC 60529 IP X0 Power supply input 90 264 V AC Power consumption 8 W max Voltage measurement inputs L1 L2 L3 N Topology and maximum nominal ranges Single phase 240 Vrms Spl...

Page 40: ... various options the Genius allows EVbox Smart Charging to take on the role of a Home or Building Energy Management System HEMS or BEMS and guarantee optimised self consumption Dimensions 108 69 25 mm 4 25 x 2 72 x 0 98 inches Weight 119 g 4 20 oz Working temperature 10 C to 60 C 14 F to 140 F Storage temperature 20 C to 90 C 4 F to 194 F Relative humidity 0 95 non condensing Operating altitude 0 ...

Page 41: ...tions but does not offer smart control functionalities for addition appliances The Wi Fi Connect is a cost efficient way to add intelligence to the Smart Charging setup Dimensions 55 mm x 55 mm x 26 6 mm 2 17 x 2 17 x 1 05 inches Weight 45 g 1 59 oz Working temperature 10 C to 60 C 14 F to 140 F Storage temperature 20 C to 90 C 4 F to 194 F Relative humidity 0 95 non condensing Operating altitude ...

Page 42: ... cm 59 05 inches Black 400 A SMARTC CT400A 1 2 ARTICLE NUMBER SMARTC CTSC TECHNICAL SPECIFICATIONS EVBox Smart Charging Current Transformer CT Input current 3 50 A Dimensions 59 35 23 mm 2 32 1 38 0 91 inches Weight 45 g 1 59 oz Working temperature 10 C to 70 C 14 F to 158 F Storage temperature 20 C to 90 C 4 F to 194 F Relative humidity 0 95 non condensing EMC IEC 61326 1 FCC 47 part 15 Connectiv...

Page 43: ...set out in clause 12 2 b The Error arises because Customer failed to follow EVBox s oral or written instructions as to the storage installation commissioning use or maintenance of the Products or if there are none good trade practice such as but not limited to use of the Products with parts accessories or software not provided or approved by EVBox c The Error arises as a result of EVBox following ...

Page 44: ...licitly rejects any liability for any direct or indirect damage in the broadest sense arising from or related to the use and or interpretation of this document EVB_SC_IM_072019 EVBox Manufacturing B V EVBox strives to manufacture products of the highest quality EVBox products are fully CE certified and compliant with the essential requirements of EMC Directive 2014 30 EU Low Voltage Directive 2014...

Page 45: ...45 I m all set Let s charge ...

Page 46: ...46 EVB_SC_IM_V1 5_0102019 EVBox Manufacturing B V ...

Reviews: