background image

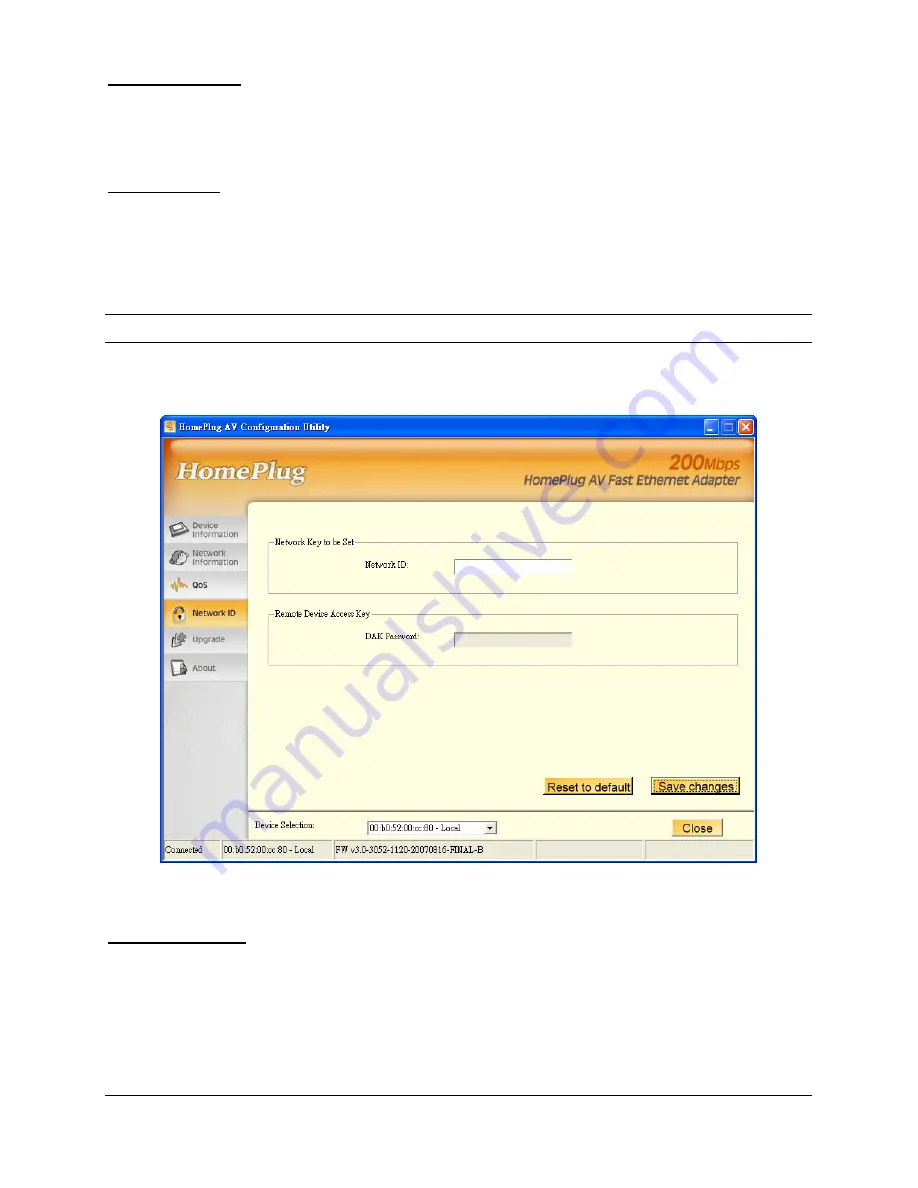
Reset to default 

Press the Reset to default button to restore the factory default QoS 
setting. 

Save changes 

Press the Save changes button to save and execute the modified 

QoS setting. 


Network ID 

This Network ID window is used to set or change the network group 

id. 


Device Selection 

Select the device form drop down list will be configure. 

10 

Summary of Contents for UPL5500-201

Page 1: ...200 Mbps HomePlug AV To Fast Ethernet Adapter UPL5500 201 K User Manual Copyright EUSSO Technologies Inc All rights reserved...

Page 2: ...and can radiate radio frequency energy and if it s not installed and used in accordance with this user s guide may cause harmful interference to radio communications Operation of this equipment in a r...

Page 3: ...PRODUCT FEATURES 1 IDENTIFYING EXTERNAL COMPONENTS 2 LED INDICATORS 2 QUICK SETUP BUTTON 3 INSTALLATION 3 CONNECTING TO NETWORK 4 CONFIGURATION UTILITY 5 INSTALL CONFIGURATION UTILITY 5 USING THE HOM...

Page 4: ...dapter is designed to provide the Plug and Play installation user just connected the Ethernet cable on the Adapter and Ethernet enabled device and pluged the Adapter to AC outlet Terms Usage In this g...

Page 5: ...On The PLC is connected to the AC power line and operation normal Off The PLC is not connected to the AC power line Power Blinking The PLC is goes to firmware upgrade or on pairing On The PLC is the P...

Page 6: ...utton on any exist PLC adapter and press the new PLC adapter s Quick Setup button within three seconds at the same time the Power LED will start blinking it means the PLC adapters goes to pairing proc...

Page 7: ...ter directly to the PC s network adapter switch or any other Ethernet enabled device Note The Ethernet port on the Adapter supports 10 100M Auto MDI MDIX function you can use a straight through or a c...

Page 8: ...er line networks Install Configuration Utility Insert the HomePlug AV utility CD into your CD ROM drive and the Auto run program will appear Alternatively this can also be done manually by double clic...

Page 9: ...y double click the icon on the desktop the Configuration Utility will be executed The Configuration Utility was divided into four functions Device Information Network Information QoS Security Upgrade...

Page 10: ...g the MAC address Firmware Version and the connected PLC device Network Information The Network Information screen shows all devices that were on the power line network are listed here Devices that ar...

Page 11: ...priority The 200M HomePlug AV to Fast Ethernet Adapter allows 4 levels of Channel Access Priority CAP 0 3 Therefore the 8 levels of VLAN Ethernet tags must be mapped to the 4 levels of CAP priority wh...

Page 12: ...ty CAP as set in the corresponding dropdown box If a packet has both VLAN and TOS in it VLAN will override TOS Default CAP The Default CAP group allows for default priority mapping of packets that do...

Page 13: ...tory default QoS setting Save changes Press the Save changes button to save and execute the modified QoS setting Network ID This Network ID window is used to set or change the network group id Device...

Page 14: ...enter the remote device access key in DAK password field then click Save changes button to sets the entered Network ID The DAK password is show on each PLC s device label Reset to Default Press the R...

Page 15: ...wo firmware files PIB file pib and firmware file nvm the confirmation windows will pop up click Yes to start the firmware upgrade or click No to abort the firmware upgrade About The About screen shows...

Page 16: ...e Coverage Up 300 meters depends on environment LED indicators Power HomePlug Ethernet Ethernet port 1 x 10 100Mbps Ethernet with Auto negotiation and Auto MDI MDIX EMI Compatibility FCC Class B CE Cl...

Reviews: