22
hang the device directly under or in front of an electrical socket (see diagram 1).
The wall supports must be attached horizontally (use a spirit level!) to the wall.
Determine the location of the wall supports (take the above into account), mark
the location of the screws and drill 5 holes at the marked places using a 6 mm
drill. Put the plugs into the holes and then screw the wall supports to the wall. Be
aware of pipes that may be contained within the walls when drilling holes!
Attach the spacer bracket with both self-tapping screws underneath the fireplace
in the holes provided. The flat side of the bracket must be placed against the
underside of the fireplace; the other must rest against the wall so that the wall
piece sticks out under the fireplace (diagram 3). This bracket will be hidden from
sight once the glass screen has been installed.
Now hang the fireplace carefully on the central wall support with the hanging
bracket (see diagram 2). The bracket should not stick out from the support! The
electrical cable comes out at the right hand, lower side of the fireplace and must
be placed out of range of the heat.
Now mark the location at which the spacer bracket must be screwed to the wall.
Remove the fireplace from the wall, drill both holes and insert a plug. Hang the
fireplace on the bracket and screw the spacer bracket to the wall.
Hang the glass plate (two people are needed for this job!) with the four hooks
over the four knobs on the sides of the fireplace and check that all four hooks are
correctly attached (see diagram 4).
Installation is now complete.
Note: ensure that the weight of the fireplace
hangs on the wall supports
and not on the spacer bracket!
Operating
Check that the details on the data plate correspond to those of the electrical
supply which you wish to use for the fireplace. Do not use the same connection
for any other equipment.
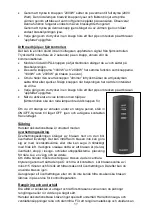
Install two AAA-1,5V batteries in the remote control.
Check that the main ON/OFF switch on the right hand, upper side of the fireplace
is 'off' (the side with the circle is depressed).
Now insert the plug into the socket.
Switch the fireplace on with the main ON/OFF switch (depress the side with the
stripe). You can now further operate the fireplace with the remote control or with
the buttons on the fireplace itself.
Warning:
This heater is not equipped with a device to control the room temperature.
Do not use this heater in small rooms when they are occupied by persons not
capable of leaving the room on their own, unless constant supervision is provided.
Operating with the buttons:
Pressing the O/I button switches the atmospheric lighting on. The red light next to
the button will be illuminated. Pressing this button again will switch the
atmospheric lighting off. If you press the O/I button for longer than three seconds,
the dimmer function will start to work: the brightness of the light will gradually
increase and then decrease. Release the button when the lighting reaches the
desired intensity.
Pressing the '1000W' button sets the heating at half capacity (1000 Watt). The
red light next to the button will be illuminated and the ventilator will start to


