

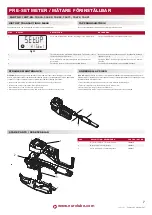

www.eurolube.com
205245 R1
EUROLUBE EQUIPMENT
PART NO / ART.NR. 10400, 10422, 10452, 10471, 10472, 10491
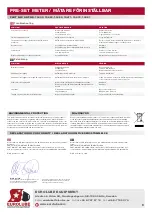
PRE-SET METER / MÄTARE FÖRINSTÄLLBAR
5
MANUAL SET OF CALIBRATION FACTOR
Manual calculation of calibration factor can be made with following equation:
MANUELL INSTÄLLNING AV KALIBRERINGSFAKTOR
Manuell beräkning av kalibreringsfaktor kan göras med följande ekvation:
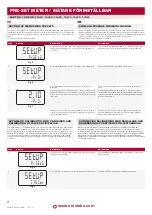
STEP
DISPLAY
DESCRIPTION
BESKRIVNING
3
PrESS
Auto
Fig 10
Press and hold “SELECT” until “press auto” is shown on the
display.
Tryck och håll "SELECT" tills "press auto" visas på displayen.
4
Fig 11
0.00
dispns
L
A
U
T
O
Press the AUTO button and the screen shown (fig. 11) will be
displayed. At this step, you can start dispensing into the vessel.
Tryck på AUTO-knappen och displayen visar enligt (fig. 11). I det
här steget kan du börja tappa vätska i kalibreringsmåttet.
5
Fig 12
1.02
AdjUst
L
Once you have reached the calibrated amount in your vessel,
press AUTO again and “Adjust” will flash on the display. You will
now need to adjust the value on the display to the actual volume
in the vessel. Press the “0.1” button to increase the amount and
the “10” button to decrease the amount until the value matches
the volume of the calibrated vessel.
När du har nått den kalibrerade mängden i ditt kärl, tryck på
AUTO igen och “Adjust” blinkar på displayen. Nu måste det
visade värdet på displayen justeras så att det överenstämmer
med den uppmätta volymen i måttet. Tryck på knappen “0.1” för
att öka mängden och knappen “10” för att minska mängden tills
värdet stämmer överens med volymen på det kalibreringsmåttet.
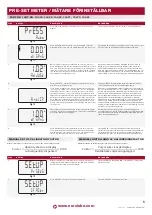
6
Press SELECT to confirm. The display will show “done” along
with the new calibration factor.
Tryck på SELECT för att bekräfta. Displayen kommer att visa
"klar" tillsammans med den nya kalibreringsfaktorn.
7
Fig 13
AntiCP
You will then be asked if you want to calibrate the anticipation
(fig. 13): Press SELECT for “yes” and “ON” for “no”. Remember
that it will not be necessary to perform this process in normal
operating conditions, only if you work with very high flow rates
and you detect that after reaching the preset value the dispensed
quantity exceeds the allowed accuracy above the preset value.
Press ON to not calibrate the anticipation, you will return to the
main menu and the new calibration factor will be saved. If you
wish to calibrate the anticipation, press SELECT and proceed to
the next step.
Du kommer då att tillfrågas om du vill kalibrera för-avstängning
(fig. 13): Tryck på SELECT för "ja" och ON för "nej". Kom ihåg att
det inte kommer att vara nödvändigt att utföra denna process
under normala driftsförhållanden, endast om du arbetar med
mycket höga flödeshastigheter och du upptäcker att efter att
ha uppnått det förinställda värdet överskrider den tappade
mängden inklusive noggrannheten (0,5%) utöver det förinställda
värdet. Tryck på ON för att inte kalibrera för-avstängning, du
kommer tillbaka till huvudmenyn och den nya kalibreringsfaktorn
kommer att sparas. Om du vill kalibrera för-avstängning, tryck på
SELECT och fortsätt till nästa steg.
8
Fig 14
1.00
dispns
L
The calibration of valve anticipation factor is performed by dis-
pensing 1 liter at the working flow rate. This preset configuration
will already appear on the display:
Kalibreringen av faktor för ventilens för-avstängnign utförs
genom att dosera 1 liter vid flödeshastigheten som mätaren kom-
mer att användas vid. Denna förinställda konfiguration kommer
redan att visas på displayen:
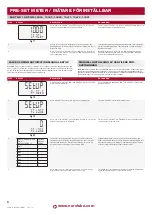
9
Press AUTO and then start dispensing. When the preset liter
is reached, the gun will automatically calibrate the anticipation
by displaying the new value on the screen. The display shows
“done” and automatically returns to the main menu.
Tryck på AUTO och börja sedan tappa vätska. När den förin-
ställda litern har nåtts kommer ventilen automatiskt att kalibrera
för-avstängningen genom att visa det nya värdet på skärmen.
Displayen visar "klar" och återgår automatiskt till huvudmenyn.
STEP
DISPLAY
DESCRIPTION
BESKRIVNING
1
SEtUP
PrSEtS
Fig 15
Manual calculation of calibration factor can be made with fol-
lowing equation:Simultaneously press the “ON” and “SELECT”
buttons until the setup menu is displayed.
Tryck samtidigt på knapparna “ON” och “SELECT” tills inställn-
ingsmenyn visas.
2
SEtUP
CFACtr
Fig 16
Press “SELECT” until the next menu is displayed.
Tryck på "SELECT" tills nästa meny visas.
𝐹𝐹𝐹𝐹𝐹𝐹𝐹𝐹𝐹𝐹𝐹𝐹
=
Quantity shown on display
Actual quantity dispensed × 1000
𝐹𝐹𝐹𝐹𝐹𝐹𝐹𝐹𝐹𝐹𝐹𝐹
=
Volym som visas på display
Den faktiska volymen upptappad × 1000
𝐹𝐹𝐹𝐹𝐹𝐹𝐹𝐹𝐹𝐹𝐹𝐹
=
Quantity shown on display
Actual quantity dispensed × 1000
𝐹𝐹𝐹𝐹𝐹𝐹𝐹𝐹𝐹𝐹𝐹𝐹
=
Volym som visas på display
Den faktiska volymen upptappad × 1000