


www.eurolube.com
205245 R1
EUROLUBE EQUIPMENT
PART NO / ART.NR. 10400, 10422, 10452, 10471, 10472, 10491
PRE-SET METER / MÄTARE FÖRINSTÄLLBAR
3
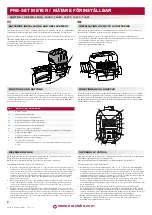
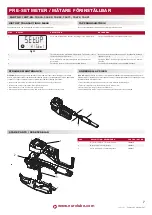
USING THE MEMORIZED PRESETS
The pre-set meter has up to 10 user memorized presets that can be reused for quicker access
to the most commonly used volumes. These presets are numbered from 0 to 9. To select these
predefined presets follow the process below. NOTE: Before activating the preset mode, make sure
the trigger is not pulled.
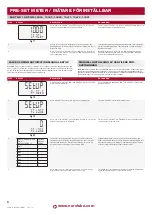
1. Press the SELECT button. The display shows the preset number 1 (fig 4).
2. Press SELECT again if you want to select another one of the preset positions. The
display will show the stored values from PR1 to PR5. After displaying the preset PR-5,
the display returns to the initial mode.
3. Once the desired preset position is displayed press the AUTO button. From this point
on, the operation will be identical to that described at the beginning of “Dispensing fluid”
section.
Refer to the “Setting up memorized presets” section of the configuration menu for saving presets.
CONFIGURATION: NAVIGATION MENU
The following settings are available:
- Set predefined values of most used presets.
- Setting of valve closing anticipation
- Setting of units of measurement
- AUTORESET mode: if set to “YES”, once a preset is finished,
the counter is reset after a few minutes.
ANVÄNDA SPARADE FÖRINSTÄLLDA VOLYMER
Den förinställda mätaren har upp till 10 användardefinierade volymer som kan återanvändas för
snabbare åtkomst till de vanligaste förinställningarna. Dessa förinställningar är numrerade från
0 till 9. Följ processen nedan för att välja dessa fördefinierade förinställningar. OBS: Innan du
aktiverar det förinställda läget, se till att avtryckaren inte är intryckt.
1. Tryck på knappen VÄLJ. Displayen visar förinställningsnumret 1 (fig 4).
2. Tryck på VÄLJ igen om du vill välja en annan av de förinställda positionerna. Displayen
visar de lagrade värdena från PR1 till PR5. Efter att ha visat den förinställda PR-5, återgår
displayen till utgångsläget.
3. När den önskade förinställda positionen visas, tryck på AUTO-knappen. Driften kommer
att vara identisk med den som beskrivs i början av avsnittet “Tappning av vätska”.
Se avsnittet “Ställa in sparade förinställningar” i konfigurationsmenyn för att spara förinställningar.
KONFIGURATION: NAVIGERINGSMENY
Följande inställningar kan justeras:
- Ställ in fördefinierade värden för de mest använda volymerna.
- Inställning av för-avstängning av ventil.
- Inställning av mätenheter
- AUTORESET-läge: om inställt på “YES”, när en tappning är klar, nollställs räknaren automatiskt
efter några minuter.
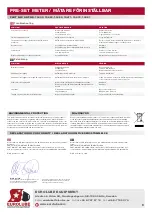
DISPLAY
DESCRIPTION
BESKRIVNING
14.20
25.00
L
L
TRIP
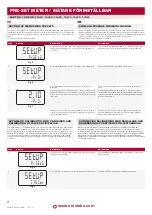
Main dispensing screen.
Press on+select to cycle
between modes:
Huvudutmatningsskärm.
Tryck on+välj för att gå mel-
lan lägen:
SEtUP
PrSEtS
Memorized presets con-
figuration.
Memorerad förinställningar
konfiguration.
SEtUP
CALibr
Calibration.
Also allows valve closure
anticipation calibration.
Kalibrering.
Tillåter även kalibrering av
ventilens för-avstängning.
SEtUP
CFACtr
Manual adjustment of
calibration factor.
Manuell justering av kalibre-
ringsfaktor.
SEtUP
FCLOSE
Manual adjustment of valve
closure anticipation.
Manuell justering av ven-
tilens för-avstängning.
SEtUP
UnIts
Units setup.
Inställning av enheter.
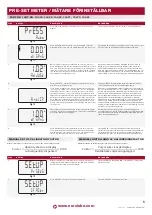
4. If you want to stop dispensing before the preset amount is reached, press the AUTO
button. The display will show “-stop-” on the bottom line (fig 3) and the amount
dispensed up to that point is stored.
5. If dispensing is not interrupted, when the preset value is reached the valve closes
automatically and “finish” is displayed on the bottom display line.
6. Finally, release the trigger if it was manually operated or press it upwards and then let it
return to its rest position if you had used the locking button.
5. Om tappningen inte avbryts stängs ventilen automatiskt när den förinställda volymen
uppnås och “finish” visas på den nedre displayraden.
6. Släpp slutligen avtryckaren manuellt om spärren inte var i, eller tryck den uppåt för att
frigöra spärren och släpp sedan handtaget.
3.00
0.00
L
L
TRIP
0.00
3.00
L
L
TRIP
A
U
T
O
0.00
-StOP-
L
1
2
Fig 1
Fig 2
Fig 3
5.00
-Pr1-
L
Fig 4