background image

GB-20

P

reparation

C

onnec

tions

Initial S

etup

U

sing the F

e

atur

es

U

sing the F

e

atur

es

via USB P

o

rt

PVR (P

ersonal 

V

ideo Rec

o

rder)

T

rouble Shooting

, Specification

 and Saf

e

ty

 W

a

rnings

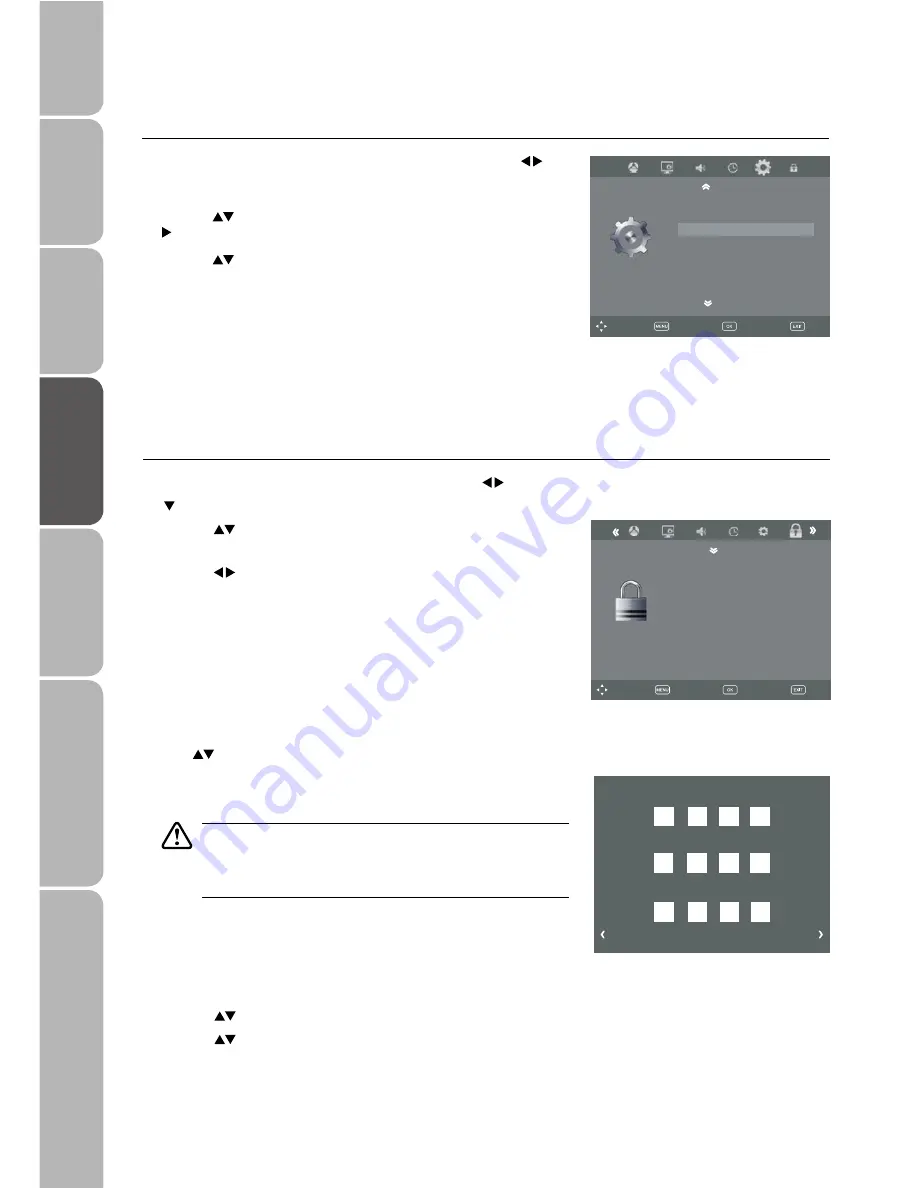
Customising the Lock Setting

Child Lock is designed to prevent accidental retuning of the TV / losing channels and prevent children watching unsuitable 
programmes.

The Lock System must be set to On for this function to operate. If the Lock Channel is set to On, a valid password must be entered 
when you access the Auto Tuning / Manual Tuning / Programme Edit / First Time Installation / Reset.

1.

   Press the 

MENU

 button to display the main menu, press the 

 buttons to select LOCK in the main menu and then press the

         or 

OK

button, it will request input password, enter “0000” to unlock the sub-menu.

2.

Press the 

 buttons to select the option that you want to set in the LOCK 

menu.

3.

Press the 

 buttons or the 

OK

 button to set.

4.

After finishing your setting, press the 

MENU

 button to save and return to the 

previous menu.

5.

    Press the 

EXIT

 button to exit menu.

Restore Factory Default 

Restores all settings to factory defaults.

1.

Press the 

MENU

 button to display the main menu and then use the 

buttons to select OPTION in the main menu and then press the 

OK

 button.

2.

Press the 

 buttons to select 

Restore Factory Default

 and then press the 

 or 

OK

button to enter sub-menu.

3.

Press the 

 buttons to select 

YES

 or 

NO

 on the screen. All settings will be 

reset to factory defaults and the 

OPTION

 menu will disappear.

Block Program

1.    

Press the 

 buttons to select Block program, then press the 

OK

 button to enter sub-menu.

2.    

Press the 

 buttons to select the program you want to lock, then press the 

GREEN

 button on your remote control. ( To

       unlock program, press the green button again. )

3.    

Press the 

OK

 button to save setting and 

MENU

 button to return to the previous menu.

Set Password

Press the 

 buttons to select “Set Password”, then press the 

OK

 button to enter sub-menu to set new password.

Use the 0-9 buttons to input a 4-digit password.

The default password is “

0000

”.

If you change the password, be sure to remember the new password. 
If you forget your password, press the master password “

8899

” on 

the remote control.

Select

Back

Exit

Exit

Move

OPTION

Country

MEMC

Restore Factory Default

     Australia

         Low

Select

Back

Exit

Exit

Move

LOCK

Lock Chnanel                         Off

Set Password

Block Program 

Parental Guidance             NO Block

Please enter old password

Please enter new password

Confirm new password

Cancel

Clear

Summary of Contents for LE32G90GD

Page 1: ...32 inch 80CM FULL HD Digital LED TV Instruction Manual Read all of the instructions before using this TV and keep the manual in a safe place for future reference ...

Page 2: ...rd or plug is damaged liquid has been spilled or objects have fallen into the apparatus or been exposed to rain or moisture does not operate normally or has been dropped t Please keep the unit in a well ventilated environment t WARNING To reduce the risk of fire or electric shock do not expose this apparatus to rain or moisture The apparatus should not be exposed to dripping or splashing liquids a...

Page 3: ...ng the SOUND Setting 16 Customising the TIME Setting 17 Customising the SETUP Setting 18 Customising the LOCK Setting 20 Customising the TV Settings ATV DTV Mode 21 Teletext ATV Mode 24 Digital Teletext DTV Mode 25 EPG Electronic Programme Guide DTV Mode 25 PVR Personal Video Recorder 26 PVR Menu Function Details 26 Format 27 Record Start 27 Record Mode 27 Schedule List 28 Recorded List 28 Play Re...

Page 4: ... included AV Cable Video Video R R L L Unpacking the TV Remove all items from the packaging It is advisable to retain the packaging however if you dispose of it please do so according to local regulations The following items are included User s Manual 32 inch 80CM FULL HD Digital LED TV Instruction Manual Read all of the instructions before using this TV and keep the manual in a safe place for fut...

Page 5: ...n the timer recording has started in the standby mode 2 IR Infrared Receiver Receives IR signals from the remote control Do not put anything near the sensor as its function may be affected 3 VOL Adjust the volume Select and adjust a setting in the OSD On Screen Display menus 4 CH Select a channel Select a sub menu of the OSD menu 5 MENU Displays the OSD menu 6 SOURCE Select among the different inp...

Page 6: ... earphones for private listening 4 VGA PC AUDIO Connect to a computer or other devices with a VGA interface 5 COAXIAL Connect to the coaxial socket on the audio amplifier system 6 Y PB PR AUDIO L R Connect to a DVD player Digital Set Top Box or other AV devices with component YPbPr video and audio output sockets 7 VIDEO AUDIO L R Connect to the composite VIDEO and AUDIO L R output sockets on exter...

Page 7: ...al injury or damage to property t Only use the battery type indicated in this manual t When the batteries are exhausted the remote will not function Replace both batteries at the same time with new ones t Do not install new batteries with used ones and do not mix different types of batteries t Do not dispose of used batteries as domestic waste Dispose of them in accordance with local regulations H...

Page 8: ...ode 7 SOURCE Select among the different input signal sources DTV ATV AV1 AV2 S Video YPBPR1 YPBPR2 HDMI1 HDMI2 HDMI3 PC USB 8 DISPLAY Display the present screen information such as the current channel and the input source 9 CH Select a channel 10 VOL Adjust the volume 11 SLEEP Set the TV sleep timer NICAM Switch between different audio languages only applicable when the TV programme has this featu...

Page 9: ...playback or pause USB mode 18 TIMESHIFT Turn on and off the Time shift function DTV mode 19 Press skip to the beginning of previous chapter or track USB mode TTX Turn on and off the Teletext function ATV DTV mode 20 SUBTITLE Display the subtitle which is broadcast with the program DTV mode 21 Press to reverse playback rapidly USB mode CANCEL Press to cancel the teletext mode completely ATV DTV mod...

Page 10: ...to advance playback rapidly USB mode REVEAL Reveal hidden information such as the answer to a quiz in Teletext ATV DTV mode 25 INDEX Press to select the page number of the Index from Teletext ATV DTV mode 26 SUBPAGE Display the subpage on the teletext screen ATV DTV mode 27 RED GREEN YELLOW BLUE Press these buttons directly to select corresponding function on the screen 24 27 25 26 ...

Page 11: ...arphone Cables not included VGA Cable not included Audio Cable not included Component Cable not included AV Cable not included Video Camera Game Console Blu Ray Player Recorder VCR Satellite Receiver Satellite antenna cable VIDEO2 HDMI3 USB L R HDMI Y Pb Cb Pr Cr White L Yellow VIdeo Red R Y Pb Cb Pr Cr White L Yellow VIdeo Red R HDMI Cable not included COAXIAL Cable not included OR RF coaxial cab...

Page 12: ...m the mains socket when not in use for a long period of time The I button at the side panel of the TV or the button on the remote control is only used for switching the TV into standby it does not disconnect the TV from the mains power To completely disconnect the mains power please remove the mains plug from the mains socket or switch off the POWER ON OFF switch The first time you turn the TV on ...

Page 13: ... view the selected channel If a blocked channel is selected the password screen will be displayed Press the 0 9 buttons to enter the password the channel will then be unlocked t Press the FAV button repeatedly to select the favourite channel if you have previously preset your favourite channels Alternative Press the FAV button to view the Favourite Channel List Then use the buttons to highlight an...

Page 14: ...directly Select Back Exit Exit Move PICTURE Standard 50 50 50 50 50 Plcture Mode Contrast Brightness Color Sharpness Tint Picture Mode Allows selection of picture enhancement options from among the following options Dynamic Standard Mild and User Contrast This item can adjust the highlight intensity of the picture but shadow on the picture is unavoidable Brightness This item can adjust the optical...

Page 15: ...at broadcast 4 3 This selection will allow you to view a picture with an original 4 3 aspect ratio black bars will appear on both the left and right of the screen 4 3 16 9 Select Back Exit Exit Move PICTURE Green Blue Aspect Ratio Noise Reduction Screen 50 50 16 9 Middle 16 9 You can view a picture format of 16 9 or a general TV programme in the 16 9 mode The 16 9 screen is viewed in the same way ...

Page 16: ...the remote control to change the Sound Mode directly Select Back Exit Exit Move SOUND User 50 50 0 On Off Sound Mode Treble Bass Balance Auto Volume Surround Sound Sound Mode Allows selection of an audio enhancement technical from among the following options Standard Music Movie Sports User You can change the value of Treble and Bass when the sound is in Personal mode Treble Controls the relative ...

Page 17: ...al II Dual I II Sleep Timer The sleep timer automatically switches the TV to standby after the preset time has elapsed The clock will be set automatically when receiving a digital signal Time must be set before using Sleep Timer OSD Timer function 1 Press the MENU button to display the main menu and then use the buttons to select TIME in the main menu and then press the OK button 2 Press the butto...

Page 18: ... then press the or OK button to highlight the first option 2 Press the buttons to select Audio Language then press the OK or button to enter the Primary sub menu Press the button again to enter the Secondary sub menu 3 Press the buttons to select the language you want then press the OK button to confirm and return to the OPTION menu Subtitle language Allows you to select your preferred subtitle la...

Page 19: ...then press the or OK button 3 Press the buttons to select time 5 10 15 20 25 30 35 40 sec 4 Press the OK button to save the setting and return to the previous menu 5 Press the EXIT button to exit the menu Select Back Exit Exit Move OPTION Subtitle Languages 1st Subtitle Languages 2nd OSD Duration Blue Screen Country MEMC Restore Factory Default English English 10S On Australia Low Select Back Exit...

Page 20: ...play the main menu and then use the buttons to select OPTION in the main menu and then press the OK button 2 Press the buttons to select Restore Factory Default and then press the or OK button to enter sub menu 3 Press the buttons to select YES or NO on the screen All settings will be reset to factory defaults and the OPTION menu will disappear Block Program 1 Press the buttons to select Block pro...

Page 21: ...tton or the OK button 3 Press the buttons to select a different rating 4 Press the MENU button to save the setting and return to the previous menu 5 Press the EXIT button to exit the menu Customising the TV Settings ATV DTV Mode Auto Scan Use this to automatically find and store all available channels This is normally recommended if some channels have been added removed by the broadcaster or you h...

Page 22: ...ing and then press the button or the OK button to enter sub menu a Press the buttons to select storage number b Press the buttons to select sound system press the buttons to select DK I BG L c Press the buttons to select channel number you want to store d Press the buttons to select search then press the buttons to start tuning e Press the buttons to select Fine Tune then press the buttons to adju...

Page 23: ...ess the buttons to highlight a channel and then press the BLUE button b Press the BLUE button again to undo it To Delete a Press the buttons to highlight a channel b Press the RED button to delete the channel To Move a Press the buttons and then press the YELLOW button to select a channel b Press the buttons to move the selected channel c Press the OK button to confirm To Rename a Press the button...

Page 24: ...on Mix To view a page of text while watching a TV programme press the TTX button twice The text will be superimposed over the TV programme Page search while watching TV Press the CANCEL button while viewing teletext enter the page number you want by using the 0 9 buttons The page number will remain on the top left hand corner of the screen Double height text If you have difficulty in reading the t...

Page 25: ...amme Guide DTV Mode This system has an Electronic Programme Guide EPG to help you navigate through all the possible viewing options The EPG supplies information such as programme listings start and end times for all available services In addition detailed information about the programme is often available in the EPG the availability and amount of programme information will vary depending on the pa...

Page 26: ...rt Select Disk C Speed Item Notes Select Disk Choose the disk to store the contents to be recorded default is C Check PVR File System This is to scan and verify there is no issue with the storage device Select OK or the button to scan the USB drive the system will show Checking If no USB has been inserted or scan has failed it will display FAIL If the scan no partitions No Partition found will be ...

Page 27: ...ess the button to start recording directly Recorded Mode 1 Press the MENU button to display the main menu and then use the buttons to select CHANNEL in the main menu and then press the OK button 2 Press the buttons to select Recorded Mode and then press the button or the OK button to set recorded mode 3 Press the buttons to select channel and recorded mode 4 Press the buttons to set start time and...

Page 28: ...button 2 Press the buttons to select Recorded List to scan record schedule 3 You can also press the INDEX button directly to display Key Function Index Press the INDEX to enter Recorded List when it shows the Recorded List menu you can switch recording program orders Up and down to move focus to select programme Close pop out the programme instruction OK Play focus programme Display Pop out or clo...

Page 29: ...s to select MOVIE and then press the OK button 3 Press the buttons to select folder PVR folder Select the recorded programme that you want to play and then press the OK button to play Time Shift Function At Time Shift playing condition the system records DTV and can play it at the same time t Time Shift Mode and Recording functions may not work if the signal strength is weak Press the TIME SHIFT b...

Page 30: ...t press the button repeatedly to speed up x 2 x 4 x 8 x 16 t During fast forward fast backward state press the button to return to normal playback or t Press the button to jump about 10 forward t Press the button to jump about 10 back t During playback press the button to display a still screen and then press the button again to resume playback t During fast forward fast rewind state press the but...

Page 31: ...l Goto Time There are three repeat modes Repeat All Repeat 1 Repeat None 5 Press the EXIT button to exit the function menu 6 Press the EXIT button again to return to the previous menu My Photo 1 Press the SOURCE button to display the input source list and then press the buttons to select the USB and then press the OK button 2 Press the buttons to select PHOTO and then press the OK buttons 3 Press ...

Page 32: ... menu 7 Press the EXIT button again to return to the previous menu My Movie 1 Press the SOURCE button to display the input source list and then press the buttons to select the USB and then press the OK button 2 Press the buttons to select Movie and then press the OK button My Text 1 Press the SOURCE button to display the input source list and then press the buttons to select the USB and then press...

Page 33: ...e connected properly Horizontal Vertical bar or picture shaking t Check for local interference such as an electrical appliance or power tool Poor reception on some channels t Station or cable channel may be experiencing problems tune to another station t Station signal is weak reposition the aerial for better reception t Check for sources of possible interference Lines or streaks in pictures t Che...

Page 34: ... reception problem either the signal is too weak or there is some kind of interference Talk to your retailer or contact your local antenna installer t Blocking can also be caused by a digital signal that is too strong If you are still experiencing blocking and the signal is strong consult your local antenna installer for advice Can I watch Free to Air using a portable set top antenna t Some but on...

Page 35: ...vertical Television System PAL SECAM BG DK I L DVB T Brightness 300 420 cd m2 Contrast Ratio 3 000 4 500 1 Inputs Output HDMI 3 PC 1 PC AUDIO 1 YPbPr 2 USB 1 S VIDEO 1 AV 2 AUDIO IN RCA 1 L R COAXIAL Output 1 RF 75 Ω 1 Speaker Power 6 W 6 W Earphone 3 5mm 1 Dimension W x D x H with base 770 x 164 x 520 mm Weight Net 9kg VGA Resolutions Supported 640 x 480 60Hz 800 x 600 60Hz 1024 x 768 60Hz 1366 x...

Page 36: ...he top Safety t Always disconnect the unit from the mains supply before connecting disconnecting other devices or moving the unit t Unplug the unit from the mains socket during a lightning storm Mains Cable t Make sure the unit or unit stand is not resting on top of the mains cable as the weight of the unit may damage the mains cable and create a safety hazard t If the mains cable is damaged it mu...

Page 37: ...t Never let anyone especially children push anything into the holes slots or any other openings in the case this could result in a fatal electric shock The lightning flash with arrowhead symbol within an equilateral triangle is intended to alert the user to the presence of uninsulated dangerous voltage within the unit s enclosure that may be of sufficient magnitude to constitute a risk of electric...

Reviews: