EUROCOM Monster 4 User Manual Download Page 20

 19

Engl

ish

Display Devices

Note that you can use external displays connected to the HDMI-Out port and/or Mini DisplayPort. See your display
device manual to see which formats are supported.
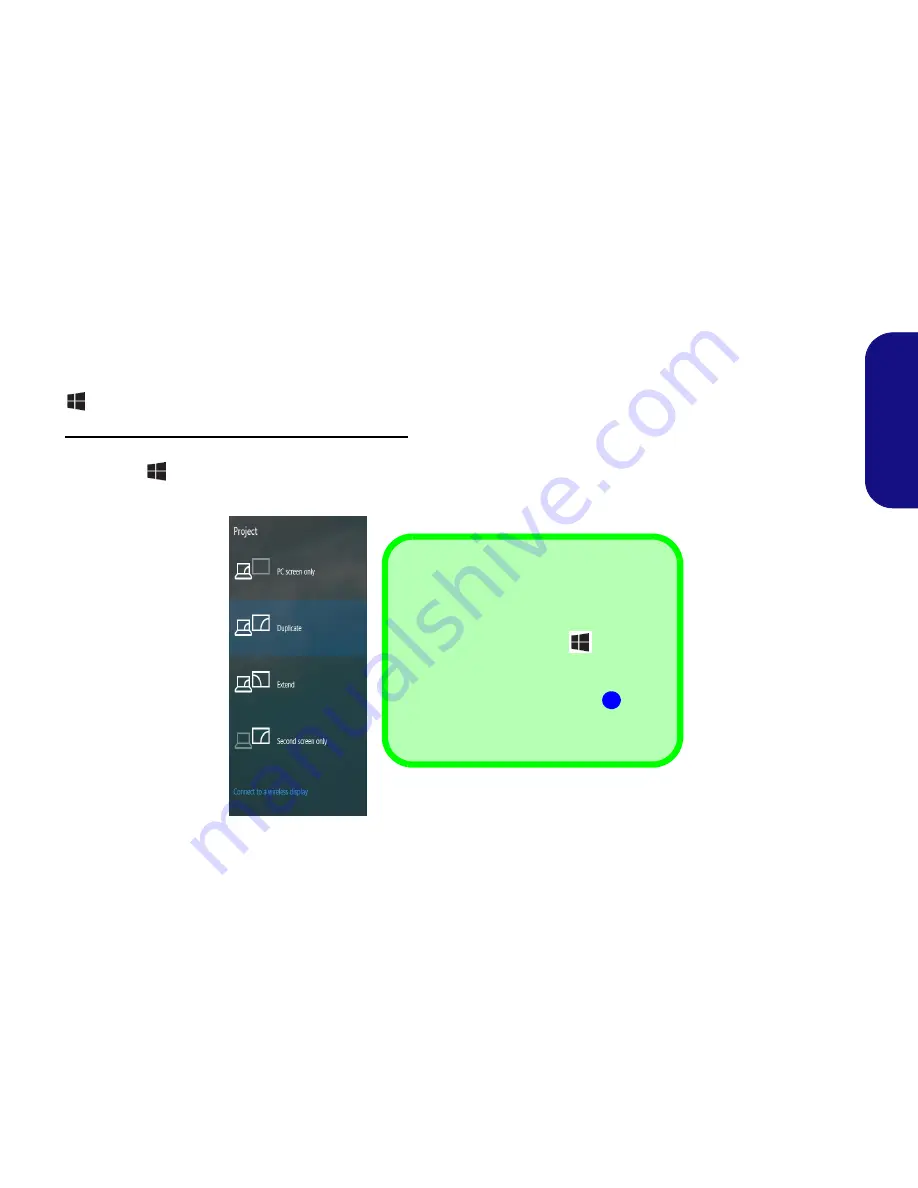
In 

Windows

 it is possible to quickly configure external displays from the 

Project

 menu (press the 

Windows Logo Key

 and the 

P

 key).

To configure the displays using the Project menu:

1. Attach your external display device to the appropriate port, and then turn it on.
2. Press the 


P

 (or 

Fn

 + 

F7

) key combination.

3. Click on any one of the options from the menu to select 

PC screen only

Duplicate

Extend

 or 

Second screen only

.

Figure 15

 - Project Menu



Mini DisplayPorts

External displays can be configured either us-
ing the

 Intel HD Graphics Control Panel

 or

by the 

Project 

menu (press  


P

 or 

Fn

 +

F7

).

If you wish to configure an external display
connected to 

Mini DisplayPort 1


(


in 

Fig-

ure 12 on page 15

) you must use 

Project

menu to control the display configuration.

2

Summary of Contents for Monster 4

Page 1: ...EUROCOM Monster 4...

Page 2: ...n t or you are planning to re configure or re install portions of the system refer to the expanded User s Manual The Device Drivers Utilities User s Manual disc does not contain an operating system Re...

Page 3: ...ted power supply If you are unsure of your local power specifications consult your service representative or local power company The AC DC adapter may have either a 2 prong or a 3 prong grounded plug...

Page 4: ...he computer yourself may violate your warranty and expose you and the computer to electric shock Refer all servicing to qualified service personnel particularly under any of the following conditions W...

Page 5: ...id LCD to a comfortable viewing angle do not to exceed 135 degrees use the other hand as illustrated in Figure 1 to support the base of the computer Note Never lift the computer by the lid LCD 6 Press...

Page 6: ...f you are using the com puter aboard aircraft by putting the system in to Airplane Mode 2 4 1 3 5 6 8 7 3 Figure 2 Front View with LCD Panel Open 1 PC Camera 2 PC Camera LED When the PC camera is in u...

Page 7: ...by the AC DC adapter plugged into a working outlet or powered by the battery with a capacity level above 20 this may not work with certain devices see page 30 Icon Color Description Green Airplane Mo...

Page 8: ...Indicators Keys Function Visual Indicators Fn Play Pause in Audio Video Programs Fn Airplane Mode Toggle Fn Touchpad Toggle Fn Sleep Toggle Fn Turn LCD Backlight Off Press a key to or use Touchpad to...

Page 9: ...the top of the Control Center Each power mode will affect the Power Conservation Mode Airplane Mode Power Plan and PC camera power etc Control Center Menus The Control Center contains 3 menu headings...

Page 10: ...period of inac tivity Click either the Performance Balanced or Ener gy Star button Fan Speed You can set the fan speed to Maximum full power Au tomatic Custom or Overclock from this menu item The fan...

Page 11: ...camera module is also effected by the Power Mode selected Left Windows Key Click Disable to disable the Windows Logo Key on the left side of the keyboard This may be useful if you are us ing the gami...

Page 12: ...mport profiles from the menus If you double click on a profile you can change the Profile Name and change an Image file images created using PNG files Keyboard and Mouse Settings Click Enable to creat...

Page 13: ...App Express Text or Disable from the menu at the bottom of the page You can rename the action by clicking in the Name box and click in Tool Tips to type in a note to remind you of the action s functio...

Page 14: ...key s required and do not click on them 6 Click Stop Record to complete the process Figure 9 Keyboard Express Key 7 Click Save to save the settings within your chosen profile 8 If you want to remove...

Page 15: ...nter key would be the most commonly used or you can leave it blank if you prefer 5 The key will now be configured to send the text message in the target program under your chosen Profile and the key w...

Page 16: ...to eject it however do not do this while a connec tion is in progress If you do eject the card while a 3G 4G con nection is ongoing you will need to shut down the system re insert the USIM card resta...

Page 17: ...ottom Cover Removal Warning Do not remove any cov er s and or screw s for the purposes of device up grade as this may violate the terms of your warranty If you need to replace re move the hard disk RA...

Page 18: ...bottom right of the screen Some of the control panels and applications referred to throughout the course of this manual can be accessed from here Throughout this manual you will see an instruction to...

Page 19: ...ntegrated GPU and the discrete GPU when required by the applications in use To access the Display control panel in Windows 1 Go to the Control Panel 2 Click Display icon in the Appearances and Persona...

Page 20: ...Attach your external display device to the appropriate port and then turn it on 2 Press the P or Fn F7 key combination 3 Click on any one of the options from the menu to select PC screen only Duplica...

Page 21: ...me Tuning Utility from the desktop shortcut or from the apps menu 7 Note that making alterations to clock frequency and or voltage can cause system instability cause components to fail cause heat dama...

Page 22: ...to the Control Panel 2 Click Realtek HD Audio Manager or right click the notification area icon and select Sound Manager 3 Click Speakers tab and click Speaker Configuration tab 4 Select 5 1 Speaker...

Page 23: ...ecording quality 4 Click OK to close the Sound control panel Sound Blaster Audio Install the Sound Blaster application to allow you to configure the audio settings to your requirements for the best pe...

Page 24: ...icon will turn yellow 5 To stop video capture click the video icon again 6 Captured photos and videos will be saved to a Camera Roll folder within the Pictures folder in This PC and to the Photos app...

Page 25: ...Driver Installation Driver Installation Power When installing drivers make sure your computer is powered by the AC DC adapter connected to a working power source Some drivers draw a significant amoun...

Page 26: ...ad Driver Yes 2 Click Next 3 Click the tickbox to accept the license and then click Next 4 Click Finish Restart Now to restart the computer Airplane Mode Airplane 1 Click 7 Install Airplane Driver Yes...

Page 27: ...Click Option Drivers button 2 Click 1 Install WLAN Driver Yes 3 Click Next 4 Click Finish to restart the computer WLAN Configuration in Windows Make sure the Wireless LAN module is turned on and not...

Page 28: ...turn on the display and then set the display to the appropriate input channel see the documentation supplied with your com patible adapter for full details Note that no driver or application is requir...

Page 29: ...d Bluetooth 4 0 Combo 1 Click Option Drivers button 2 Click 2 Install Combo BT Driver Yes 3 Click Next 4 Click Finish to restart the computer Bluetooth Configuration in Windows Make sure the Bluetooth...

Page 30: ...tration 4 The TPM Management window allows you to configure the TPM within Windows As TPM is usually administered within large enterprises and organizations your system administrator will need to assi...

Page 31: ...stantial amount of disk space for each file Note that the Windows system requires a minimum of 20GB 64bit of free space on the C drive system partition It is recommended that you save the capture vide...

Page 32: ...mputer in DC Mode Note that when the computer is in DC mode powered by the battery only the CPU may not run at full speed This is a design feature im plemented in order to protect the battery Storage...

Page 33: ...n Jack One RJ 45 LAN Jack One DC In Jack Communication Built In Gigabit Ethernet LAN 2 0M FHD PC Camera Module Factory Option M 2 3G 4G Module WLAN Bluetooth M 2 Modules Factory Option Intel Wireless...

Reviews: