background image

7

5 - I

NSTALLING YOUR WINE CABINET

- On unpacking you wine cabinet after delivery, check for any obvious exterior damage (dents, malformation, etc.).

Open the door and check that the inside of the appliance is complete and in good condition (walls, shelves, hinges, control panel, etc.).

- In the event of a problem, contact your dealer.

- M ove your wine cabinet to your selected location.This position must be:

- away from any heat source
- not too wet (wash room, utility room, bathroom, etc.)
- be on a flat solid floor
- have an electrical power supply (standard 13A plug connected to a 30 mA circuit breaker)

- Never place your wine cabinet in a location liable to flooding.

- Avoid splashing water onto the base of the appliance.

- Place the clay humidity cassette (for 1 temperature models only), which you will find inside your cabinet's "accessories" box) in the receptacle provided for
it beneath the grid located at the base of the cabinet (see diagram page 19). When using the cassette for the first time, please soak the cassette for ten
minutes in water, and let it drain.

- Take the power lead (which you will find inside your cabinet's "accessories" box) and connect it to the
socket provided at the rear bottom left of the cabinet.

- Unwind the power supply lead so that it can be accessed.

- Place the power supply lead so that it is not in contact with any of the appliance's components.

I M P O RTANT - Wait 48  hours befo re switching on to allow the fluids contained in the internal

c i rcuits to settle.

- Adjust the 4 feet of the cabinet (by screwing in or out), so that your wine cabinet stands perfectly level
(we recommend using a spirit level).

- Never obstruct the front ventilation grille.
- Remove the protective packing inside the cabinet.

- Install the carbon filter, which you will find inside your cabinet's "accessories" box , by placing it in the air circulation hole located inside the cabinet on the
top left hand side (see diagram opposite).

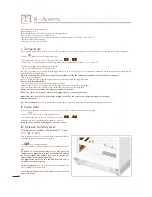
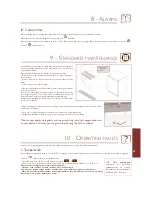
- For medium and large models, if the wine cabinet is not fbuilding in, it is 

essential

to secure it to the wall

to prevent it fromtipping forward.

You will find all the necessary parts in the accessories bag supplied with the unit.

For installation (see diagram opposite):

1- Attach the bracket (1) to the cabinet with the screws (2)

2- Clip the nut (3) to this bracket (preferably choose the hole nearest to the cabinet)

WARNING: make sure that the part is correctly clipped by pulling upwards by hand.The clip must not come
out

3- Preposition the wall bracket (1’) (on the nut (3) to determine the position for drilling the holes for the
wall-mounting screws

4- Drill the holes then attach the wall bracket (1’) with (4) suitable screws

WARNING: ensure that the wall fixing can withstand a tensile force of 100 kg

5- Tighten screw (6) with the washer (5) until it is screwed fully in and there is contact between the wall
bracket (1’) and the nut (3).

Only full tightening of the screw will ensure correct fixing of the unit.

N.B.: when moving your wine cabinet, do not incline it more
than  45°,and  always  toward  side  where  the  power  lead  is
located.

I - In General

1 - fixing bracket (x2)
2 – screw for fixing to cabinet (x2)
3 – clipped nu t
4 - screw to suit wall fixing (not supplied)
5 - washer
6 - fixing screw

Summary of Contents for Compact 59

Page 1: ...Mode d emploi Gamme Compact 59 Technical Manual Compact 59 Range Gebrauchsanweisung ReiheCompact 59 Modo de empleo Gama Compact59 ...

Page 2: ...OS PARA VINOS SYSTÈMES DE RANGEMENT STORAGE SYSTEMS REGALSYSTEME SISTEMAS DE COLOCACIÓN CLIMATISEURS DE CAVE CELLAR CONDITIONERS WEINKELLERKLIMAGERÄTE CLIMATIZADORES PARA BODEGA SERVICE DU VIN AU VERRE SYSTEM TO SERVE WINES BY THE GLASS OFFENAUSSCHANKSYSTEM DISPENSADOR DE VINO POR COPA First Classic Compact Cuir Leather Leder Cuero Meuble àVins Elite Modulothèque Modulocube Modulorack CL C CL A Vi...

Page 3: ... preservation Having appropriate storage that cuts down on handling is essential Natural ventilation A constant supply of filtered air from the outside is indispensable if unpleasant smells and mould development are to be avoided All of these criteria are embodied in the EuroCave Compact cabinet that you have just acquired We thank you for the faith you have shown in us French Wines Alsace 10 C 50...

Page 4: ...INE CABINET 1 Connecting up your wine cabinet p 14 II Switching on the cabinet p 14 III Control panel description p 15 IV Temperature settings a 1 temperature models V059 V159 V259 p 16 b Multi temperature models S059 S159 S259 p 17 V Humidity level display p 18 VI Lighting mode adjustment p 18 VII Adjusting the display contrast p 18 VIII Carbon filter counter log display p 18 8 ALARMS 1 Temperatu...

Page 5: ... and handle 10 Free air circulation hole 11 Specification label 12 4 adjustable levelling feet 13 Lug for fixing to work surface if flush fitted 14 Anti tilt system for medium and large models 15 Location of temperature probe in 1 temperature models 15bis Location of temperature probe in multiple temperature models 16 Humidity cassette 1 temperature models 17 Grid 18 Lower hinge removable door pin...

Page 6: ...anufacturer s part IMPORTANT any intervention should be carried out by a qualified electrician Caution When using your wine cabinet alw ays take certain basic precau tions especially Make sure that the plug is earthed and that the installation s circuit is protected by a 30 mA fuse 3 POWER SUPPLY For your personal safety the wine cabinet should be properly earthed Disposal of packaging The packagi...

Page 7: ...of the cabinet by screwing in or out so that your wine cabinet stands perfectly level we recommend using a spirit level Never obstruct the front ventilation grille Remove the protective packing inside the cabinet Install the carbon filter which you will find inside your cabinet s accessories box by placing it in the air circulation hole located inside the cabinet on the top left hand side see diag...

Page 8: ...ility a Summary of parts 1 Hinge 2 5 10 Grommets 3 No 25 Torx screw 4 Flush fitting hinge 6 Hinge without pin 7 Door pivot guide 8 Pillar 9 Washer 11 Closing clip 12 Lock 13 Locking bar 14 Logo support 15 Phillips screws 16 Nut 17 No 20 Torx screw 18 EuroCave Logo ...

Page 9: ...lugs 2 and screws 3 with a T25Torx screwdriver and lift off the hinge 1 Fig 3 Fig 1 Fig 2 Fig 3 Precautions When closing the door check that the seal adheres correctly to the cabinet so that it is airtight Remove plugs 5 Fig 6 Weight of the panel max 15kg Fit the hinge without pin 6 with the screws 3 Fig 7 A maxi A mini B C mini 059 831 815 Solid door 552 820 Glass door 540 159 1231 1215 Solid doo...

Page 10: ...pty If necessary use the hexagonal pillars 8 Fig 9 that you will find in the accessories bag Tilt the unit forward taking care to keep the door closed Unscrew the rear feet and install the pillars using a 17 mm flat spanner Screw the 2 rear feet back onto the pillars Repeat these operations for the 2 front feet taking good care to tilt the unit backwards Do not obstruct For safety reasons we do no...

Page 11: ...ghtly then lifting it up Fig b Remove the washer 9 remove the pin 7 with a no 10 hexagonal spanner Fig c Carefully remove the plug 10 with a thin blade and in its place fit the pin 7 and washer 9 Fig c Replace the plug 10 on the opposite side Fig c Then turn the logo round solid doors only Unscrew the screw 17 with a 25 Torx screwdriver Fig e Remove the cam 13 Fig e Unscrew the nut 16 with a no 28...

Page 12: ...a TX20 Torx spanner supplied in the accessories bag Figs k and e WARNING note the direction of rotation of the cam 13 it must always turn upwards whether the door is mounted on the right or left side Reposition the door vertically on its axis 7 not forgetting the washer 9 Fig m Fig i Fig j Fig k Fig m Fig n Reattach the hinge 1 with the screws 3 so that the door is parallel with the cabinet Fig n ...

Page 13: ...n a sliding shelf If you have sliding shelves for easy day to day access it is a good idea to place them in the upper part of your wine cabinet For this reason place one or two bottles of each of your various wines on the sliding shelves and your reserve stock on the storage shelves Then all you have to do is top them up as required When using your wine cabinet never pull out more than one sliding...

Page 14: ...SIONING YOUR WINE CABINET 1 Connecting up your wine cabinet Make check that your socket has a power supply presence off fuses and amperages and that there is an operational 30 mA circuit breaker Not applied to certain countries Having waited for 48 hours switch on your wine cabinet at the main power supply II Switching on the cabinet Press on the internal and standby button and then release A star...

Page 15: ... circuit operating indicator light blue Temperature alarm Temperature units depending on country Temperature zone concerned and door open alarm Infra red door open detection sensors Standby status button Did you know Contrary to popular belief all red white or sparkling wines can be preserved at a temperature of between 10 and 14 C If wine is subjected to violent heat variations it will dilate the...

Page 16: ...w the new setting The default setting is 12 C 54 F ideal maturing temperature However this setting can be adjusted between 5 and 20 C 41 and 68 F Beyond these limits the buttons and are disabled Converting your maturing cabinet into a service cabinet You can use your 1 temperature maturing cabinet as a service cabinet in order to bring your white and red wine to tasting temperature setting range b...

Page 17: ...e is 18 C 64 F However this setting can be adjusted between 15 and 22 C 59 and 72 F Beyond these limits the buttons and are disabled WARNING to operate correctly your cabinet should be located in a room with a temperature between 12 and 35 C 54 and 95 F When making substantial changes to the temperatures it may take several hours to stabilise and display the required temperature Lowest cabinet tem...

Page 18: ...ayed Press on the button to select your lighting mode two options Example of a display for 1 temperature model Press on the button to confirm your choice and move on to the next step setting display contrast Note When Ecl is displayed you have 15 seconds to select and confirm the required lighting mode otherwise the display automatically returns to cabinet temperature VII Adjusting the display con...

Page 19: ... may trigger This could happen when first starting up the cabinet this is not due to an operating fault Wait a few days for the cabinet interior temperature to stabilise If however after a few days the alarm is still triggered please contact your dealer Apart from these three cases if the alarm triggers it could be the result of an operating fault see next page Contact your dealer N B Only prolong...

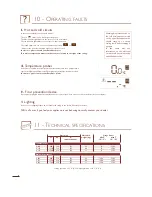
Page 20: ...er in this way you can guarantee the long life of your cabinet 10 OPERATING FAULTS In the event of operating faults in your appliance alarms will warn you of the type of problem encountered 1 Temperature If your cabinet s temperature stays at or 4 C 7 F in relation to the set temperature for more than 24 hours a visual and sound alarm is triggered The icon flashes and a sound signal alerts you The...

Page 21: ...r cabinet is equipped with a frost prevention device to protect you in the event of a cold circuit failure see above chapter V Lighting In the event of a lighting failure do not handle the casing or the diodes Contact your dealer 10 OPERATING FAULTS Warning Any intervention on the cold circuit must be carried out by a qualified expert who should carry out a circuit sealing check before starting it...

Page 22: ...12 SIMULATIONS DE RANGEMENT 12 STORAGE LAYOUT EXAMPLES 12 LAGERUNGS BEISPIELE 12 SIMULACIONES DE COLOCACIÓN 79 ...

Page 23: ...AXLN 39 6 ACUPC 8 ACUPC 8 6 ACUPC 8 6 ACUPC ACOP 9 56 53 38 31 Les capacités des armoires sont calculées en configurations usine avec des bouteilles Bordeaux Tradition The cabinet capacities are calculated in factory configuration using traditional Bordeaux bottles Die Kapazitäten der Schränke werden mit Bordeauxflaschen Tradition in Fabrik Konfigurationen berechnet Las capacidades de las bodegas ...

Page 24: ...n factory configuration using traditional Bordeaux bottles Die Kapazitäten der Schränke werden mit Bordeauxflaschen Tradition in Fabrik Konfigurationen berechnet Las capacidades de las bodegas están calculadas en configuraciones de fábrica con botellas Burdeos Tradición 81 V S Présentation Presentation Präsentationsregale Presentación V S Stockage Storage Lagerregal Almacenamiento 40 bouteilles 40...

Page 25: ...259 MULTI TEMP S 259 ACUPC 8 ACUPC 8 ACUPC 8 ACUPC 8 ACUPC 8 ACUPC 8 ACUPC 8 118 164 AXLN 11 167 66 Les capacités des armoires sont calculées en configurations usine avec des bouteilles Bordeaux Tradition The cabinet capacities are calculated in factory configuration using traditional Bordeaux bottles Die Kapazitäten der Schränke werden mit Bordeauxflaschen Tradition in Fabrik Konfigurationen bere...

Page 26: ...ation wether partial or total are strictly prohibited without prior written consent from EuroCave Die Angaben in diesem Dokument können ohne Ankündigung geändert werden EuroCave gewährt keine Garantie wenn das Gerät anders als für seine gedachte Zweckbestimmung eingesetzt wird EuroCave haftet nicht für Fehler die diese Anweisung enthalten könnte und auch nicht für Schäden in Zusammenhang oder im A...

Page 27: ...ler for further information Seit mehr als 30 Jahren führend im Bereich der Lagerung der Präsentation und dem Ausschank vonWeinen schlägt Ihnen EuroCave Lösungen vor die jedem Ihrer Bedürfnisse angepasst sind Wein Zigarrenklimaschränke Weinkeller Kompaktklimaanlagen Geräte für den glasweisen Offenausschank Weinkeller Regalsysteme Zögern Sie nicht länger setzen Sie sich mit Ihren EuroCave Händler in...

Reviews: