background image

1.4 Setup

1. UPS input connection

Plug the UPS into a grounded receptacle only. Avoid using extension cords, power strips or surge protectors

2.  UPS output connection

There are two kinds of outputs:  programmable outlets and general outlets. Please connect non-critical devices to the 
programmable outlets and critical devices to the general outlets. You may extend the backup time to critical devices by 
setting shorter backup time for non-critical devices

3. Communication connection (Optional)

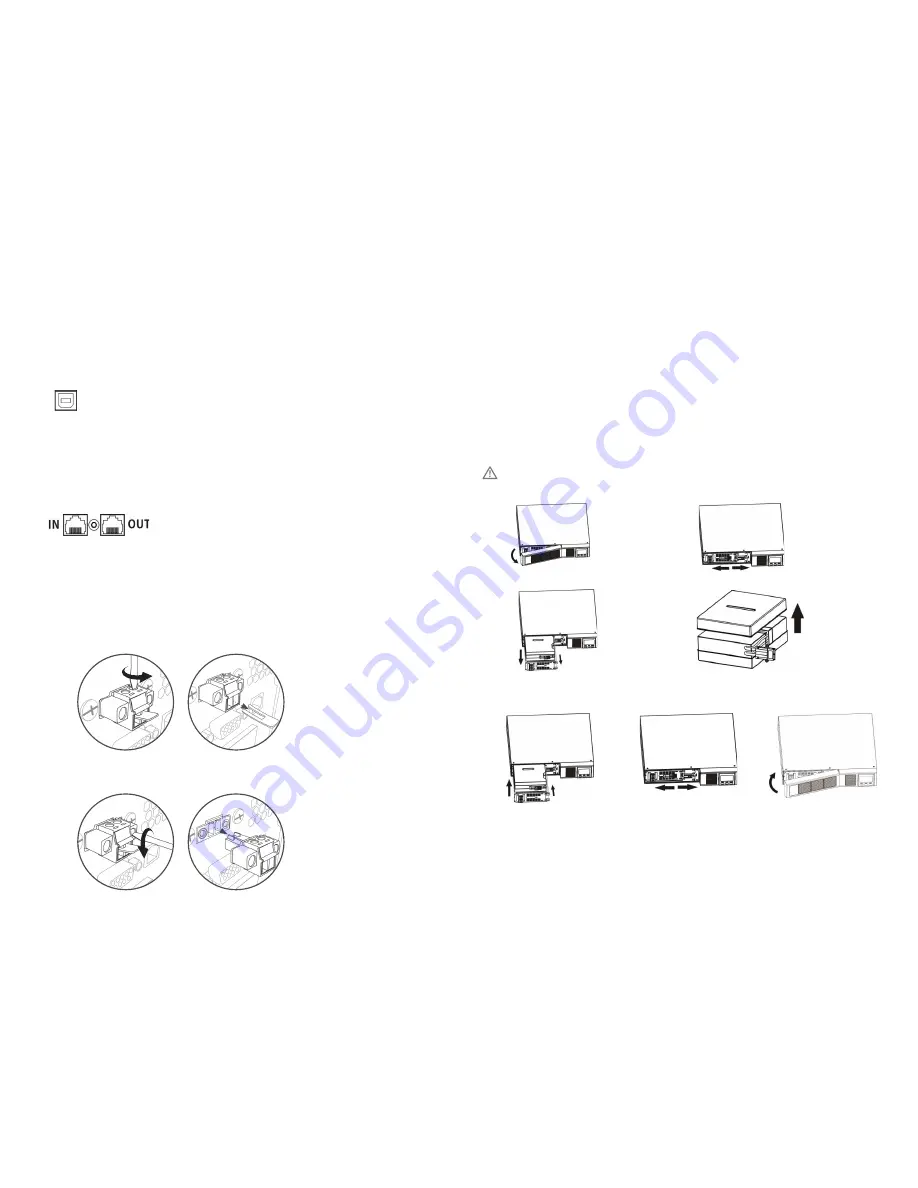
USB Port

4. Network connection

Network/Fax/Phone surge port

Method 1

Remove two top screws

Pull out metal pin

Method 2

Remove two front screws

Pull out the entire green connector

To allow for unattended UPS shutdown/start-up and status monitoring, connect the included USB cable from the 
computer to the UPS system

Note:  

USB port and RS-232 port can’t work at the same time. 

5. Disable and enable EPO function

This UPS is equipped with EPO function. Pin 1 and Pin2 are closed by default for normal UPS operation. 

Note:  

The EPO function logic can be set up via LCD setting. Please refer to program 16 in UPS setting for the details

Connect a single modem/phone/fax/network line into surge-protected “IN” outlet on the back panel of the UPS unit. 
Connect from “OUT” outlet to the equipment with another modem/fax/phone/network line cable. 

1.5 Battery Replacement

Note:


This UPS is equipped with internal batteries and only a trained technician should replace the batteries. 

Note:


When battery is disconnected, equipment is not protected from power outages. 

Caution! – Adhere to all warnings, cautions, and notes before replacing batteries.  

1

2

3

4

Remove front panel

Disconnect battery wires

Pull out the battery box by removing two screws 
on the front panel

Remove the top cover of battery box and replace 
the inside batteries 

5

6

7

Remove the top cover of battery 
box and replace the inside 
batteries

After replacing the batteries, 
put the battery box back to the 
its original location and screw it 
tightly

Put the front panel back on the unit

6. Turn on the UPS

Press the ON/Mute Button on the front panel for two seconds to power on the UPS. 

Note:  

The battery charges fully during the first five hours of normal operation. Do not expect full battery run 

capability during this initial charge period

7. Install software (Optional for advanced users)

For optimal computer system protection, install UPS monitoring software to fully configure the UPS system. Please 
follow steps below to download and install monitoring software. 

1. Go to the website

 http://www.V7-world.com/downloads

2.  Select ViewPower software for your operating system to download the software. 
3.  Follow the on-screen instructions to install the software. 

Summary of Contents for UPS1500RM2U

Page 1: ...PS 1500VA PARA INSTALACIÓN EN BASTIDOR 2 UNIDADES UPS DA 1500 VA MONTAGGIO RACK 2U UPS 1500VA RACK MOUNT 2U UPS1500RM2U 2UUPS1500VARACKMOUNT 2 HE USVMIT1 500VAZURRACKMONTAGE ONDULEURÀMONTAGESURRACK2U 1500VA 2UNIDADESUPS1500VAPARAINSTALACIÓNENBASTIDOR UPS2UDA1500VAPERMONTAGGIOINRACK 2UUPS1500VARACKMOUNT ...

Page 2: ... 2 Operation EMI RFI Filters Battery Charger Battery DC to DC Converter Inverter AVR TX Output For safety consideration the UPS is shipped out from factory without connecting battery wires Before installation of the UPS please follow the steps below to re connect the battery wires 1 3 Installation Remove Front Panel Connect the AC Input and re connect battery wires Put the front panel back on the ...

Page 3: ...UT outlet to the equipment with another modem fax phone network line cable 1 5 Battery Replacement Note This UPS is equipped with internal batteries and only a trained technician should replace the batteries Note When battery is disconnected equipment is not protected from power outages Caution Adhere to all warnings cautions and notes before replacing batteries 1 2 3 4 Remove front panel Disconne...

Page 4: ...d level by 0 24 25 49 50 74 and 75 100 Indicates Overload Programmable Outlets Information Indicates that programmable management outlets are working Mode Operation Information Indicates the UPS connects to the mains Indicates the battery is working Indicates charging status Indicates the bypass circuit is working Indicates the ECO mode is enabling Indicates the UPS is working in boost mode Indica...

Page 5: ... the battery capacity Default setting Note when setting is 0 the back up time will only be 10 seconds 07 Battery total AH setting Set up the battery total AH of the UPS Set the battery total capacity from 7 999 in AH Set the correct battery total capacity if there is a connected battery bank 08 EPO Logic Setting Set up the EPO function Control Logic AO Active Open Default When AO is selected as EP...

Page 6: ...m even though the mains are normal The AC input power is not connected Check if input power cord firmly connected to the mains The AC input is connected to the UPS output Plug AC input power cord to AC input correctly The icon and the warning code flashing on LCD display and alarm is sounding every 2 seconds EPO function is activated Set the circuit in closed position to disable EPO function The i...

Page 7: ...icon is lit on LCD display Alarm sounds continuously The UPS automatically shut down due to an overload at the output Remove excess loads from the UPS output and restart Fault code is shown as 14 and alarm sounds continuously The UPS automatically shut down because of a short circuit on the UPS Check output wiring and if connected devices are in short circuit status Fault code is shown as 01 02 03...

Page 8: ...t and short circuit in the upstream of the UPS system The recommended protection specification is 11A for 800VA 1100VA 15A for 1 5 VA 20A for LV 2KVA and 30A for 2 5 3KVA with a B or C trip curve The UPS system operates with hazardous voltages Repairs should be carried out only by a qualified technician CAUTION risk of electric shock Even after the unit is disconnected from the mains building wiri...

Page 9: ... EMI RFI Filters Battery Charger Battery DC to DC Converter Inverter AVR TX Output Aus Sicherheitsgründen wird die USV ab Werk ohne angeschlossene Batteriekabel geliefert Bevor Sie die USV Installieren befolgen sie bitte die folgenden Schritte um die Batteriekabel wieder anzuschließen 1 3 Installation Nehmen Sie die Frontblende ab Schließen Sie denWechselstromeingang an und verbinden Sie die Batte...

Page 10: ... der Rückseite der USV an Anschließend können Sie ein weiteres Modem Fax Telefon Netzwerkkabel an den OUT Anschluss stecken 1 5 Austauschen der Batterien Hinweis Diese USV ist mit integrierten Batterien bestückt die nur von einer Elektrofachkraft ausgetauscht werden sollten Hinweis Wenn die Batterie nicht angeschlossen ist sind die Geräte nicht vor Stromausfällen geschützt Achtung Beachten Sie all...

Page 11: ... 0 24 25 49 50 74 und 75 100 an Zeigt Überlast an Informationen zu programmierbaren Ausgängen Zeigt an dass die programmierbaren Ausgänge in Betrieb sind Informationen zum Betriebsmodus Zeigt an dass die USV an ein Hauptnetz angeschlossen ist Zeigt an dass die Batterie in Betrieb ist Zeigt den Ladestatus an Zeigt an dass die Bypass Schaltung in Betrieb ist Zeigt an dass der ECO Modus aktiviert ist...

Page 12: ...trägt die Backup Zeit nur 10 Sekunden 07EinstellungderBatteriekapazitätinAh Einstellen der Batteriekapazität der USV in Ah Einstellen der Batteriekapazität von 7 999 in Ah Einstellen der richtigen Batteriekapazität wenn eine Batterie angeschlossen ist 08 Einstellung der EPO Logik Einstellen der Kontrolllogik für die EPO Funktion AO Active Open Standard Wenn AO als EPO Logik ausgewählt ist wird die...

Page 13: ...en Prüfen Sie das Eingangsstromkabel auf korrekten Sitz Der AC Eingang ist mit einem USV Ausgang verbunden Schließen Sie das AC Stromkabel an den AC Stromeingang der USV an Das Symbol und dieWarnung blinken auf der Anzeige und der Alarm ertönt alle zwei Sekunden Die EPO Funktion ist aktiviert Schließen Sie den Schaltkreis um die EPO Funktion zu deaktivieren Die Symbole und und die Warnung blinken ...

Page 14: ...er Alarm gibt einen Dauerton ab Die USV hat sich aufgrund zu hoher Ausgangslast selbsttätig abgeschaltet Beseitigen Sie die übermäßige Belastung am USV Ausgang und starten Sie die USV neu Der Fehlercode 14 wird angezeigt und der Alarm gibt einen Dauerton ab Die USV hat sich aufgrund eines Kurzschlusses am USV selbsttätig abgeschaltet Prüfen Sie die Ausgangsverkabelung und ob sich ein verbundenes G...

Page 15: ...lüssen verfügt Die empfohlene Schutzspezifikation lautet 11 A für 800 VA 1 100 VA 15 A für 1 5 VA 20 A für LV 2 KVA und 30 A für 2 5 3 KVA mit einer B oder C Auslösekurve Die USV arbeitet mit hohen Stromspannungen Reparaturen sollten nur von qualifiziertem Personal durchgeführt werden VORSICHT Stromschlaggefahr Selbst wenn die USV vom Stromnetzt genommen wurde sind Geräte und interne Komponenten n...

Page 16: ...d une sortie onduleur 1 2 Fonctionnement EMI RFI Filters Battery Charger Battery DC to DC Converter Inverter AVR TX Output Pour des questions de sécurité l onduleur est expédié depuis l usine sans que soient connectés les câbles de batterie Avant son installation veuillez suivre les étapes ci dessous pour reconnecter les câbles des batteries 1 3 Installation Retirez le panneau avant Connectez l ar...

Page 17: ... de sortie de l onduleur 1 5 Remplacement de la batterie Remarque Cet onduleur est équipé de batteries internes et seul un technicien qualifié est habilité à procéder au remplacement des batteries Remarque Lorsque les batteries sont déconnectées les équipements ne sont pas protégés contre les pannes de courant Avertissement Veuillez respecter tous les avertissements mises en garde et remarques ava...

Page 18: ...les Indique l état de fonctionnement activé de sorties programmables Informations sur le mode de fonctionnement Indique l état de connexion de l onduleur au réseau électrique Indique l état de fonctionnement des batteries Indique l état de charge Indique le fonctionnement du circuit de dérivation Indique l état d activation du mode d arrêt automatique Indique le fonctionnement de l onduleur en mod...

Page 19: ...a durée d autonomie ne sera que de 10 secondes 07 Réglage de la capacité totale en AH des batteries Définir la capacité totale en AH des batteries de l onduleur Réglez la capacité totale des batteries dans la plage comprise entre 7 et 999 AH Réglez la capacité totale et réelle des batteries s il existe une banque de batteries connectée 08 Réglage de l arrêt d urgence commandé Configurer le contrôl...

Page 20: ...un avertissement sonore toutes les 2 secondes Remarque La fonction Erreur de câblage sur site ne peut pas être activée via le logiciel Veuillez consulter le manuel du logiciel pour plus d informations Problèmes Cause Solution Aucun indicateur n est activé et aucune alarme ne retentit même lorsque l alimentation secteur est normale L alimentation d entrée n est pas connectée Vérifiez si le cordon d...

Page 21: ...Le code d erreur 43 et l icône s affichent à l écran L alarme émet un signal sonore continu L onduleur se met à l arrêt automatiquement en raison de la surcharge à sa sortie Débranchez l excès de charge à la sortie de l onduleur et redémarrez le Le code d erreur affiché est 14 et l alarme émet un signal sonore continu L onduleur se met à l arrêt automatiquement en raison d un court circuit à ses b...

Page 22: ...e protection contre les surintensités et les court circuits en amont de l onduleur Les valeurs spécifiques recommandées pour la protection sont de 11A pour 800VA 1100VA 15A pour 1 5 VA 20A pour LV 2KVA et 30A pour 2 5 3KVA avec une courbe de déclenchement B ou C L onduleur fonctionne avec des tensions dangereuses Des réparations doivent être entreprises par un technicien qualifié ATTENTION Risques...

Page 23: ... Charger Battery DC to DC Converter Inverter AVR TX Output Por motivos de seguridad la unidad SAI se envía de fábrica sin los cables de conexión de la batería conectados Antes de realizar la instalación siga los pasos indicados para conectar los cables de la batería 1 3 Instalación Extraiga el panel frontal Conecte la entrada CA y vuelva a conectar los cables de la batería Coloque de nuevo el pane...

Page 24: ...rior de la unidad SAI Conecte desde la toma OUT salida el equipo con otro cable de línea de módem teléfono fax 1 5 Substitución de la batería Nota Este protector de sobrevoltaje está equipado con baterías internas que solamente podrán ser reemplazadas por un técnico cualificado Nota Cuando la batería esté desconectada el equipo no estará protegido en caso de un corte en la fuente de alimentación P...

Page 25: ...a carga Indica el nivel de carga en 0 24 25 49 50 74 y 75 100 Indica un estado de sobrecarga Información sobre las tomas programables Indica que las tomas de gestión programable están funcionando Información sobre el modo de funcionamiento Indica que el sistema SAI está conectado a la fuente de alimentación Indica que está funcionando la batería Indica el estado de carga Indica que está funcionand...

Page 26: ...eguridad será solamente 10 segundos 07 Configuración AH total de la batería Establece el AH total de la batería del SAI Establezca la capacidad total de la batería entre 7 y 999 en AH Establezca la capacidad total correcta de la batería en caso de que haya un banco de batería conectado 08 Ajustes de lógica del apagado de emergencia Establezca la lógica de control de la función de apagado de emerge...

Page 27: ...e alimentación CA no está conectado Compruebe si el cable está correctamente conectado a la fuente de alimentación La entrada CA está conectada a la salida del SAI Las conexiones del cable de entrada CA a la entrada CA no están realizadas correctamente El icono y el código de advertencia parpadean en la pantalla LCD y la alarma suena cada 2 segundos La función de apagado de emergencia está activad...

Page 28: ...ilumina el icono en la pantalla La alarma suena de forma continuada EL SAI se apaga de forma automática debido a un exceso de carga en la salida Elimine el exceso de carga de la salida del SAI y reinicie la unidad El código de error se muestra como 14 y la alarma suena de forma continuada El SAI se ha apagado de forma automática debido a un cortocircuito en el SAI Compruebe el cableado de salida y...

Page 29: ...te y cortocircuitos en la corriente ascendente del sistema SAI La especificación de protección recomendada es de 11 A para 800 VA 1100 VA 15 A para 1 5 VA 20 A para LV 2 KVA y 30A para 2 5 3KVA con una curva de activación tipo B o C El sistema SAI funciona con voltajes peligrosos Las reparaciones deben ser realizadas solamente por personal técnico cualificado PRECAUCIÓN Riesgo de descarga eléctric...

Page 30: ...nzionamento EMI RFI Filters Battery Charger Battery DC to DC Converter Inverter AVR TX Output Per motivi di sicurezza il sistema UPS è fornito con i cavi della batteria scollegati Prima di installare il sistema UPS ricollegare i cavi della batteria attenendosi alla procedura seguente 1 3 Installazione e montaggio Rimuovere il pannello anteriore Collegare l ingresso CA e ricollegare i cavi della ba...

Page 31: ...ratensioni sul pannello posteriore del sistema UPS Collegare la presa OUT all apparecchiatura con un altro cavo di linea modem fax telefono rete 1 5 Sostituzione delle batterie Nota il sistema UPS è dotato di batterie interne che possono essere sostituite esclusivamente da un tecnico qualificato Nota quando la batteria è scollegata le apparecchiature non sono più protette dai blackout Attenzione P...

Page 32: ... sovraccarico Informazioni sulle prese programmabili Indica che le prese programmabili sono in funzione Informazioni sulle modalità di funzionamento Indica che il sistema UPS è collegato alla rete elettrica Indica che la batteria è in funzione Indica lo stato di carica Indica che il circuito di bypass è in funzione Indica che la modalità ECO è in funzione Indica che il sistema UPS funziona in moda...

Page 33: ...onomia dipende dalla capacità della batteria impostazione predefinita Nota quando l impostazione è 0 l autonomia sarà pari solo a 10 secondi 07 Impostazione della capacità totale in AH della batteria Impostare la capacità totale in AH della batteria del sistema UPS Impostare la capacità totale della batteria da 7 a 999 in AH Impostare la capacità totale corretta della batteria se è collegato un gr...

Page 34: ...na indicazione e allarme anche in assenza di anomalie della rete elettrica L alimentazione CA in ingresso non è collegata Controllare se il cavo di alimentazione di ingresso è collegato alla rete elettrica L ingresso CA è collegato all uscita del sistema UPS Collegare il cavo di alimentazione di ingresso CA all ingresso CA L icona e il codice di avvertenza lampeggiano sul display LCD e viene emess...

Page 35: ...uasto 43 e l icona è accesa Viene emesso un allarme acustico continuo Il sistema UPS si arresta automaticamente a causa di un sovraccarico sull uscita Rimuovere i carichi eccessivi dall uscita del sistema UPS e riavviare Viene visualizzato il codice guasto 14 e viene emesso un allarme acustico continuo Il sistema UPS si arresta automaticamente a causa di un corto circuito sul sistema UPS Verificar...

Page 36: ...vracorrenti e dai corto circuiti a monte del sistema UPS La specifica di protezione consigliata è 11 A per 800 1100 VA 15 A per 1 5 VA 20 A per LV 2kVA BT e 30 A per 2 5 3 kVA con curva di sgancio B o C Il sistema UPS funziona con tensioni pericolose Eventuali riparazioni devono essere eseguite esclusivamente da tecnici qualificati ATTENZIONE rischio di scosse elettriche Anche dopo aver scollegato...

Page 37: ...attery Charger Battery DC to DC Converter Inverter AVR TX Output Vanwege veiligheidsoverwegingen wordt de UPS af fabriek verzonden zonder aangesloten accukabels Volg voorafgaand aan installatie van de UPS de volgende stappen om de accukabels weer aan te sluiten 1 3 Installatie Verwijder het voorpaneel Sluit de wisselstroomingang aan en sluit de accukabels weer aan Plaats het voorpaneel terug op he...

Page 38: ...paneel van het UPS apparaat Maak een verbinding tussen de uitgang OUT en de apparatuur met een andere kabel voor de modem telefoon fax netwerklijn 1 5 Accu vervangen Opmerking Deze UPS bevat interne accu s en alleen een opgeleid monteur mag deze accu s vervangen Opmerking Als de accu is ontkoppeld is de apparatuur niet beschermd tegen stroomuitval Voorzichtig Volg alle waarschuwingen adviezen en o...

Page 39: ... aan met 0 24 25 49 50 74 en 75 100 Geeft overbelasting aan Informatie over programmeerbare uitgangen Geeft aan dat de programmeerbare beheeruitgangen werken Informatie over bedrijfsmodus Geeft aan dat de UPS is aangesloten op de netvoeding Geeft aan dat de accu werkt Geeft de status van de lading aan Geeft aan dat de bypass schakeling werkt Geeft aan dat de ECO modus is ingeschakeld Geeft aan dat...

Page 40: ...lling Opmerking als de instelling 0 is is de back uptijd slechts 10 seconden 07 Totale AH instelling voor de accu Totale AH voor de accu van de UPS instellen Stel de totale capaciteit voor AH in van 7 tot 999 Stel de correcte totale accucapaciteit in als een accupak is aangesloten 08 Instelling EPO logica Besturingslogica van de EPO functie instellen AO Actief open standaard Indien AO is geselecte...

Page 41: ...ingang is niet aangesloten Controleer of het netsnoer goed op de netvoeding is aangesloten De wisselstroominvoer is aangesloten op de uitvoer van de UPS Steek het netsnoer in de wisselstroomingang Het pictogram en de waarschuwingscode knipperen op het LCD scherm en het alarm klinkt elke 2 seconden De EPO functie is ingeschakeld Stel het circuit in op de gesloten stand om de EPO functie uit te scha...

Page 42: ...t op het LCD scherm op Het alarm klinkt continu De UPS is automatisch afgesloten als gevolg van een overbelaste uitvoer Ontkoppel de extra belasting van de UPS uitgang en start opnieuw Foutcode 14 wordt weergegeven op het LCD scherm en het alarm klinkt continu De UPS is automatisch afgesloten als gevolg van een kortsluiting in de UPS Controleer de bedrading van de uitvoer en of aangesloten apparat...

Page 43: ...rspanning en kortsluiting aanwezig zijn De aanbevolen beveiligingsspecificatie is 11 A voor 800 VA tot 1100 VA 15 A voor 1 5 VA 20 A voor LV 2 KVA en 30 A voor 2 5 tot 3 KVA met een uitschakelingscurve B of C Het UPS systeem werkt met gevaarlijke spanningen Reparaties moeten worden uitgevoerd door een gekwalificeerde monteur VOORZICHTIG kans op elektrische schokken Ook nadat het apparaat is losgek...

Page 44: ...www V7 world com 08 17 2016 ...

Reviews: