


10
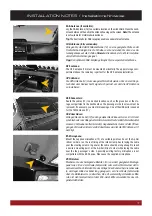
INSTALLATION EXAMPLE / Einbaubeispiel
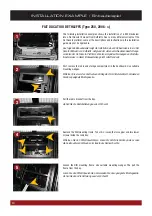
Loosen the screw on the left.
Lösen Sie die Schraube links.
Open the upper glove box and unmount it on the side.
Öffnen Sie das obere Handschuhfach und hängen Sie es seitlich aus.
Install now the supplied ESX device holder into the radio bay. For this, use the
included screws. Now lay the cable of the new ESX device (see page 2-3) inside
the vehicle from the bay to the desired installation location.
Installieren Sie die im Lieferumfang enthaltene ESX-Einbauhalterung im Radio-
schacht. Verwenden Sie dafür die beiliegenden Schrauben. Verlegen Sie nun die
Anschlusskabel des neuen ESX Geräts (siehe S. 2-3) im Fahrzeug vom Einbau-
schacht zum gewünschten Einbauort.
12
15
11
13
14
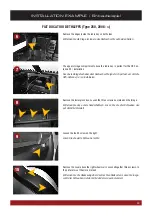
Pull the glove box.
Ziehen Sie das Handschuhfach heraus.
Now drill a hole (approx. 20 mm in diameter) for the USB cable on the rear of
the unmounted glove box. For this, use a suitable plastic drill.
Bohren Sie nun eine Öffnung (ca. Ø 20 mm) für das USB-Kabel auf der Rück-
seite des ausgehängten Handschuhfachs. Verwenden Sie dafür einen geeig-
neten Kunststoffbohrer.
FIAT DUCATO III DETHLEFFS (Type 250, 2006 ->)