background image

22

15

POWER

This product is designed for operation with a 12 Volt DC, negative ground vehicle.

Too low voltage or wrong polarity may cause malfunctions.

SERVICE

Do not try and service these products yourself, seek only a qualified service center or factory service center.

DAMAGES

Be careful not to drop or apply undue pressure to the frontpanel of your video monitor. 

If the screen cracks due to misuse your warranty will be void!

CHECK-POINTS

1. The operating temperature of this product is limited to -20°C- +80°C.

Your vehicle can reach temperatures up to 100

¡

C in the summertime.

2. From time to time when your vehicle extremely hot or cold you must allow

for your air conditioner or heater to cool or heat the vehicle to operating 

temperatures to return to normal operating ranges are achieved.

3. Your optimum picture quality is achieved when you are directly in front 

of monitor (+/- 30 degrees).
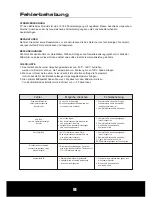
Symptoms

Probable Causes

Solution

Little regular light

spots and color spots on the 

screen or black horizontal line 

in the picture 

1. No 12 voltage

2. The A/V cable of the monitor is loose or is

    damaged

1. Check if power is on or the connection is   

    unstable

2. Check the A/V cable

Black Screen but

Operation LED is illuminated

1. No Video-Signal

2. The A/V cable of the monitor is loose or is

    damaged

3. Brightness or Contrast ratio is

    too low

1. Check output signal of th Video Source

2. Check or replace A/V cable

3. Reset to factory settings via the OSD-Menu

1. Check output signal of th Video Source

2. Check or replace A/V cable

3. Increase Brightness or Contrast ratio

1. This is a principally "Symptom" in the usual 

    range for manufacturing standards of  

    LCD/TFT monitors.

Unclear Picture

1. Bad Quality of the Video Source    

2. Brightness or Contrast ratio is

    too low

1. Replace or change the disk            

2

Brightness or Contrast ratio

. Increase 

1. No Color Signal from Video Source

2. The A/V cable of the monitor is loose or is

    damaged

3. Color settings are wrong

Black Screen and

Operation LED is not illuminated

No Color

Trouble Shooting

Summary of Contents for VM701S

Page 1: ...7 17 8 cm TFT LCD 16 9 Car Monitor Bedienungsanleitung Owner s Manual...

Page 2: ...iodesign de french Inhaltsverzeichnis Technische Daten 7 17 8 cm TFT LCD 16 9 Auto Monitor Installation freistehend oder in Kopfst tze Aufl sung 1400 x 234 px Aufl sung RGB 480 x 234 px Kontrast Verh...

Page 3: ...iert werden dass es im Falle eines Unfalls nicht zur Gefahr wird INSTALLATION Die besten Einbauten werden von qualifiziertem Fachpersonal oder geschulten Technikern durchgef hrt REINIGUNG Benutzen Sie...

Page 4: ...itte achten Sie beim Anschlie en der einzelnen Komponenten auf korrekte Polung der Kabel bzw auf die richtigen Kennfarben der Cinch Stecker Rot Z ndung Monitor 1 Stecker mit Kabelsatz Gelb Batterie 12...

Page 5: ...re Bauteile des Fahrzeugs besch digen D Methode 2 Installation in der Nackenst tze Schneiden Sie dann eine aus reichende Einbau ffnung B in die Nackenst tze Als Vorlage kann das innere Ma des Einbaura...

Page 6: ...uschalter 2 Bild spiegeln oder drehen 3 Aktiviert das OSD Men 4 Stummschaltung 5 Taste schaltet zwischen Audio Video Signal 1 oder 2 6 Lautst rke 7 Helligkeit 8 Farbe 9 Kontrast Basis Funktionen 1 2 1...

Page 7: ...ng dreimal um zu den Einstellungen f r Farbe Color zu gelangen Danach dr cken Sie die LINKS oder RECHTS Taste auf dem Display oder die HOCH oder RUNTER Taste auf der Fernbedienung um die gew nschte Ei...

Page 8: ...lit t 2 Erh hen Sie das Helligkeits Kontrastverh ltnis 1 1 Kein Farb Bild vom Video Player 2 Das Anschlusskabel des Monitors hat sich gel st oder ist defekt 3 Farbeinstellungen sind falsch STROMVERSOR...

Page 9: ...tent Specifications 7 17 8 cm TFT LCD 16 9 Car Monitor Stand alone or Headrest Installation Resolution 1400 x 234 px Resolution RGB 480 x 234 px Contrast Ratio 300 1 Brightness 350cd m2 Viewing Angle...

Page 10: ...where it can become hazardous during sudden stops or in the event of an accident INSTALLATION Quality installations are best performed by qualified and certified installers CLEANING THE SCREEN Use on...

Page 11: ...Video Signal 2 Video Signal 1 CAUTION Please observe the right polarity of the connections and the right colours of the RCA Plugs Monitor 1 Optional Monitor 2 RCA yellow RCA yellow RCA yellow VIDEO I...

Page 12: ...f the vehicle D Method 2 Installation in Headrest Cut out a sufficient mounting hole in the headrest B Use the inner dimensions of the mounting frame as draft Then lead the A V Cable from the Monitor...

Page 13: ...2 3 4 6 8 7 9 5 1 Power on off 2 Display Overturn 3 Activates OSD Menu 4 Mute Audiosignal 5 Selector for AV Signal 1 or 2 6 Volume 7 Brightness 8 Color 9 Contrast Basic Functions 1 Infrared Sensor fo...

Page 14: ...u three times on the Display or on the Remote to activate the settings for Color Then press LEFT or RIGHT on the Display or UP or DOWN on the Remote to adjust the settings Tint only NTSC Mode Press Me...

Page 15: ...obable Causes Solution Little regular light spots and color spots on the screen or black horizontal line in the picture 1 No 12 voltage 2 The A V cable of the monitor is loose or is damaged 1 Check if...

Page 16: ...Distribution Audio Design GmbH Am Breilingsweg 3 76709 Kronau Germany Tel 49 0 7253 9465 0 Fax 9465 10 www audiodesign de...

Reviews: