ESX Vision Naviceiver VN710 MT-ASX Installation Manual Download Page 9

9

INSTALLATION EXAMPLE / Einbaubeispiel

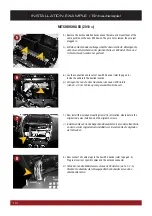
2.)   Disconnect all cable plugs on the back of the radio panel.

2.)   Ziehen Sie alle Kabelstecker auf der Rückseite der Radioblende ab.

1

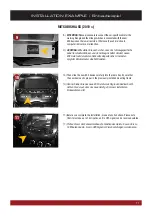
3.)   Remove the original radio unit (4 screws). Keep the four screws for later.
 

Then pull out the radio unit from the bay and disconnect all cable plugs


from the device.

3.)   Entfernen Sie das originalen Radiogerät (4 Schrauben). Bewahren Sie 
 

die vier Schrauben für später auf. Ziehen Sie es dann vorsichtig aus 


dem Schacht und entfernen Sie alle Kabelstecker vom Gerät.

2

3

4.)   Remove the two silver decoration panels on each side of the big panel 
 

(4 screws) and screw them at the same position on the new eSX device. 

4.)   Entfernen Sie die beiden silbernen Dekorationsblenden an jeder Seite 
 

der großen Blende (4 Schrauben). Befestigen Sie dann diese entsprechend 


an der gleichen Stelle am neuen ESX Gerät.

4

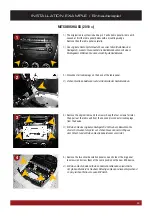
1.)   The original radio system is build up in 2 units (radio panel & radio unit).
 

Loosen at first the radio panel below with a mounting wedge. 


Remove then the radio panel carefully.

1.)   Das originale Radio System besteht aus zwei Teilen (Radioblende & 
 

Radiogerät). Lockern Sie zunächst die Radioblende unten mit einem 


Montagekeil. Entfernen Sie dann vorsichtig die Radioblende.

MITSUBISHI ASX (2010 >)

Summary of Contents for Vision Naviceiver VN710 MT-ASX

Page 1: ...E IN B A U A N L E IT U N G IN S T A L L A T IO N G U ID E VN710 MT ASX V 1 2...

Page 2: ...en Hinweise vor der Installation 1 Behandeln Sie bitte alle Teile des Soundsystems und die Komponenten Ihres Fahrzeugs grunds tzlich mit Vorsicht 2 Beachten Sie unter allen Umst nden die Vorschriften...

Page 3: ...3 INDEX Inhaltsverzeichnis Scope of delivery 4 Lieferumfang 4 Connection Diagram 6 Anschlussdiagramm 6 Installation notes 7 Installationshinweise 7 Installation example 9 Einbaubeispiel 9...

Page 4: ...INKL NAVIGATION SOFTWARE MicroSD Speicherkarte 8GB Navigationssoftware 1 4 REMOTE CONTROL Fernbedienung 1 5 VIDEO INPUT Cable Set Video Eingang Kabelsatz J5 1 6 REAR CAM INPUT R ckfahrkamera Eingang...

Page 5: ...Cable Set with 2 CONNECTORS USB Kabelsatz mit 2 Anschl ssen D10 1 11 iPOD IPHONE CONNECTOR iPod iPhone Anschluss B8 1 12 BT MICROPHONE BT Mikrofon G2 1 13 GPS Antenna GPS Antenne GPS 1 14 HANDBRAKE CO...

Page 6: ...INPUT Cable Set Video Eingang Kabelsatz GPS Antenna GPS Antenne REAR CAM INPUT R ckfahrkamera Eingang USB Cable Set with 2 CONNECTORS USB Kabelsatz mit 2 Anschl ssen VIDEO OUT DUAL ZONE Video Ausgang...

Page 7: ...passenger s side A possibly existing factory microphone is not compatible with the ESX device Please use the supplied microphone BT Mikrofon Montieren Sie das beiliegende Mikrofon 12 an einem geeignet...

Page 8: ...se angeschlossen werden W hrend der Fahrt wird der Bildschirm zur Vermeidung von Unf llen durch Unachtsamkeit dunkel geschaltet Die Video ausg nge 7 sind hiervon nicht betroffen 14 TMC cable antenna C...

Page 9: ...om Ger t 2 3 4 Remove the two silver decoration panels on each side of the big panel 4 screws and screw them at the same position on the new ESX device 4 Entfernen Sie die beiden silbernen Dekorations...

Page 10: ...io Befestigen Sie dann diese entsprechend an der gleichen Stelle am ESX Ger t Diese sind nicht verschraubt sondern nur gesteckt INSTALLATION EXAMPLE Einbaubeispiel MITSUBISHI ASX 2010 6 Lay the connec...

Page 11: ...hes is connected with the new ESX device on the lower rear side Otherwise the vehicle s board computer indicates a malfunction 9 ACHTUNG Bitte stellen Sie auch sicher dass das fahrzeugspezifische Kabe...

Page 12: ...D E S I G N ESX Car Media Systems Audio Design GmbH Am Breilingsweg 3 D 76709 Kronau Germany Tel 49 0 7253 9465 0 Fax 49 0 7253 946510 www esxaudio de www audiodesign de 2013 All Rights Reserved...

Reviews: