


11
INSTALLATION EXAMPLE / Einbaubeispiel
MITSUBISHI ASX (2010 >)
11.) Before you complete the installation, make a function check. Please note
that it may take up to 15 minutes, until a GPS signal can be received outside.
11.) Prüfen Sie vor dem Zusammenbau die Funktion des Geräts. Es kann bis zu
15 Minuten dauern, bis ein GPS Signal im Freien empfangen werden kann.
11
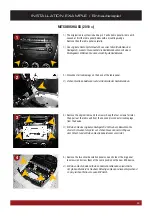
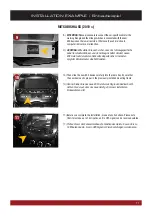
9.)
ATTENTION:
Please also ensure to connect the car-specific cable for the
warning triangle and the airbag switches is connected with the new
eSX device on the lower rear side. Otherwise the vehicle‘s board
computer indicates a malfunction.
9.)
ACHTUNG:
Bitte stellen Sie auch sicher, dass das fahrzeugspezifische
Kabel für die Warnblinker- und den Airbag-Schalter mit dem neuen
ESX Gerät auf der unteren Rückseite eingesteckt ist. Ansonsten
zeigt der Bordcomputer eine Fehlfunktion.
9
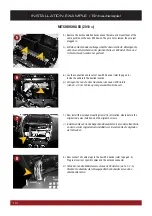
10.) Then slide the new eSX device carefully into the radio bay. ensure that
the new device sits proper in the previously installed mounting frame.
10.) Dann schieben Sie das neue ESX Gerät vorsichtig in den Radioschacht.
Achten Sie darauf, dass das neue Gerät gut im zuvor installieren
Einbaurahmen sitzt.
10