background image


Connecting the TriggerBox to 
Cameras 

Follow these 3 steps and you'll get your Esper TriggerBox up and running in no time. By the end, you'll 
have your cameras connected and ready to start using. 
 

Step 1. Connecting your cameras to the TriggerBox 

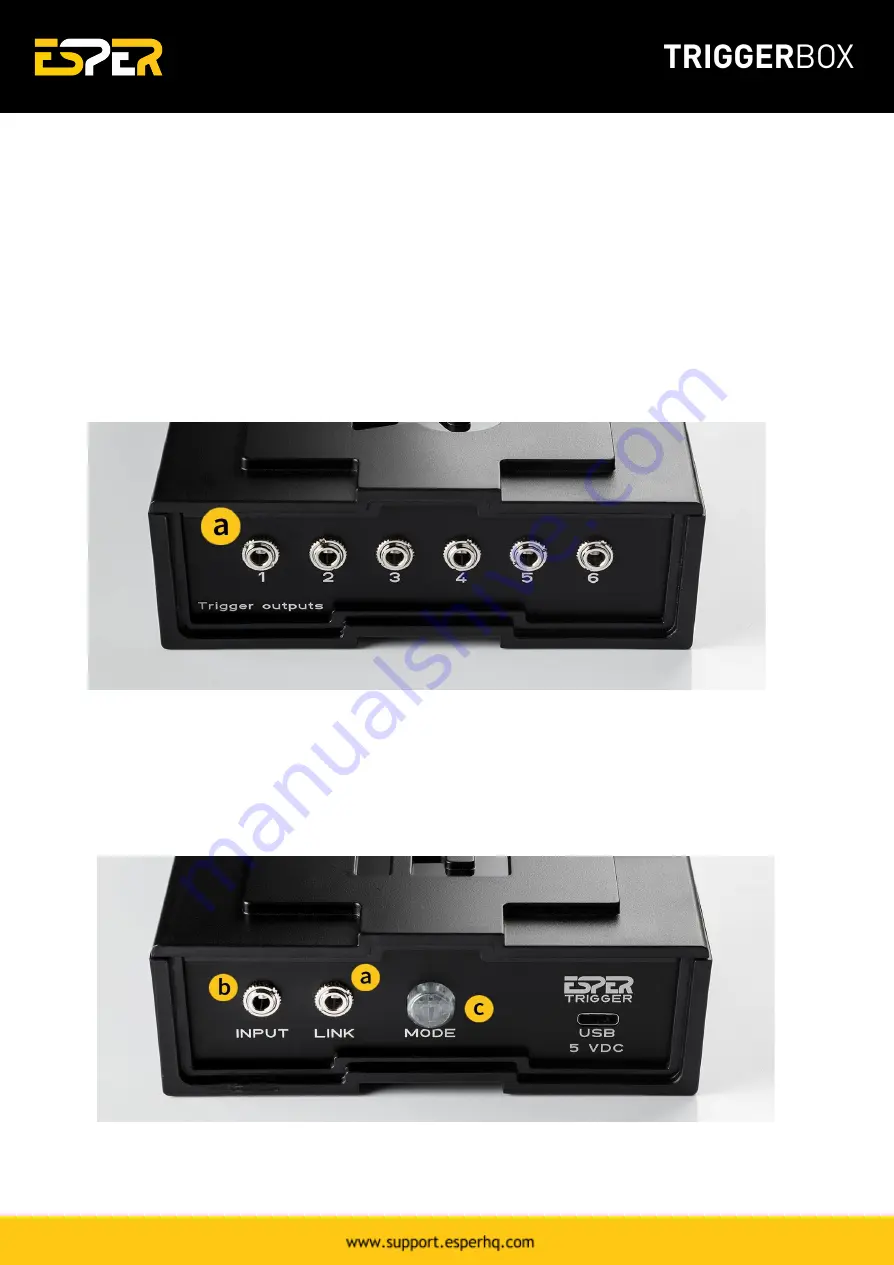
Each camera is connected to a single output socket of the TriggerBox 

(fig.1 a)

 via a 3.5mm adaptor 

cable. 


Figure 1. 

ESPER TriggerBox - Trigger outputs.


Step 2. Linking multiple TriggerBoxes together 

Multiple TriggerBoxes can be connected together to allow for the triggering of more than 6 cameras to 
create larger multi-camera setups. Multiple TriggerBoxes are linked by connecting a 3.5mm stereo 
cable to the link socket 

(fig.2 a)

 of the first TriggerBox and then to the input 

(fig.2 b)

 of the next unit 

and repeating down the line. 

Figure 2.

 ESPER TriggerBox front panel. 


Summary of Contents for TriggerBox

Page 1: ......

Page 2: ...UE MODES 10 TriggerBox Controller Software 11 Download TriggerBox Software 13 Installing the software 14 Interval Mode 15 Delay Mode 17 Serial Instruction Set 18 Set up procedure 18 Camera trigger notes 18 TriggerBox command modes 19 Complete commands list 20 Using Flashes 23 Camera combination 27 Troubleshooting 30 Steps to take before contacting support 30 Hardware issues 32 Software issues 32 F...

Page 3: ...o the instructions below to properly understand the functionality of hardware in your multi camera setup Front 1 Input 3 5mm 3 Pole Jack Opto Isolated for connecting the remote shutter release 2 Link 3 5mm 3 Pole Jack Opto Isolated for connecting multiple units 3 Mode Switch Green All Trigger Blue Smart Trigger 4 USB C Control Program and Power the TriggerBox via a computer 2 ...

Page 4: ...include additional cabling Note Please check all the contents of your order upon receipt of goods If you receive a delivery and an item is missing please notify us within 48 hours of your order collection Issues raised after this period are subject to possible rejection resulting in the denial of a replacement of the missing item You can still return your item s within 30 days of the date of recei...

Page 5: ...powerbox Safety Warning To prevent injury to yourself or to others make sure to read the following safety precautions before using the equipment Please read and follow these instructions Do not disassemble or modify the product Do not expose the product to high temperatures severe cold or high humidity Keep out of the reach of children Turn off immediately in the event of a malfunction Do not oper...

Page 6: ...riggerBox fig 1 a via a 3 5mm adaptor cable Figure 1 ESPER TriggerBox Trigger outputs Step 2 Linking multiple TriggerBoxes together Multiple TriggerBoxes can be connected together to allow for the triggering of more than 6 cameras to create larger multi camera setups Multiple TriggerBoxes are linked by connecting a 3 5mm stereo cable to the link socket fig 2 a of the first TriggerBox and then to t...

Page 7: ...witch LED is Green fig 3 a All Trigger mode all 6 outputs and the link socket fire at once when a shutter release is connected to the input socket LED is Blue fig 3 b Smart Trigger mode all 6 outputs and the link socket can be fired from a computer or a shutter release plugged into the TriggerBox input All the outputs can be individually turned on and off delayed and programmed in sequences via th...

Page 8: ...Trigger Modes Connecting the TriggerBox in All Trigger GREEN MODE 1 Connecting a Single TriggerBox in All Trigger GREEN MODE 2 Connecting Multiple TriggerBoxes in All Trigger GREEN MODE 7 ...

Page 9: ...Connecting the TriggerBox in Smart Trigger BLUE MODE 1 Connecting a Single TriggerBox in Smart Trigger BLUE MODE 2 Connecting Multiple TriggerBoxes via CPU in Smart Trigger BLUE MODE 8 ...

Page 10: ...e Programmed Smart Trigger BLUE MODE Tip When in Smart Trigger BLUE Mode it is possible to programme the TriggerBox with a computer and then store the setting in memory for triggering at a later time by a computer or remote shutter release 9 ...

Page 11: ...le TriggerBoxes as a Hybrid Trigger GREEN BLUE MODES Switch the first TriggerBox in the chain to Smart Trigger Mode BLUE and connect to a Computer Connect flashes and or camera models and link together with your remaining TriggerBoxes and switch them to All Trigger Mode GREEN 10 ...

Page 12: ...vely turned on and off Delay values can be assigned to outputs 1 6 allowing tighter synchronization between different camera models and with flash strobe lighting Sequencing sequence up to 8 stages with different settings for a more creative shot Bulb mode timer assigns a fixed length of time to the trigger button press Intervalometer fires all 6 outputs at pre determined intervals or time periods...

Page 13: ... up with these settings Use this to store settings for a permanent fixed installation where there is no need to change settings Box Lights On Switches the mode light on or off for all the selected TriggerBoxes Useful should a mode light be visible in the shot Identify Selected Trigger Boxes Flashes the mode light of the selected TriggerBoxes to aid identification and naming Outputs 1 6 Function De...

Page 14: ...ip The following are the system requirement for installing ESPER TriggerBox Controller Software and operating and setting the cameras from your PC Windows System Requirements Operating System Windows XP SP2 Windows Vista Windows 7 Windows 8 Windows 10 USB with 2 0 port must be standard equipment CPU Processor with 2GHz or faster RAM A minimum of 512 MB of RAM Monitor Monitor Resolution 1024 X 768 ...

Page 15: ... the TriggerBoxController 1 6 jar file to open the software fig 5 1 Note When you first run the software it will check you have an up to date version of Java and prompt a download if you don t Figure 5 TriggerBoxController Software Extracted Tip If the application won t open then check that your version of Java is up to date here http www java com en download installed jsp 3 Once open you need to ...

Page 16: ...ful in both research and creative applications The intervalometer can set the interval between shots the total duration of shooting the total number of shots the total playback time of the clip delaying the start of shooting exposure ramping by varying the bulb time over the duration of shooting The intervalometer can also be used to step between sequence stages in delay mode allowing for the cons...

Page 17: ... total playback time of the sequence Bulb Time set the length of the shutter button press note this setting is carried across to both delay mode and fan mode End Bulb Time set the length of the bulb time Reset zeros intervalometer settings Send to sequencer the fire signal from the intervalometer is sent to the sequencer to allow the automatic stepping through of sequencing settings shots total nu...

Page 18: ...fferent from the previous sequence Remove Sequence Stage Removes the last sequence added All settings will also be removed once the sequence is deleted Repeat Stage Repeats stage Please Note stage repeats are only available when controlling the TriggerBox from the TriggerBox Controller software if the sequence settings are saved to the box memory and the TriggerBox is triggered using a wire remote...

Page 19: ...cifies either an action to be performed immediately e g S to fire shutters or defines a programmable parameter e g s000111 to enable only the last three shutter outputs TriggerBox settings can be saved to the internal memory EEPROM through the O command Upon power up the box will recall saved settings negating the need to program again Any timing value sent to the TriggerBox is in milliseconds and...

Page 20: ...Mode six camera command string set up m0 set box to Simple Mode s111111 enable all shutter outputs f111111 enable all focus outputs each shot F1 focus camera wait camera response time value allow camera to respond to half button press S release shutter F0 release focus Sequence Mode Sequence mode allows the user to specify up to eight stages Each stage allows every output s shutter and focus line ...

Page 21: ...se shutter F0 release focus Complete commands list Tip All commands that do not return a data string will return tenFour with the exception of the fire the shutters command It is advised to wait for the TriggerBox to print tenFour before issuing another command General Commands Command Description S Fire the shutters If the box is in Sequencer Mode it will move to the next available stage F1 F0 As...

Page 22: ... R Box will read the settings from its EEPROM into RAM This also happens on box startup nExample Name Set the box s internal name N Print BoxName Example Name l1 l0 Turn front mode light on or off L Print Light EN DIS m0 m2 Set mode to simple mode or sequencer mode M Print Mode 0 z123 Set input delay to 123 millis x897 Set link delay to 897 millis Z Print InDelayMils 0 X Print LinkDelayMils 0 i34 ...

Page 23: ...its 4th stage zero start index J Print STG_NDX 3 P Activate the next available sequencer stage Prints ERR tooManyActiveStages if eight stages are active U Deletes current stage Subsequent stages if present move to fill the gap Prints ERR notEnoughStages if only one stage is active W Print NM_ACTV_STG 1 number of active sequence stages w Print the sequencer in easy to read format T Reset the sequen...

Page 24: ...ash to the TriggerBox Setting up your flashes with the TriggerBox is straight forward and doesn t take much time at all 1 Connect your cable from your flash to a TriggerBox output fig 7 a This is typically a 3 5mm 3 5mm jack cable connecting from the sync connection of the flash unit to a TriggerBox output In this guide we will use output 6 Figure 7 TriggerBox rear outputs panel 1 6 2 Once you hav...

Page 25: ...t the same time so it is important to ensure all the cameras are set to Manual Focus and use a slow shutter speed such as 1 10 If all your camera settings are the same and some cameras are still not getting a proper exposure you will need to delay the firing of the flash Capturing the flash during the exposure 1 Flashes are much more responsive than cameras In order for your multi camera setup to ...

Page 26: ...speed to milliseconds by dividing 1 over the bottom number and then multiplying by 1000 So in this example 1 divided by 10 0 1 and 0 1 multiplied by 1000 100 so the cameras shutter is open for 100mS 61mS Shutter Lag 50mS 1 2 Shutter Speed 111mS Flash Delay 3 Once you have calculated your flash delay you need to load it to the TriggerBox via the TriggerBoxController software Simply enter the value ...

Page 27: ...e of the exposure window The delay value may still need fine tuning as some cameras shutter lag can vary with every exposure The above calculation will get you a good starting point which you can then increase or decrease in 5mS increments to ensure a good exposure every time Tip View Imaging resource website https www imaging resource com 26 ...

Page 28: ...r Connecting the TriggerBox to Cameras guide 2 Now you ve got all your cameras connected to the TriggerBoxes you need to launch the TriggerBoxController software and connect the TriggerBoxes to the software Figure 11 TriggerBoxController software Finding your cameras shutter lags 3 Now that your TriggerBoxes are all connected to the software you need to look up the shutter lags of the cameras that...

Page 29: ... page 5 You now need to look for the section on shutter lag This is found under Performance Timings Look for Shutter Lag prefocused and there you will see your cameras shutter lag in seconds Figure 13 Imaging Resource performance timing section 28 ...

Page 30: ...ime as the slow cameras Slowest camera 113ms fastest camera 61ms delay 52ms Assigning the delays 7 Now that you have got your delay for the fastest cameras in your array you need to assign it to the outputs that your fast cameras are connected to If you have the fast cameras connected to ports 4 5 6 you would assign the delay to these ports so that they would fire at the correct time Figure 14 Tri...

Page 31: ...ey are designed to be used in isolation so to optimise them for use in multi camera setups they need to be set in very specific ways So to ensure the cameras are set correctly for multi camera use follow these steps 1 Confirm the cameras are in manual M exposure mode Manual exposure mode will give you total control over the exposure settings and prevent the cameras from making decisions about the ...

Page 32: ...utputs so go to 3 3 Take a camera and cable combination that is known to work and plug into the output socket that is not firing If it fixes it look at the problematic camera and cable combination If not then it is a fault with the TriggerBox output socket and you will need to contact our support team see below What information you can provide when raising a support ticket Going through the steps ...

Page 33: ...w a warning message In most cases if such a message is shown the camera s shutter will not release Issue TriggerBox is not powering up Mode button doesn t light up anymore Fix 1 Make sure the USB C cable is fully inserted into the TriggerBoxes USB C port A loose connection can cause the TriggerBox to not power up Try turning the USB C cable around the other way also Fix 2 Try a different USB cable...

Page 34: ...ftware Thank you to everyone who let us know about the issue Issue TriggerBoxController software is not opening on Mac Fix 1 You need to give the software permissions to run on your Mac To do this hold Ctrl and right click the jar file and click open A dialogue box will open asking if you want to run it click open and the software will run Note You will not need to do this every time you want to r...

Page 35: ...he TriggerBox holds down the camera s shutter release input Some cameras need a pulse in the region of 100ms 200ms Start with 150ms and see how that performs Bulb time can be found within the interval mode setting Note If your camera fires multiple times after changing the bulb time try lowering the time inputted to where the camera fires once Issue TriggerBoxController software doesn t open I get...

Page 36: ...n the latest version of the TriggerBoxController software and click connect The TriggerBox Controller software will check the firmware version of each TriggerBox that is switched to blue If an update is available the TriggerBoxController will present the option to install the latest firmware to the TriggerBox Once the update is underway the front light will go out for up to thirty seconds while up...

Page 37: ...C Power Consumption 250mA Input 3 5mm Jack Link Output 3 5mm Jack Outputs 1 6 3 5mm Jack Compatibility TriggerBox works with SLR and DSLR cameras and strobes This includes cameras and strobes that come with a female sync port connection Canon Fujifilm Olympus Panasonic Pentax 2 5mm 3 5mm Jack Nikon MC DC2 Trigger Cable Nikon 10 pin Trigger Cable Canon N3 Shutter Release Cable Sony Multiport Trigge...

Page 38: ...PER TriggerBox is used in conjunction with a compatible camera and flash equipment as to which ESPER shall have no responsibility The warranty covers all defects encountered in normal use of the ESPER TriggerBox and does not apply in any of the following cases 1 Loss of or damage to the ESPER TriggerBox due to abuse mishandling improper packaging by you alteration accident and or electrical curren...

Reviews: